2018 rock climbing accident on Le Petit Cheval, Washington

On July 14th, my wife and I both fell 15 feet at the first pitch of Le Petit Cheval – Spontaneity Arete, in Washington Pass, North Cascades, Washington. We hope to share our experience to help make others safer. Luckily, we didn’t fall any further, we were prepared (SOS beacon), and we didn’t suffer any permanent injuries.

Events leading up to the fall

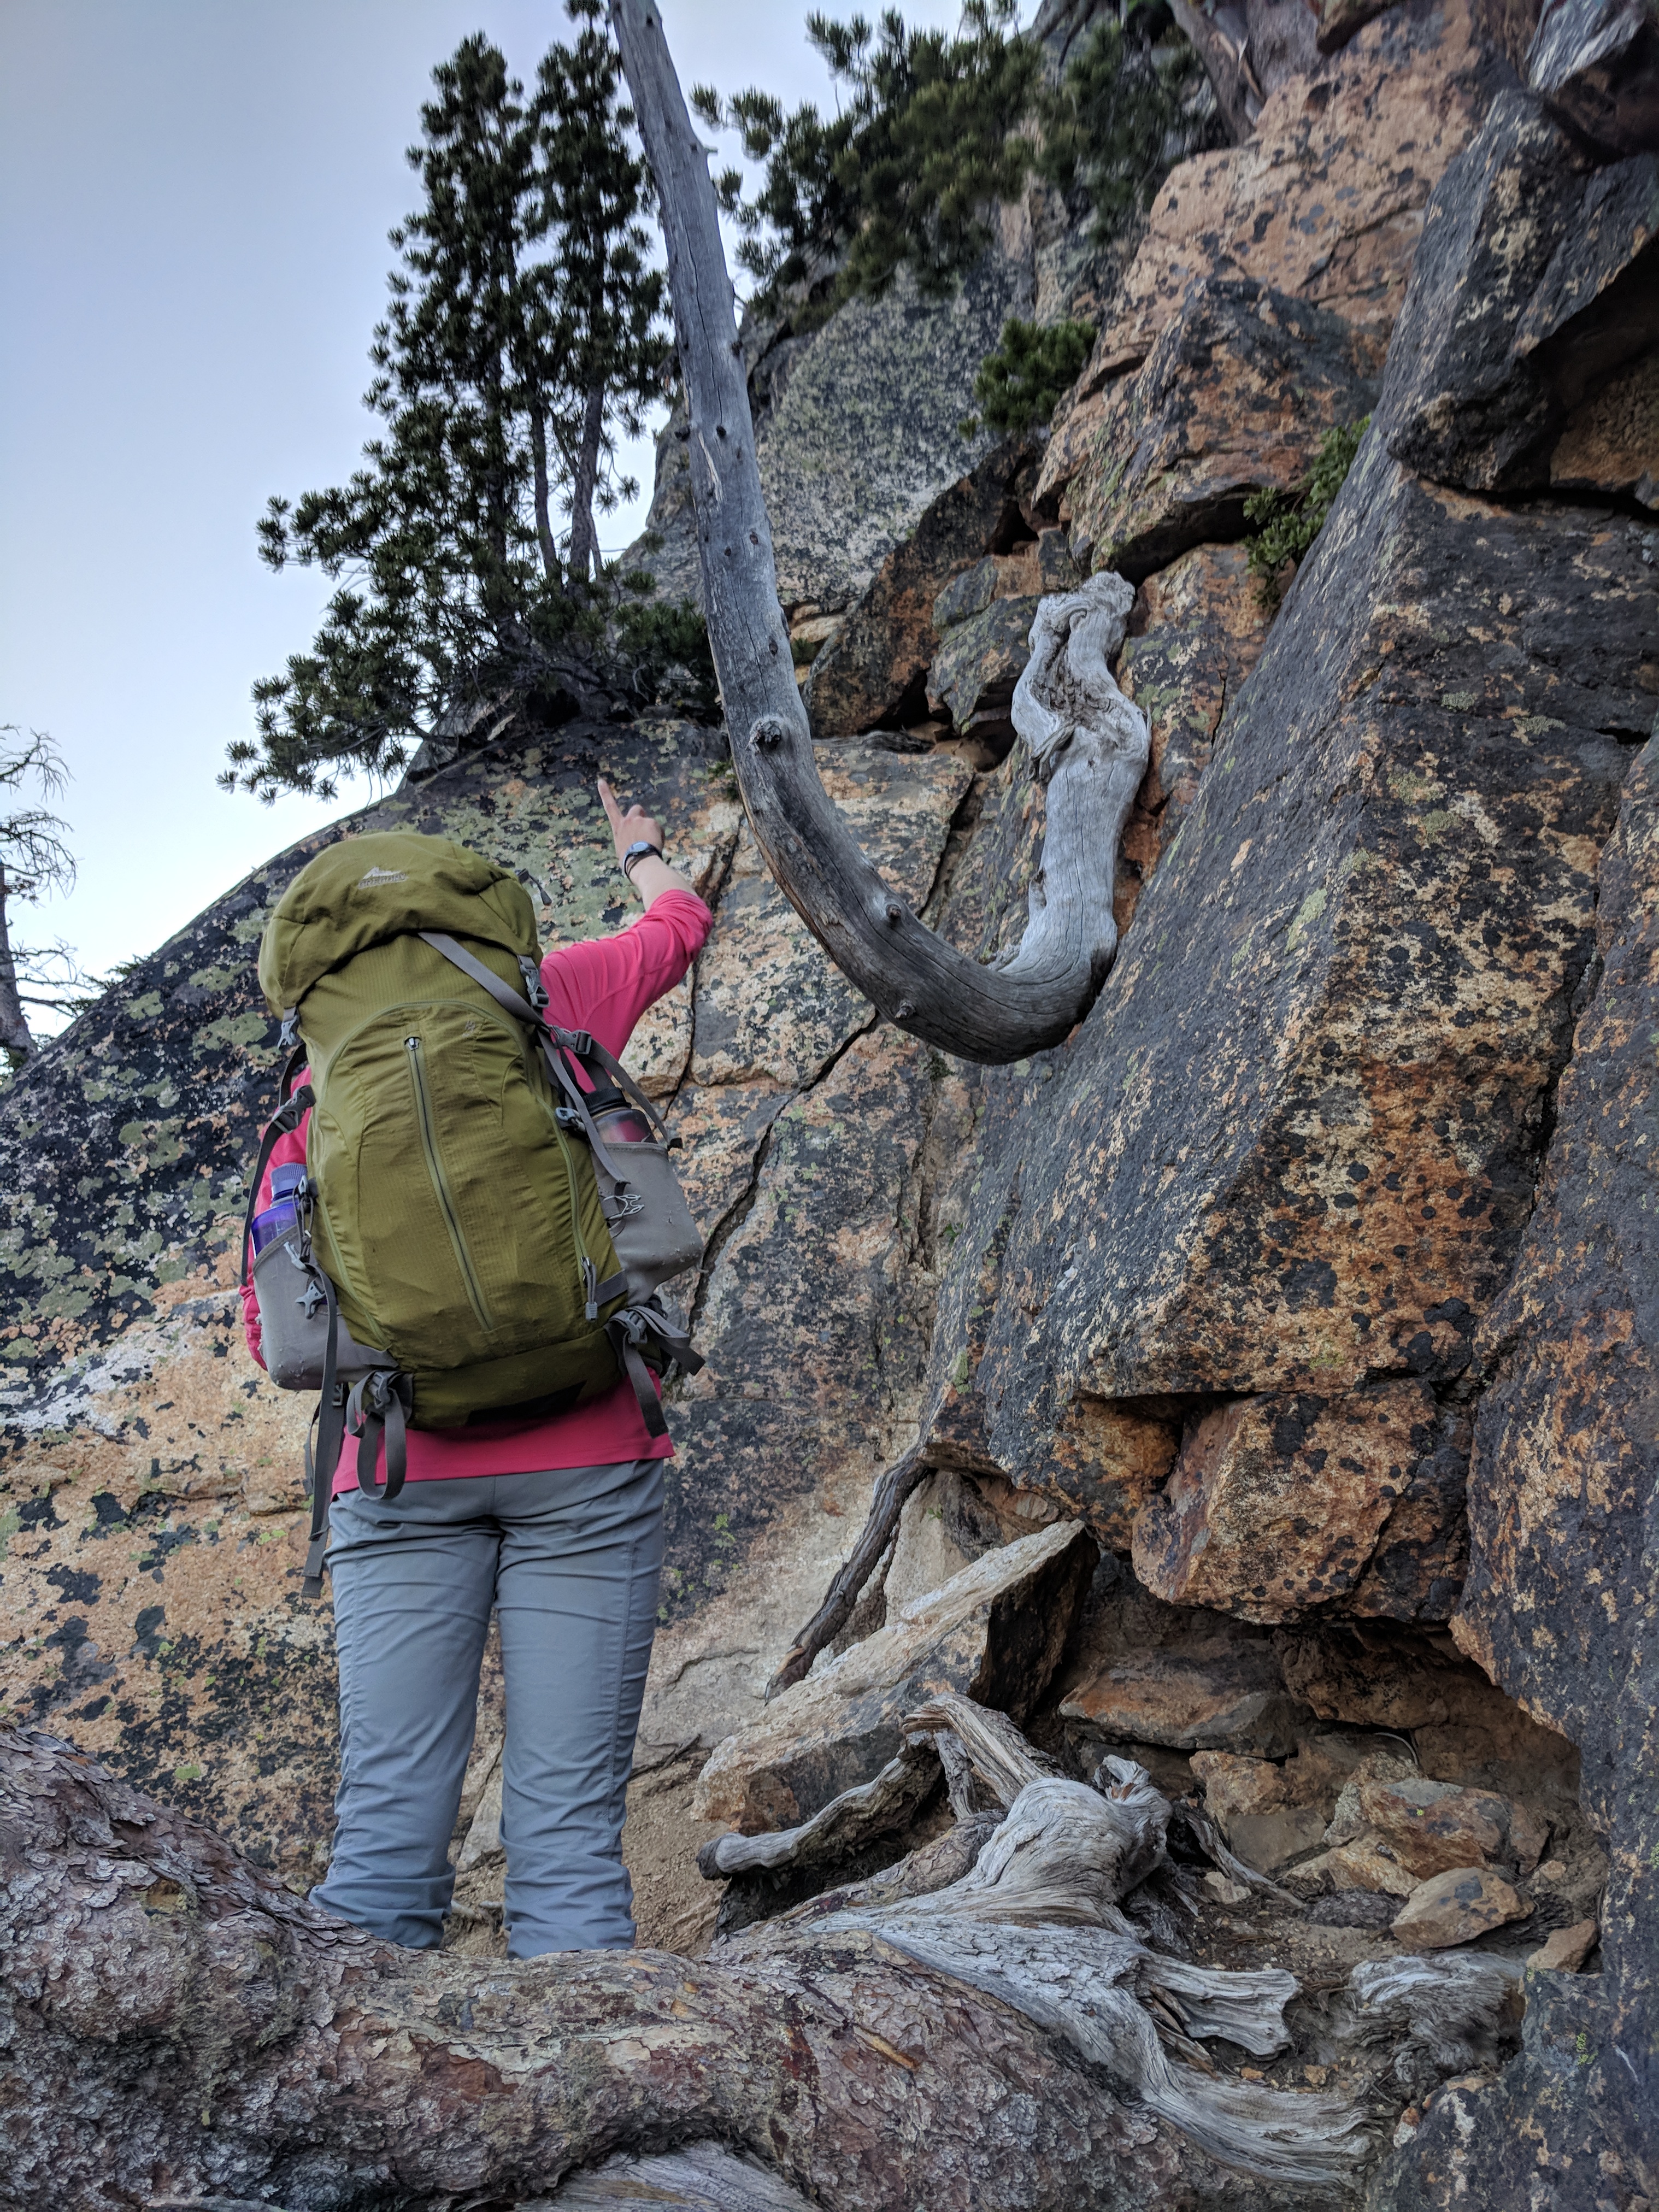
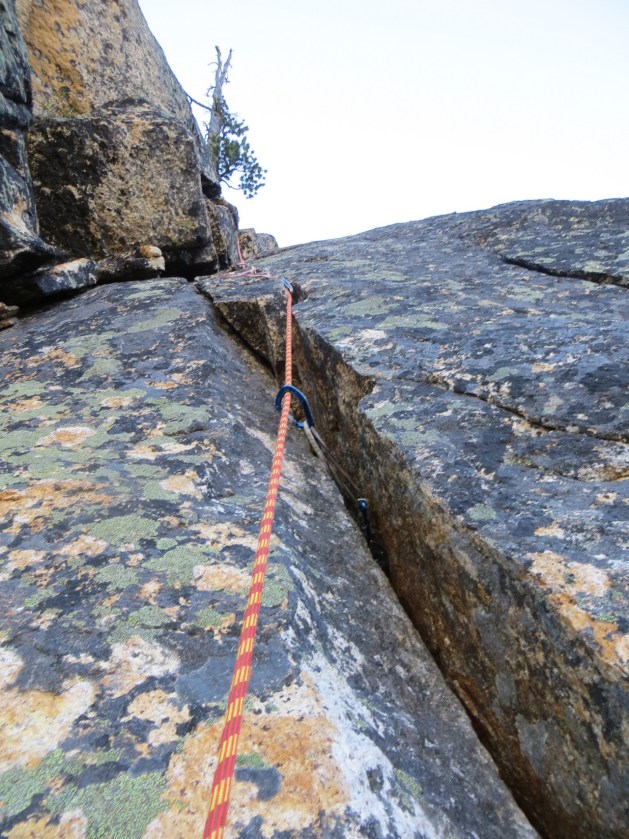
Alexis and I had just reached pitch 1 of Le Petit Cheval. There were no photos on Mountain Project of the first pitch, so we weren’t sure exactly where it starts.

We were unknowingly at the start of pitch 1, which starts with a class 4 / low class 5 section of 10 vertical feet that leads to another ledge.

Alexis at the actual base of pitch 1. We scrambled this 10 ft of class 4/5 to the next ledge, where we then roped up.

But since it looked easy enough, and there was a definitive ledge above it (and we didn’t know where the official pitch starts, and everything leading up to this had similar class 4 scrambling), we decided to scramble up it. That scramble went fine.

Once on the ledge, there were several choices of cracks and routes.

Attempting the cracks

There are two crack options at this point – a wide off-width crack to the left, or a hand/fist sized crack on the right. Once again, there’s no photos of this on Mountain Project, but apparently people climb both. Consensus seems to say the crack on the right is the correct one.


The left (off-width) and right (hand/fist) cracks

Alexis tried the left crack first (seen below from Dandelion’s blog), but due to the awkward off-width, it seemed hard to protect and more difficult than just a 5.7.

The left crack which Alexis tried first. Credit to Dandelion’s blog for photo.

Since we saw some other crack options, Alexis downclimbed back to the ledge, and we moved over to the more parallel hand/fist sized crack to the right (not seen in the photo).

This right crack took gear a lot easier, but it was similarly a bit awkward to climb (granted neither of us are crack fans).

Alexis was about 10 feet up the crack when it was becoming difficult, so rather than continuing and potentially getting into even tougher unknown climbing, we decided that we should look at some other options (it seemed like you could walk around even further to the right, so maybe we weren’t on the route).

So Alexis started downclimbing again. She had two cams in at this point. But then we made our mistake… She reached her last cam and took it out, and was only at most 4 feet above our ledge. But little did we know, it was a large awkward step down, and the ledge was smaller than we thought.

The fall

I (the belayer) was standing to the right and close to Alexis. Alexis was struggling with the final step down. I tried to assist with my left hand behind her back as she made the step down.

Alexis and I on the wall, just before the fall

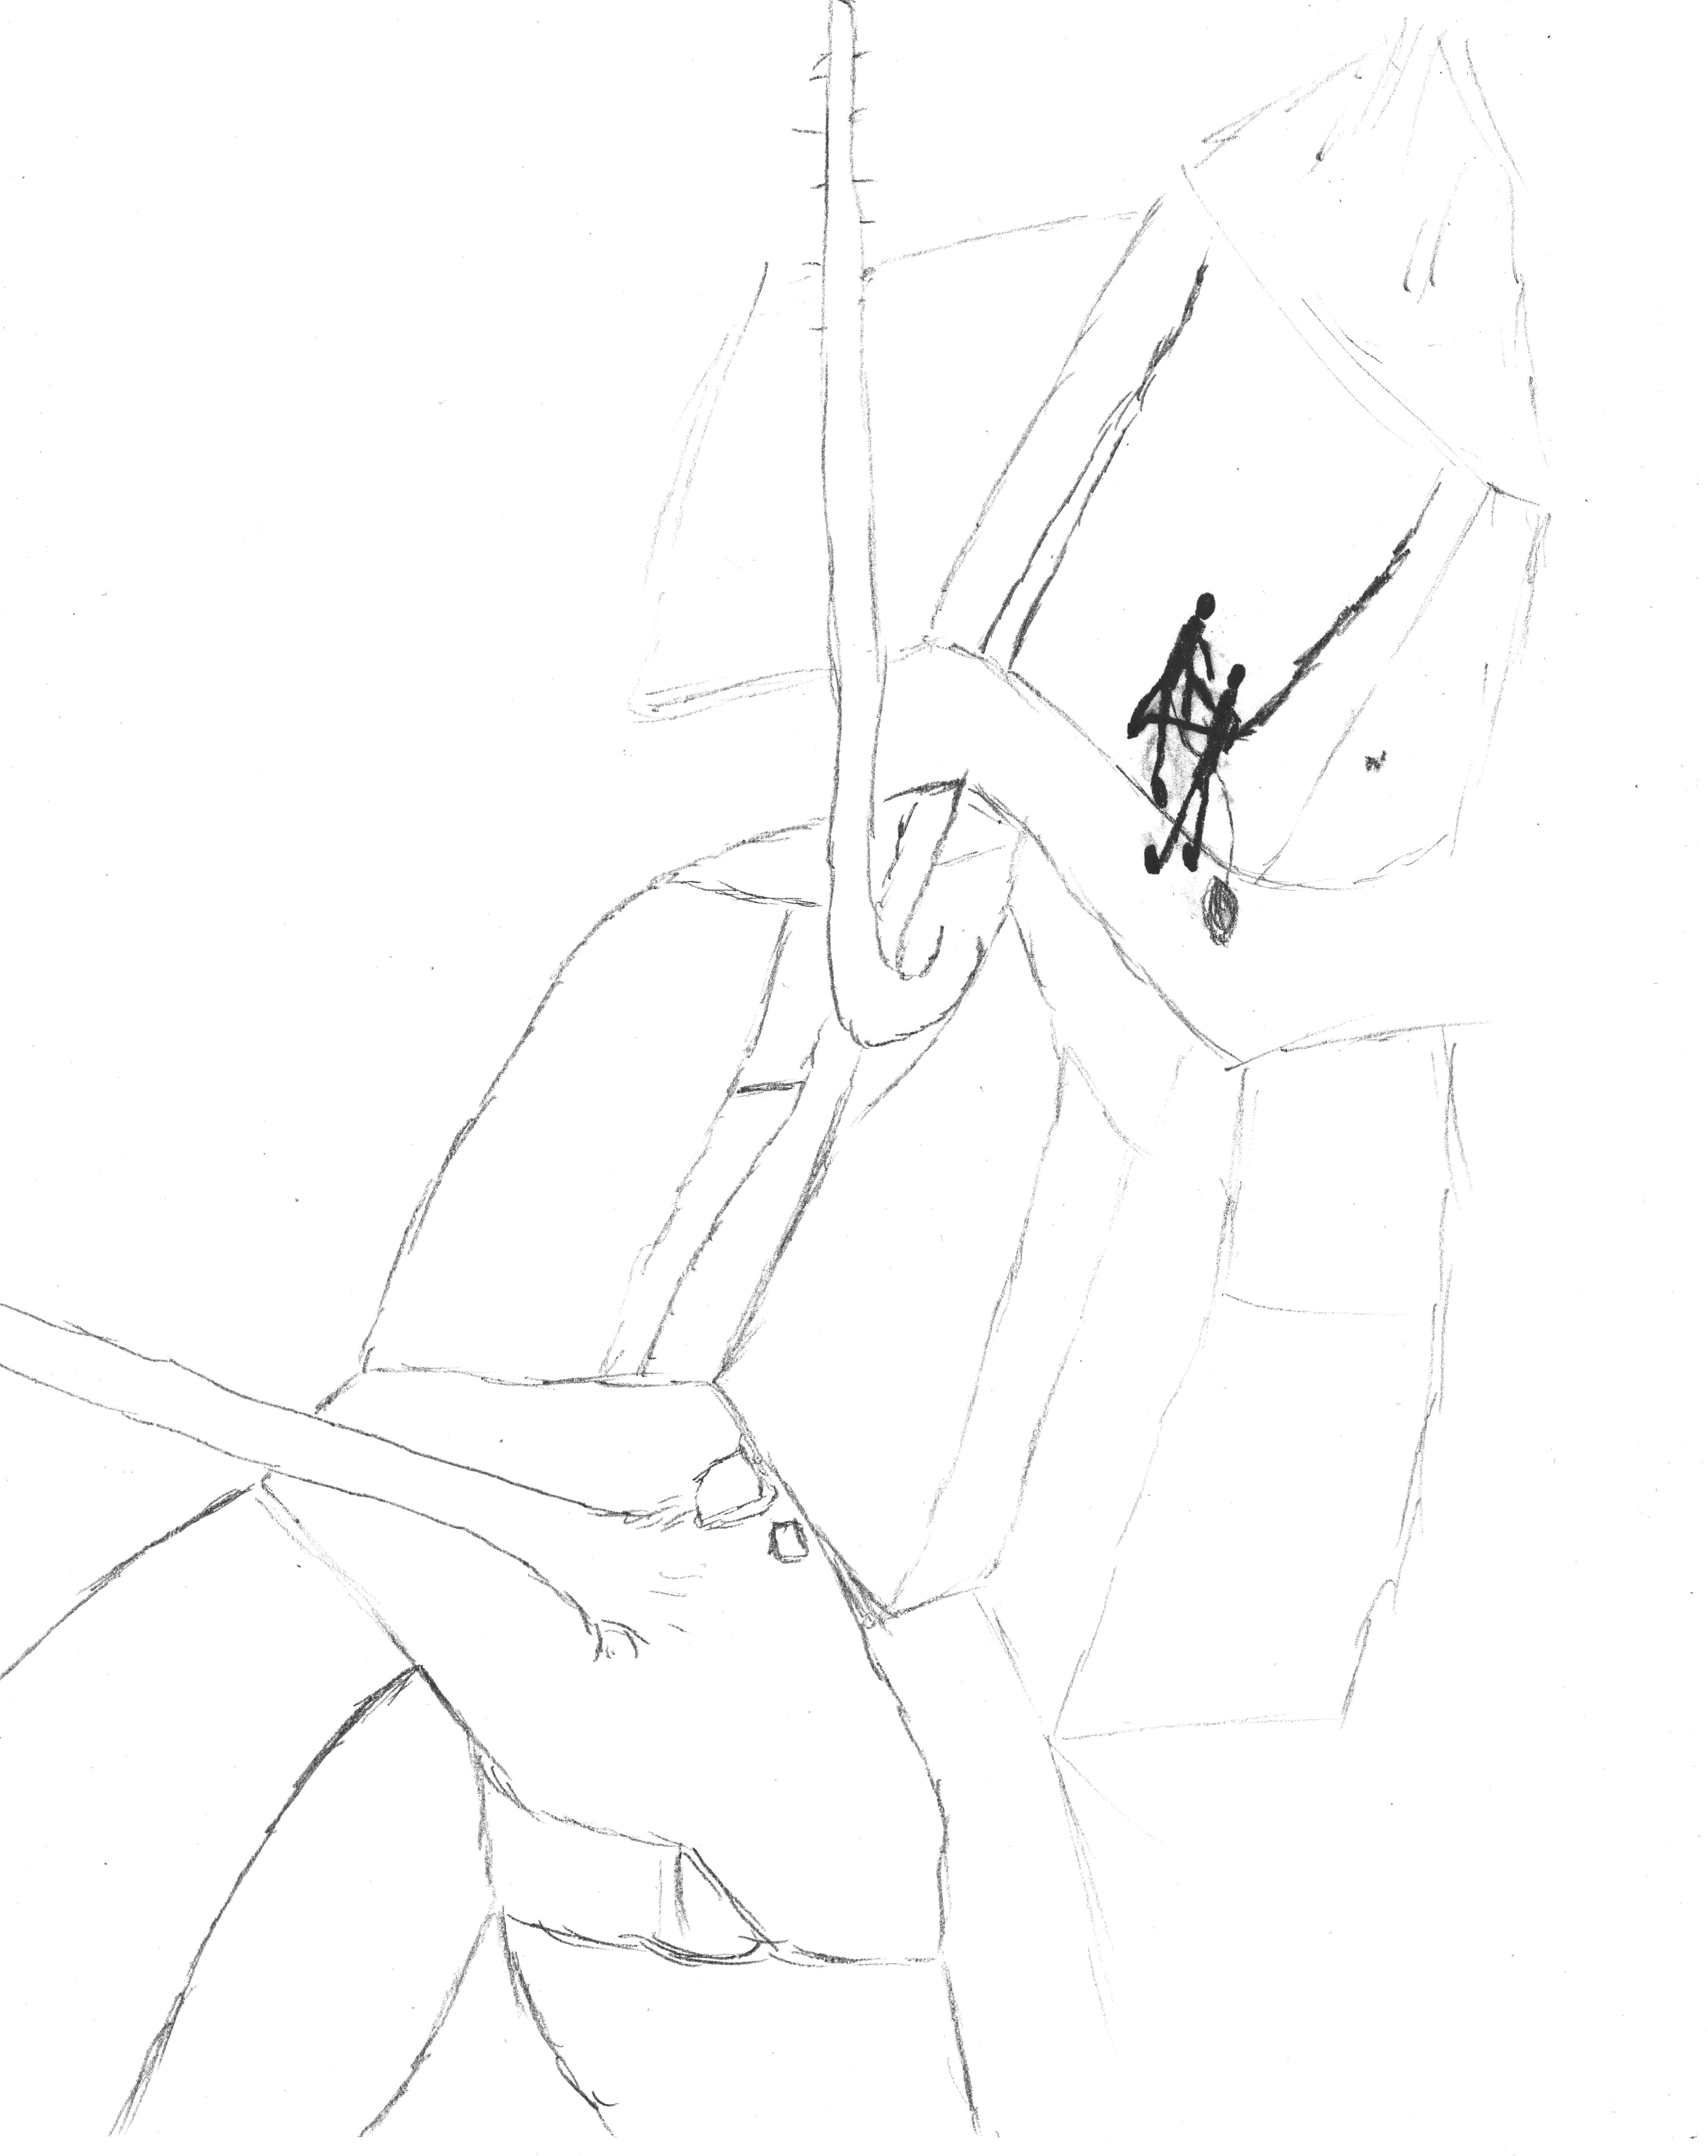
Then suddenly, something happened – maybe she lost balance as she was trying to step down, or maybe she stepped down but her foot slipped on the sloping gravel on the ledge. It all happened too fast that we don’t remember exactly what happened.

All I think I know happened was that she likely ended up leaning/falling to the left. I tried holding her with my left arm, but it was a futile effort.

Then came our mistake: Since we were on the “first pitch” and on a “flat ledge”, we hadn’t anchored me (the belayer) in anywhere. So we had zero protection and anchors. We weren’t connected to the rock. We made a mistake and failed to realize that we should have been treating this as a multi-pitch scenario, in case someone falls below the “ground” of the first pitch. We’ve seen other climbers make this mistake (and done this ourselves) on other climbs, especially where we believed the climbing to be fairly easy, but hadn’t thought much of it.

We both went tumbling down. Initially I might have still been trying to hold Alexis, but with about 5 feet of rope slack between us, and the MegaJul auto locking belay device in use, we were a connected duo either way.

We fell back down the 10 foot class 4/5 scramble and rolled a tiny bit more, and miraculously managed to stop just beneath that ledge, on a 30 degree downslope dirt slope.

Somehow we luckily stopped right here.

Alexis was a few feet below me, upside down, with her legs above her head. Her leg might have possibly caught around a small adjacent tree, which might have been what prevented her from rolling any more. She looked like she was about ready to continue rolling though. If we had gone any further, it would have been a 50 foot drop after that.

Our mistakes and learnings… No one ever expects to be the one who makes a mistake, but we all eventually make mistakes…

  • Downclimbing: Simply leave the last piece in and either lower from it, or downclimb beneath it even if the ledge below looks stable. Maybe we could reach the cam once on the ground. If not, we could re-climb back up to it, placing tons of cams beneath, so that as you do downclimb, you have another cam beneath you every few feet. Or, even though it’s a difficult decision, just leave a piece behind – it’s not worth your life.
  • Awareness of potential of falling beneath the “ground”: Before we started climbing, we should have analyzed the ledge we were starting from… it was slanting, and gravely – a.k.a. we could fall beneath it, we’re not actually on the ground. Therefore, either anchor the belayer in or instantly put a piece in before climbing, to prevent an infinite fall.
  • Spotting the climber: When the climber isn’t clipped in, the belayer should be spotting (something I rarely see climbers do). I often try to be on top of my spotting game, but this time I wasn’t doing a great job – I wasn’t directly behind the climber, in a position where I could rotate their body upwards rather than letting them fall back. Had I been in that correct position, I probably would have realized “whoa, there’s not much room left on this ledge…” and that would have made me pause and probably recommend lowering from a piece. But instead, I was to the right of Alexis, where there was more ground space, but that wasn’t where she was going to fall.

But unfortunately, as with all mistakes, we made decisions that, in hindsight, weren’t the best. We always knot the rope while rappelling, we carefully inspect slings on anchors and replace when worn, etc. However, no one is perfect, and mistakes are inevitable. Mistakes are often only discovered when something unplanned happens, and then you realize that what you had been doing was actually unsafe. Our hope is that others can learn from these mistakes, just like I’m personally reading up on other climbing accidents to learn about other mistakes I would never think about.
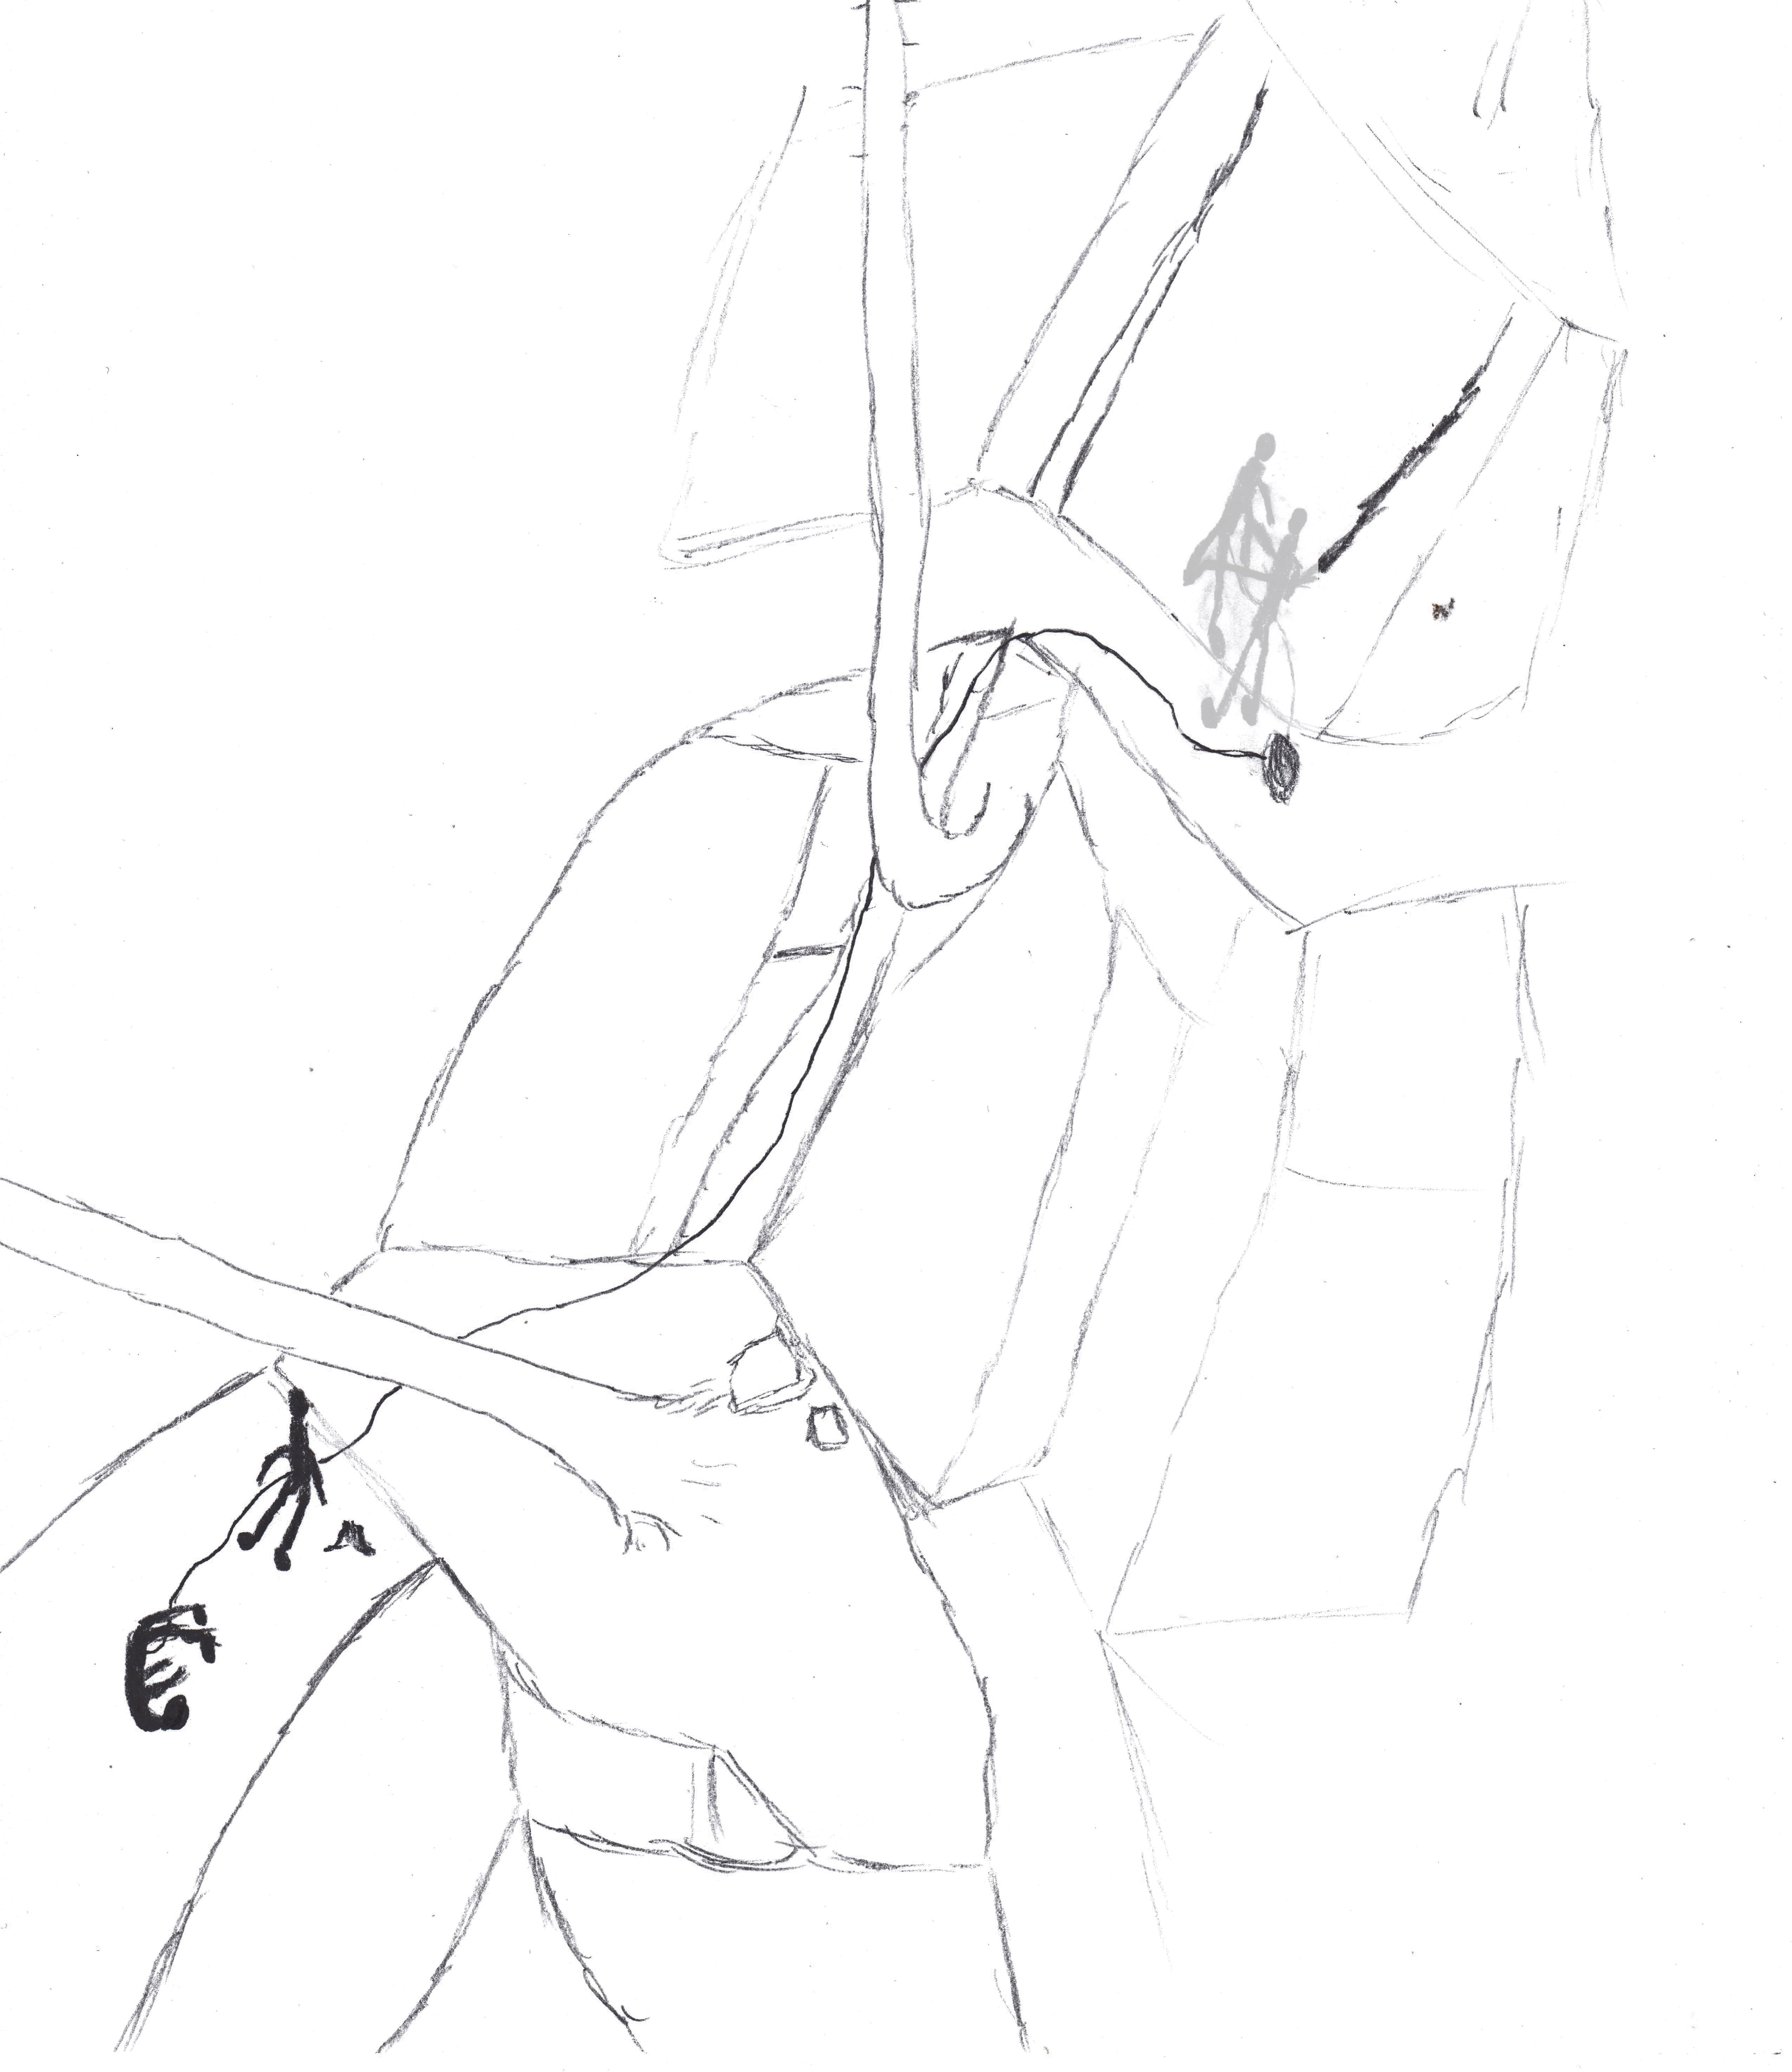
Getting secure

After we stopped falling, Alexis hadn’t said anything since we landed where we were, so I called out her name. She didn’t respond. “Alexis!” I said again. A tiny mumble comes out. “Alexis!” Some more mumbles come out.

From the mumbles, I know she’s at least alive.

I look around and assess the situation. We’re still on a downslope and Alexis looks like she’s about ready to keep tumbling down, especially if she moves at all.

I need to get us anchored so that we don’t fall any more. Right next to me, there’s a small tree stump. I take the rope between us and coil it around the tree stump to quickly provide an anchor while I think some more. It will hopefully hold with the friction of the rope wrapped around it three times.

Now I look around for a better anchor. I need to get Alexis upright and we need to get off of this downslope.

About 6 feet above me, there’s a large tree. If I can get to it and sling it, that’ll be a bomber anchor, and then I can help get Alexis up there.

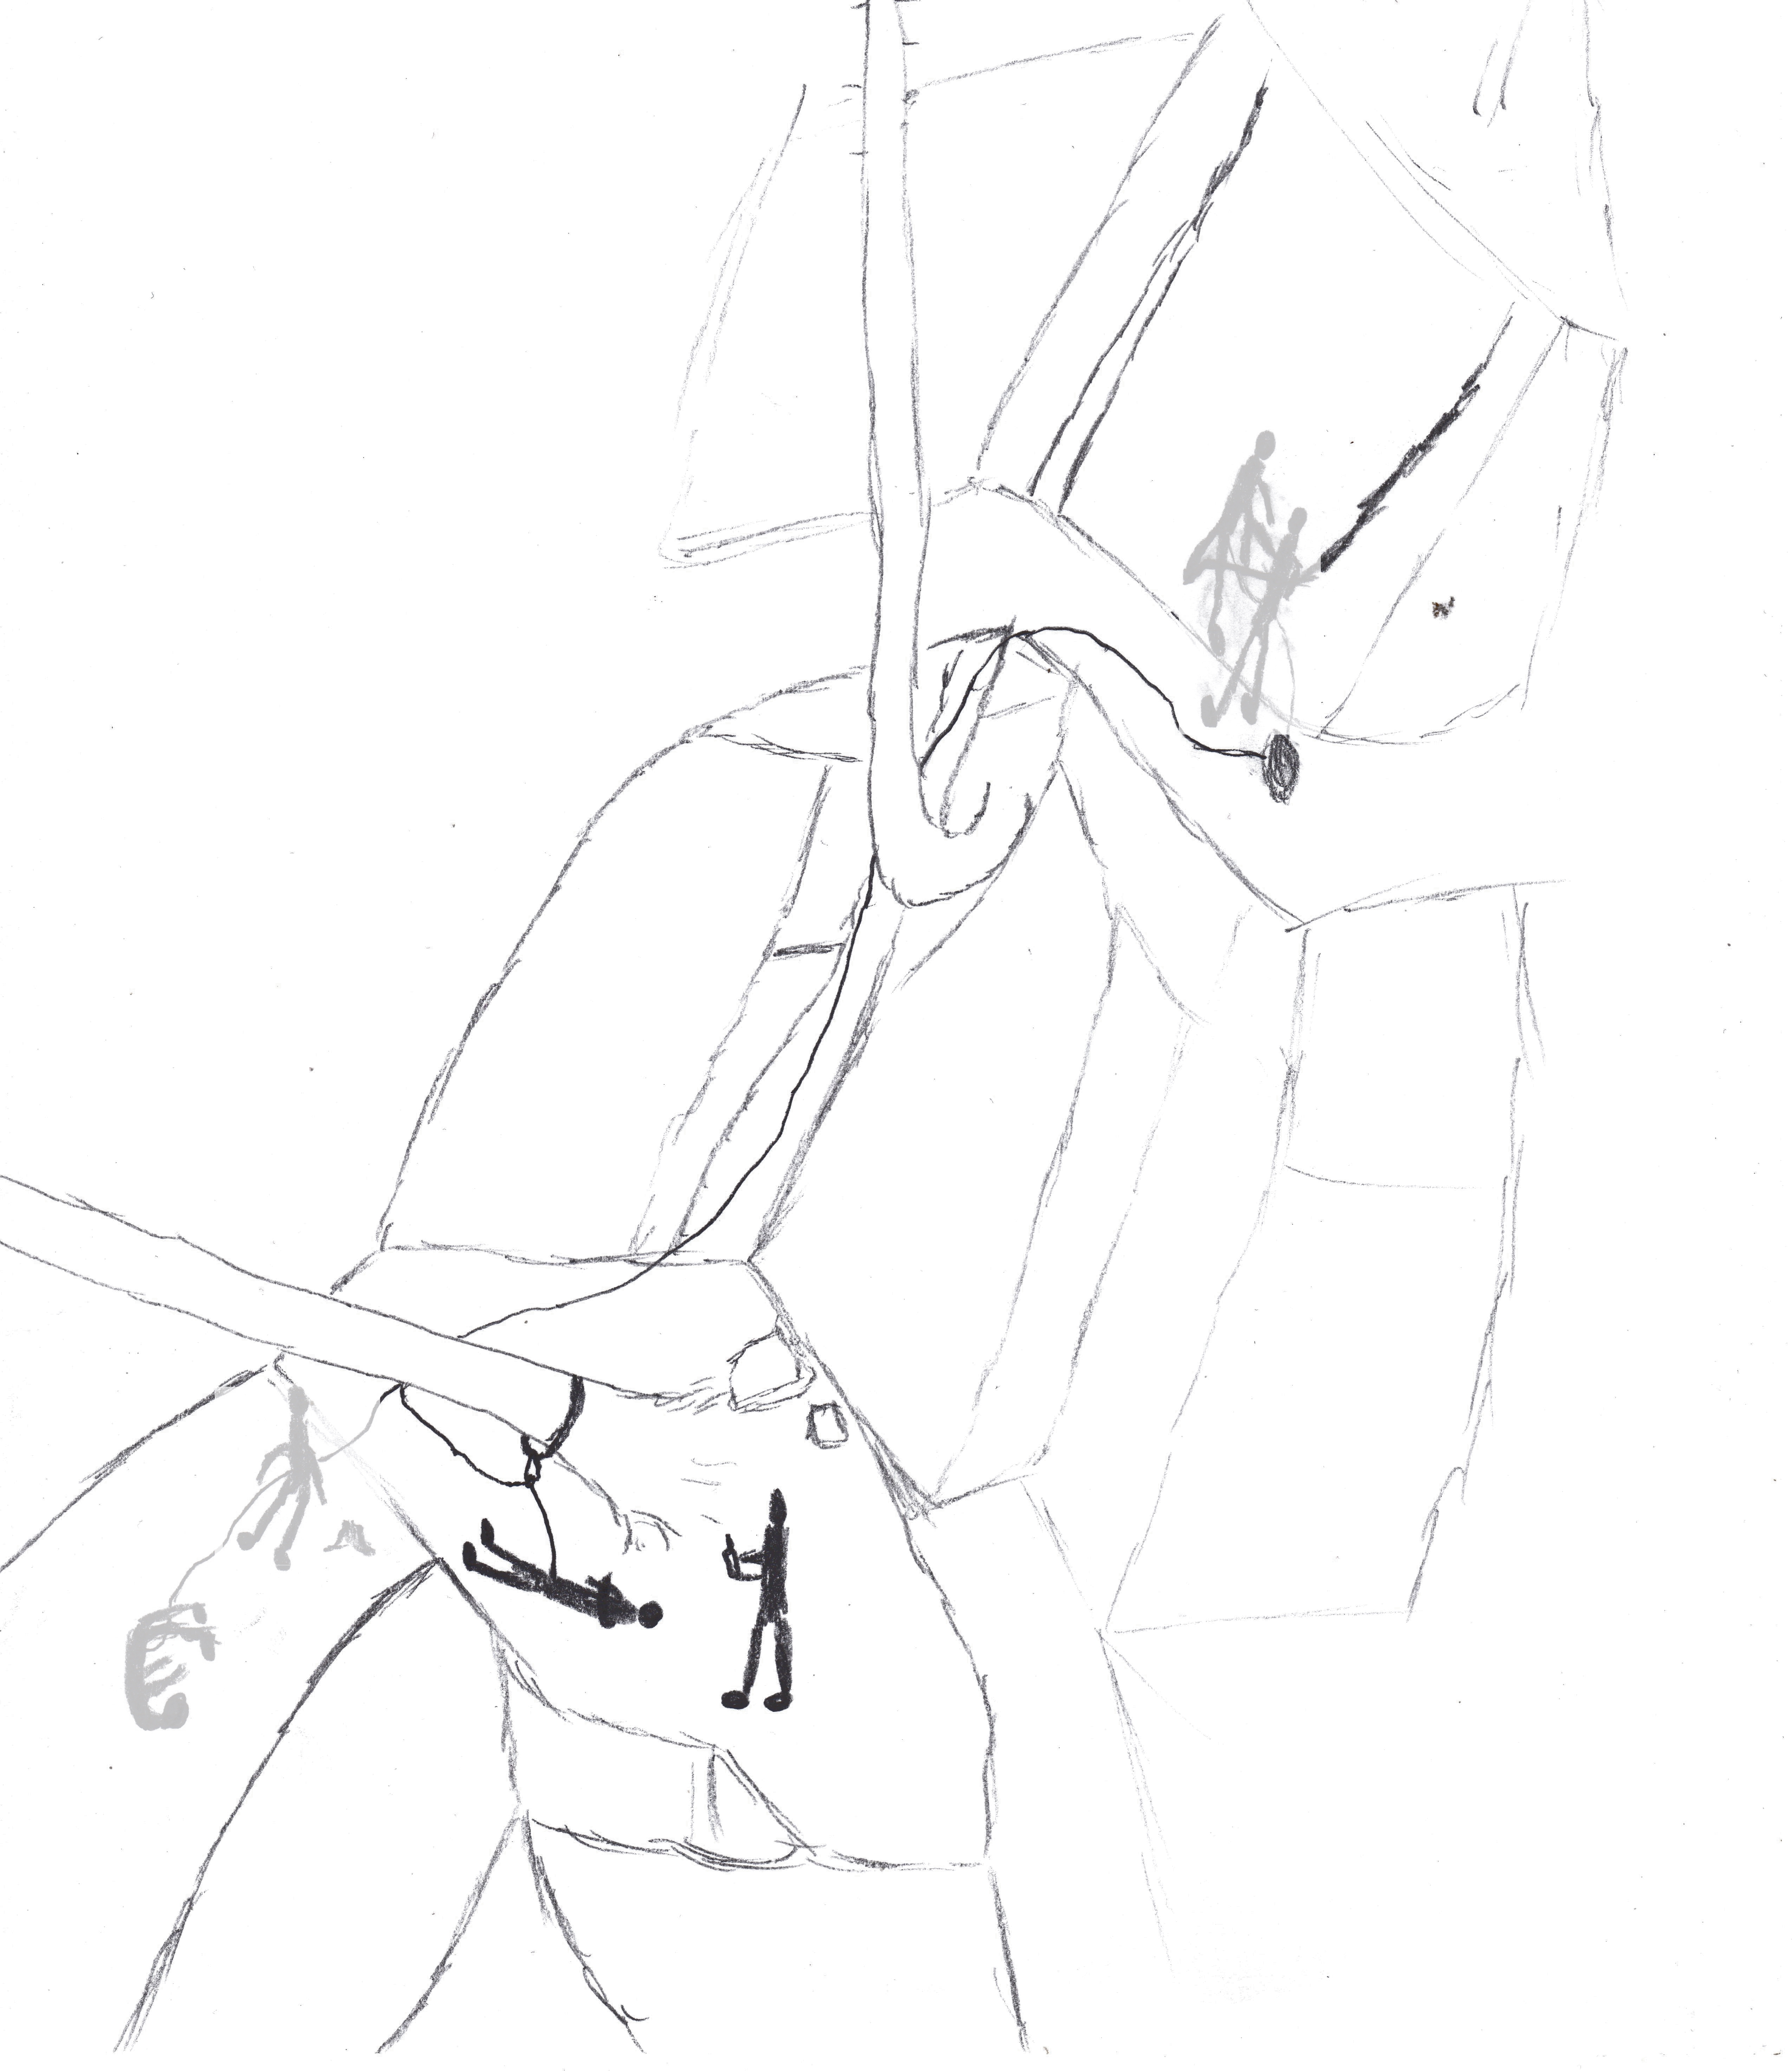
I feed out more slack for myself using my MegaJul belay device, while checking that the rope is still decently wrapped around the temporary tree stump anchor, and then I stand up.

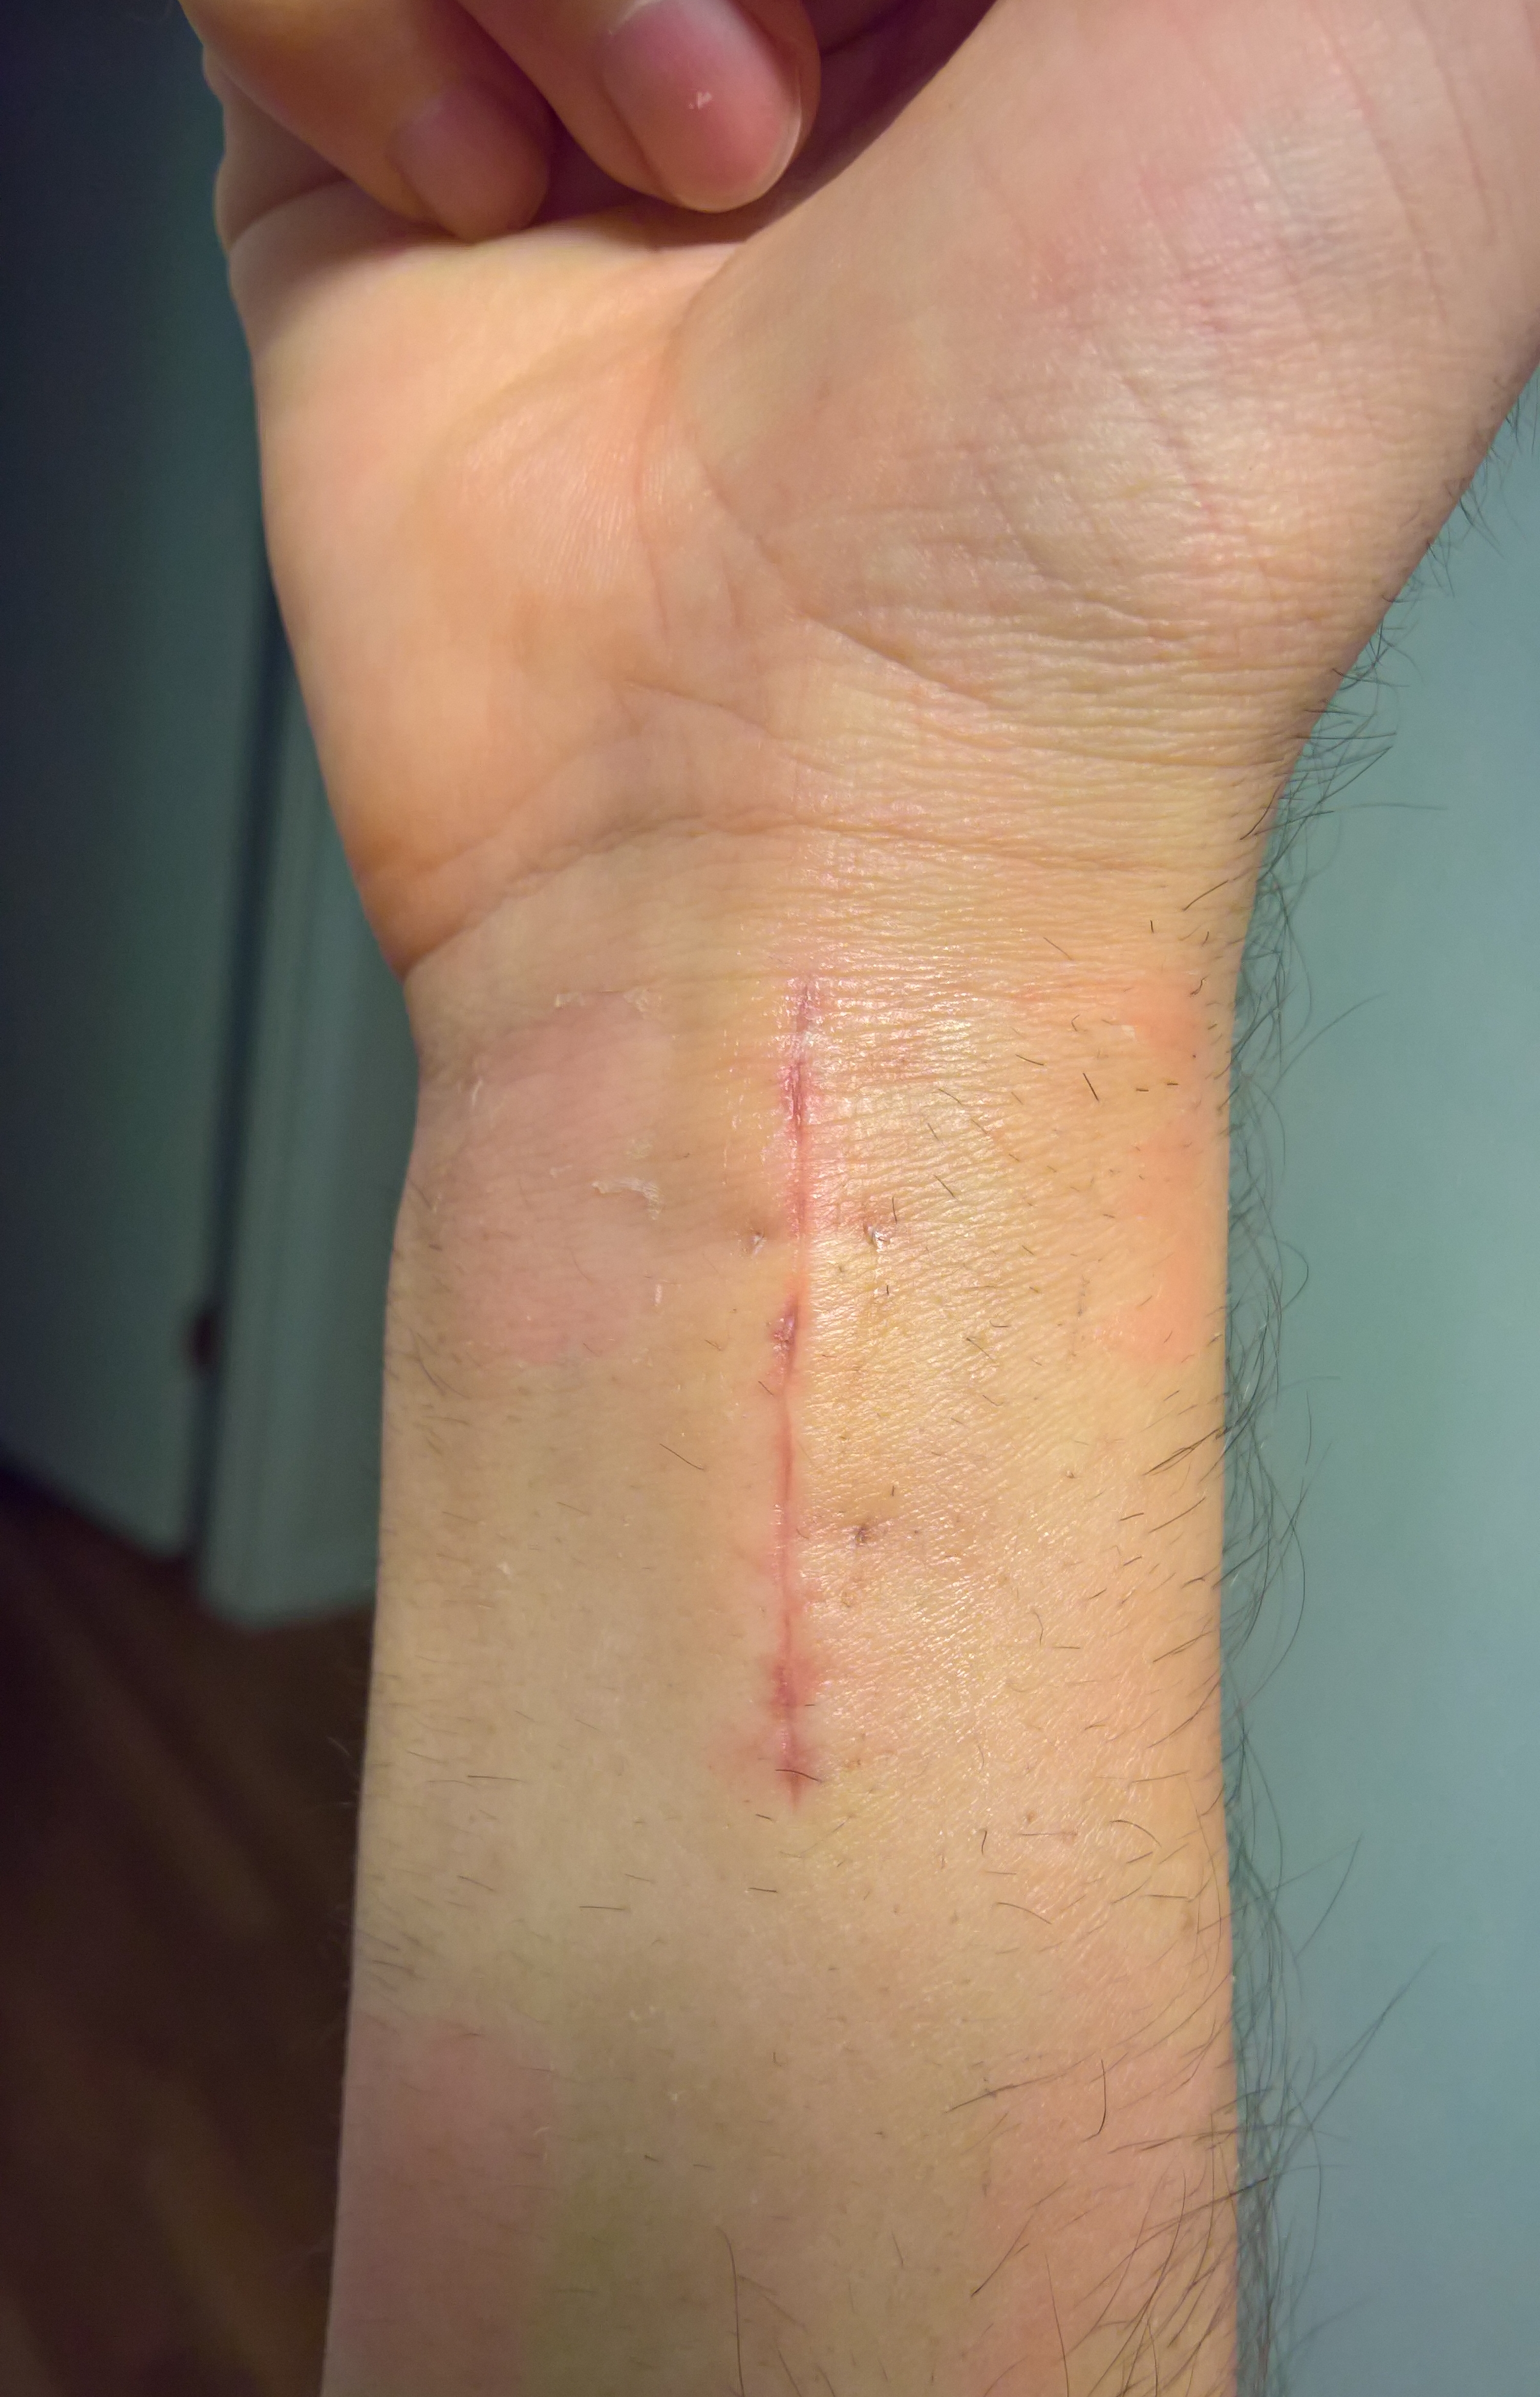
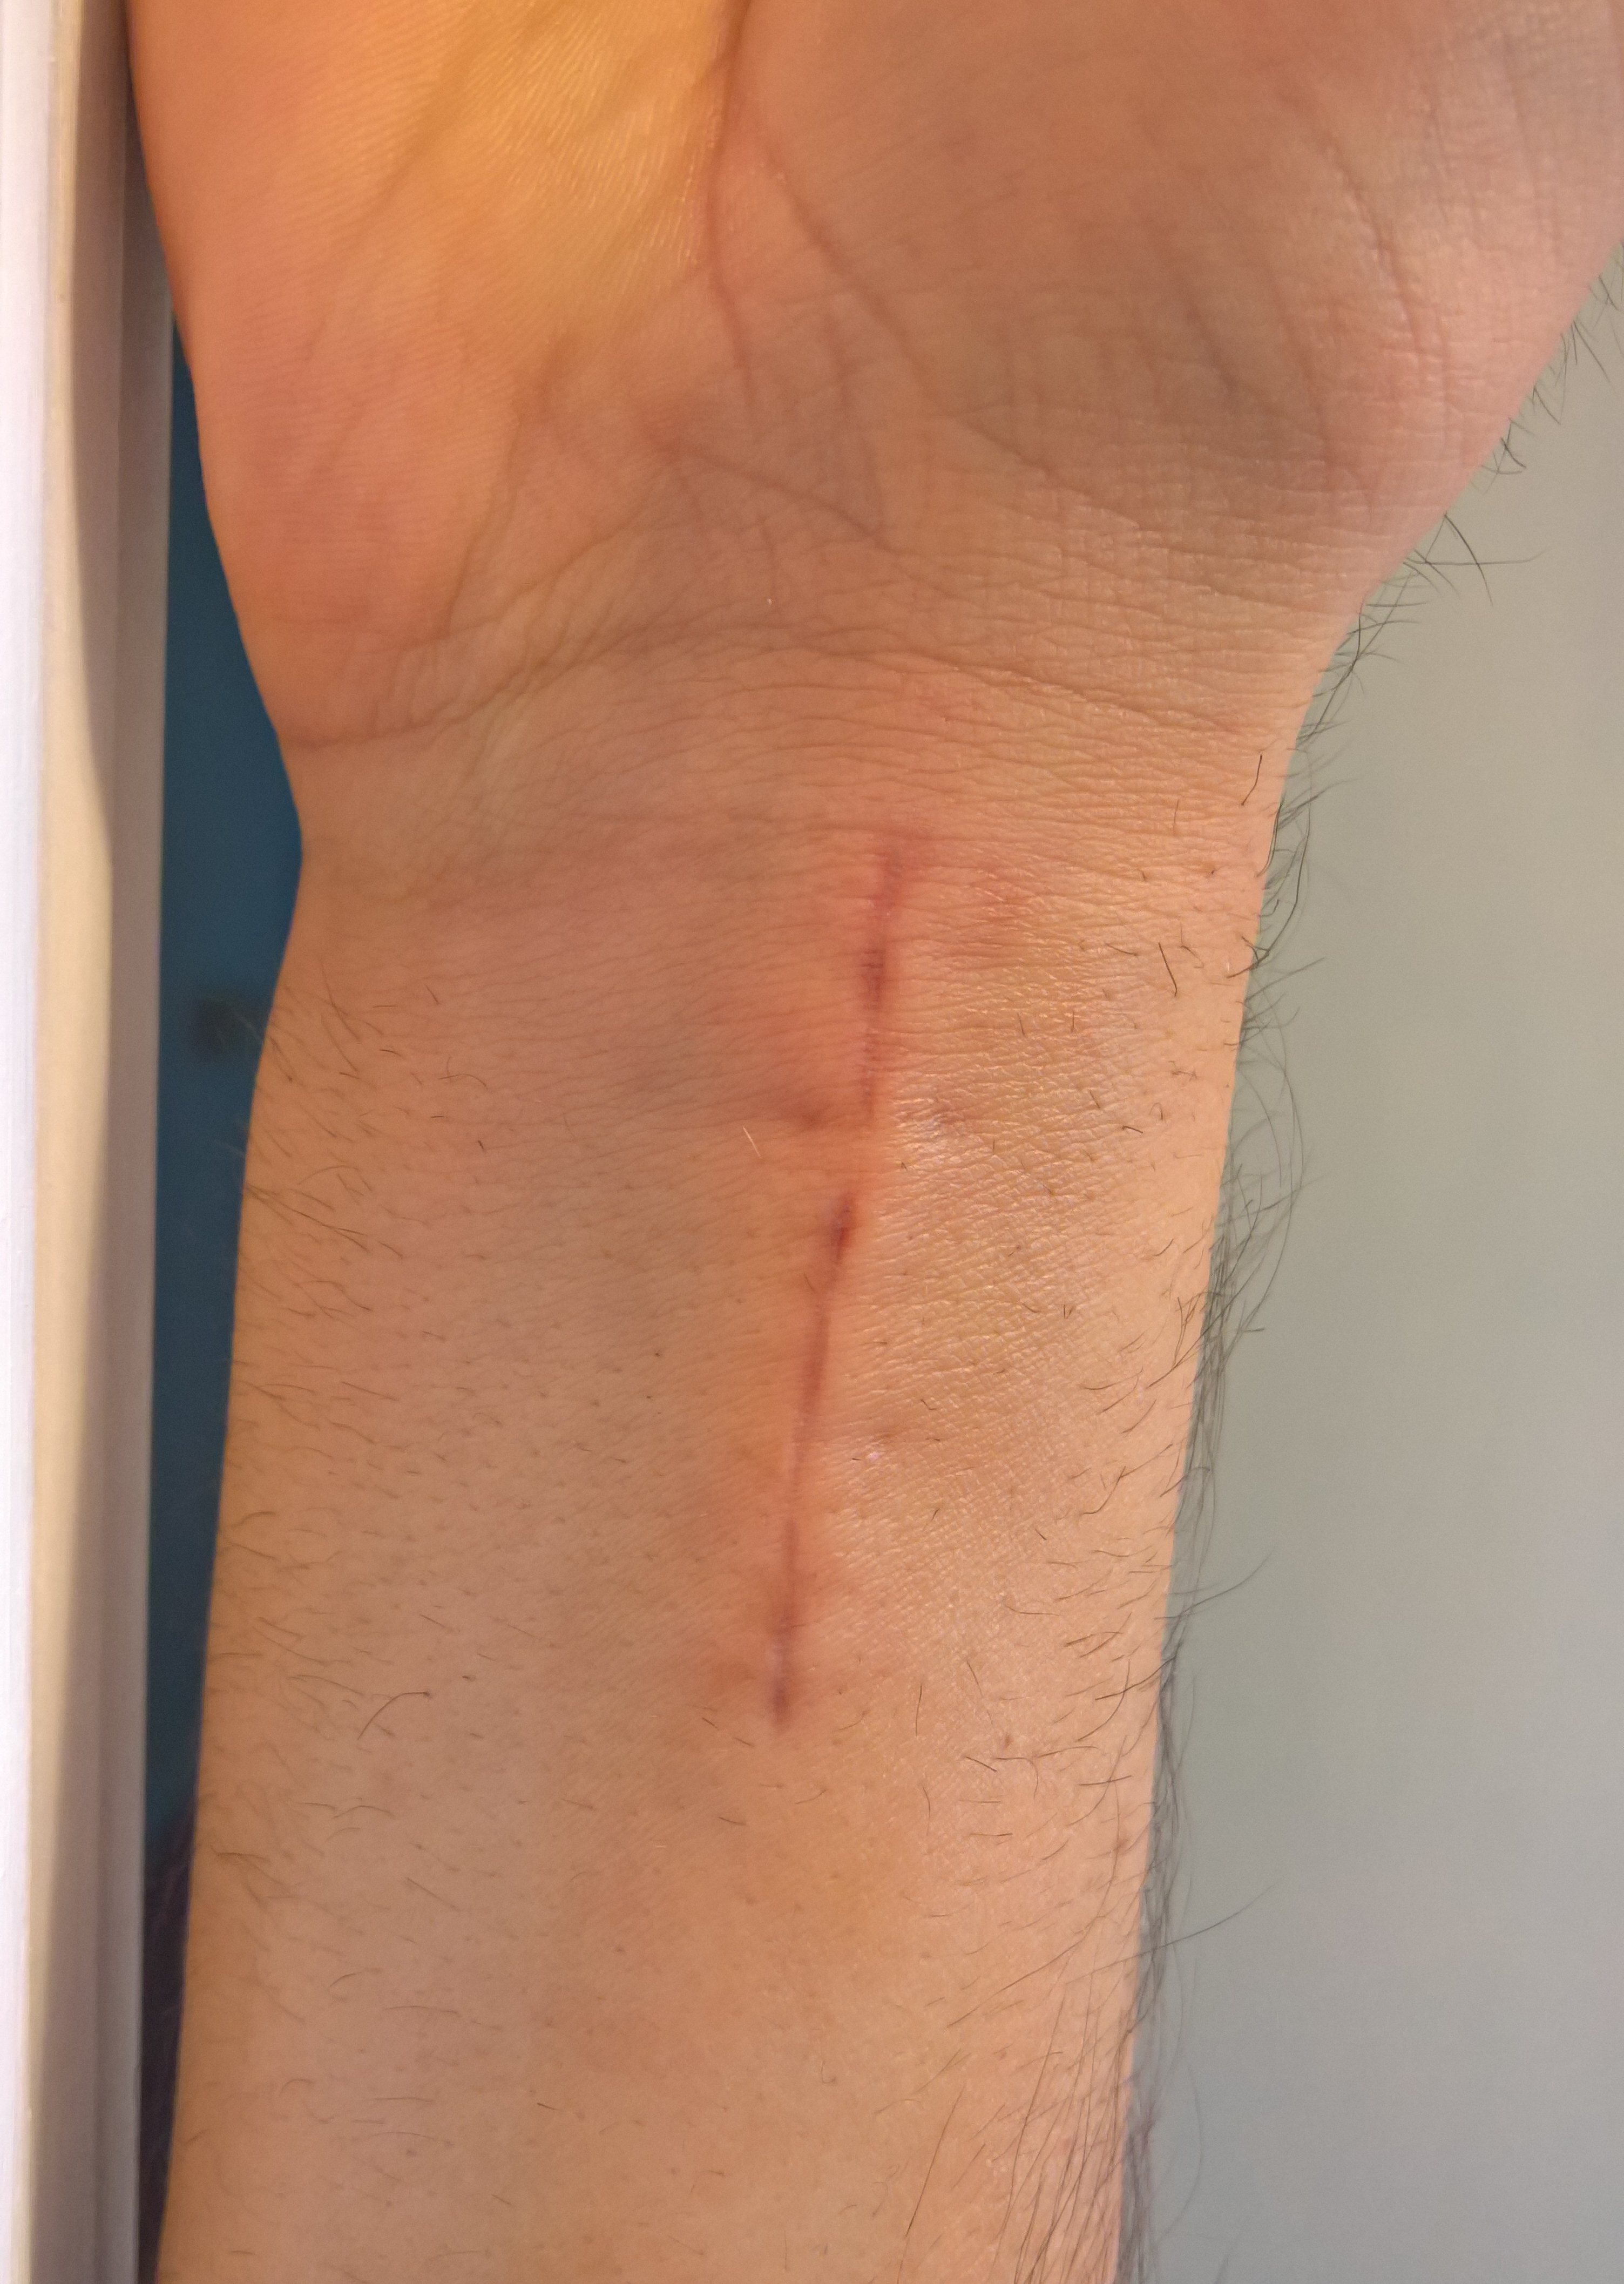
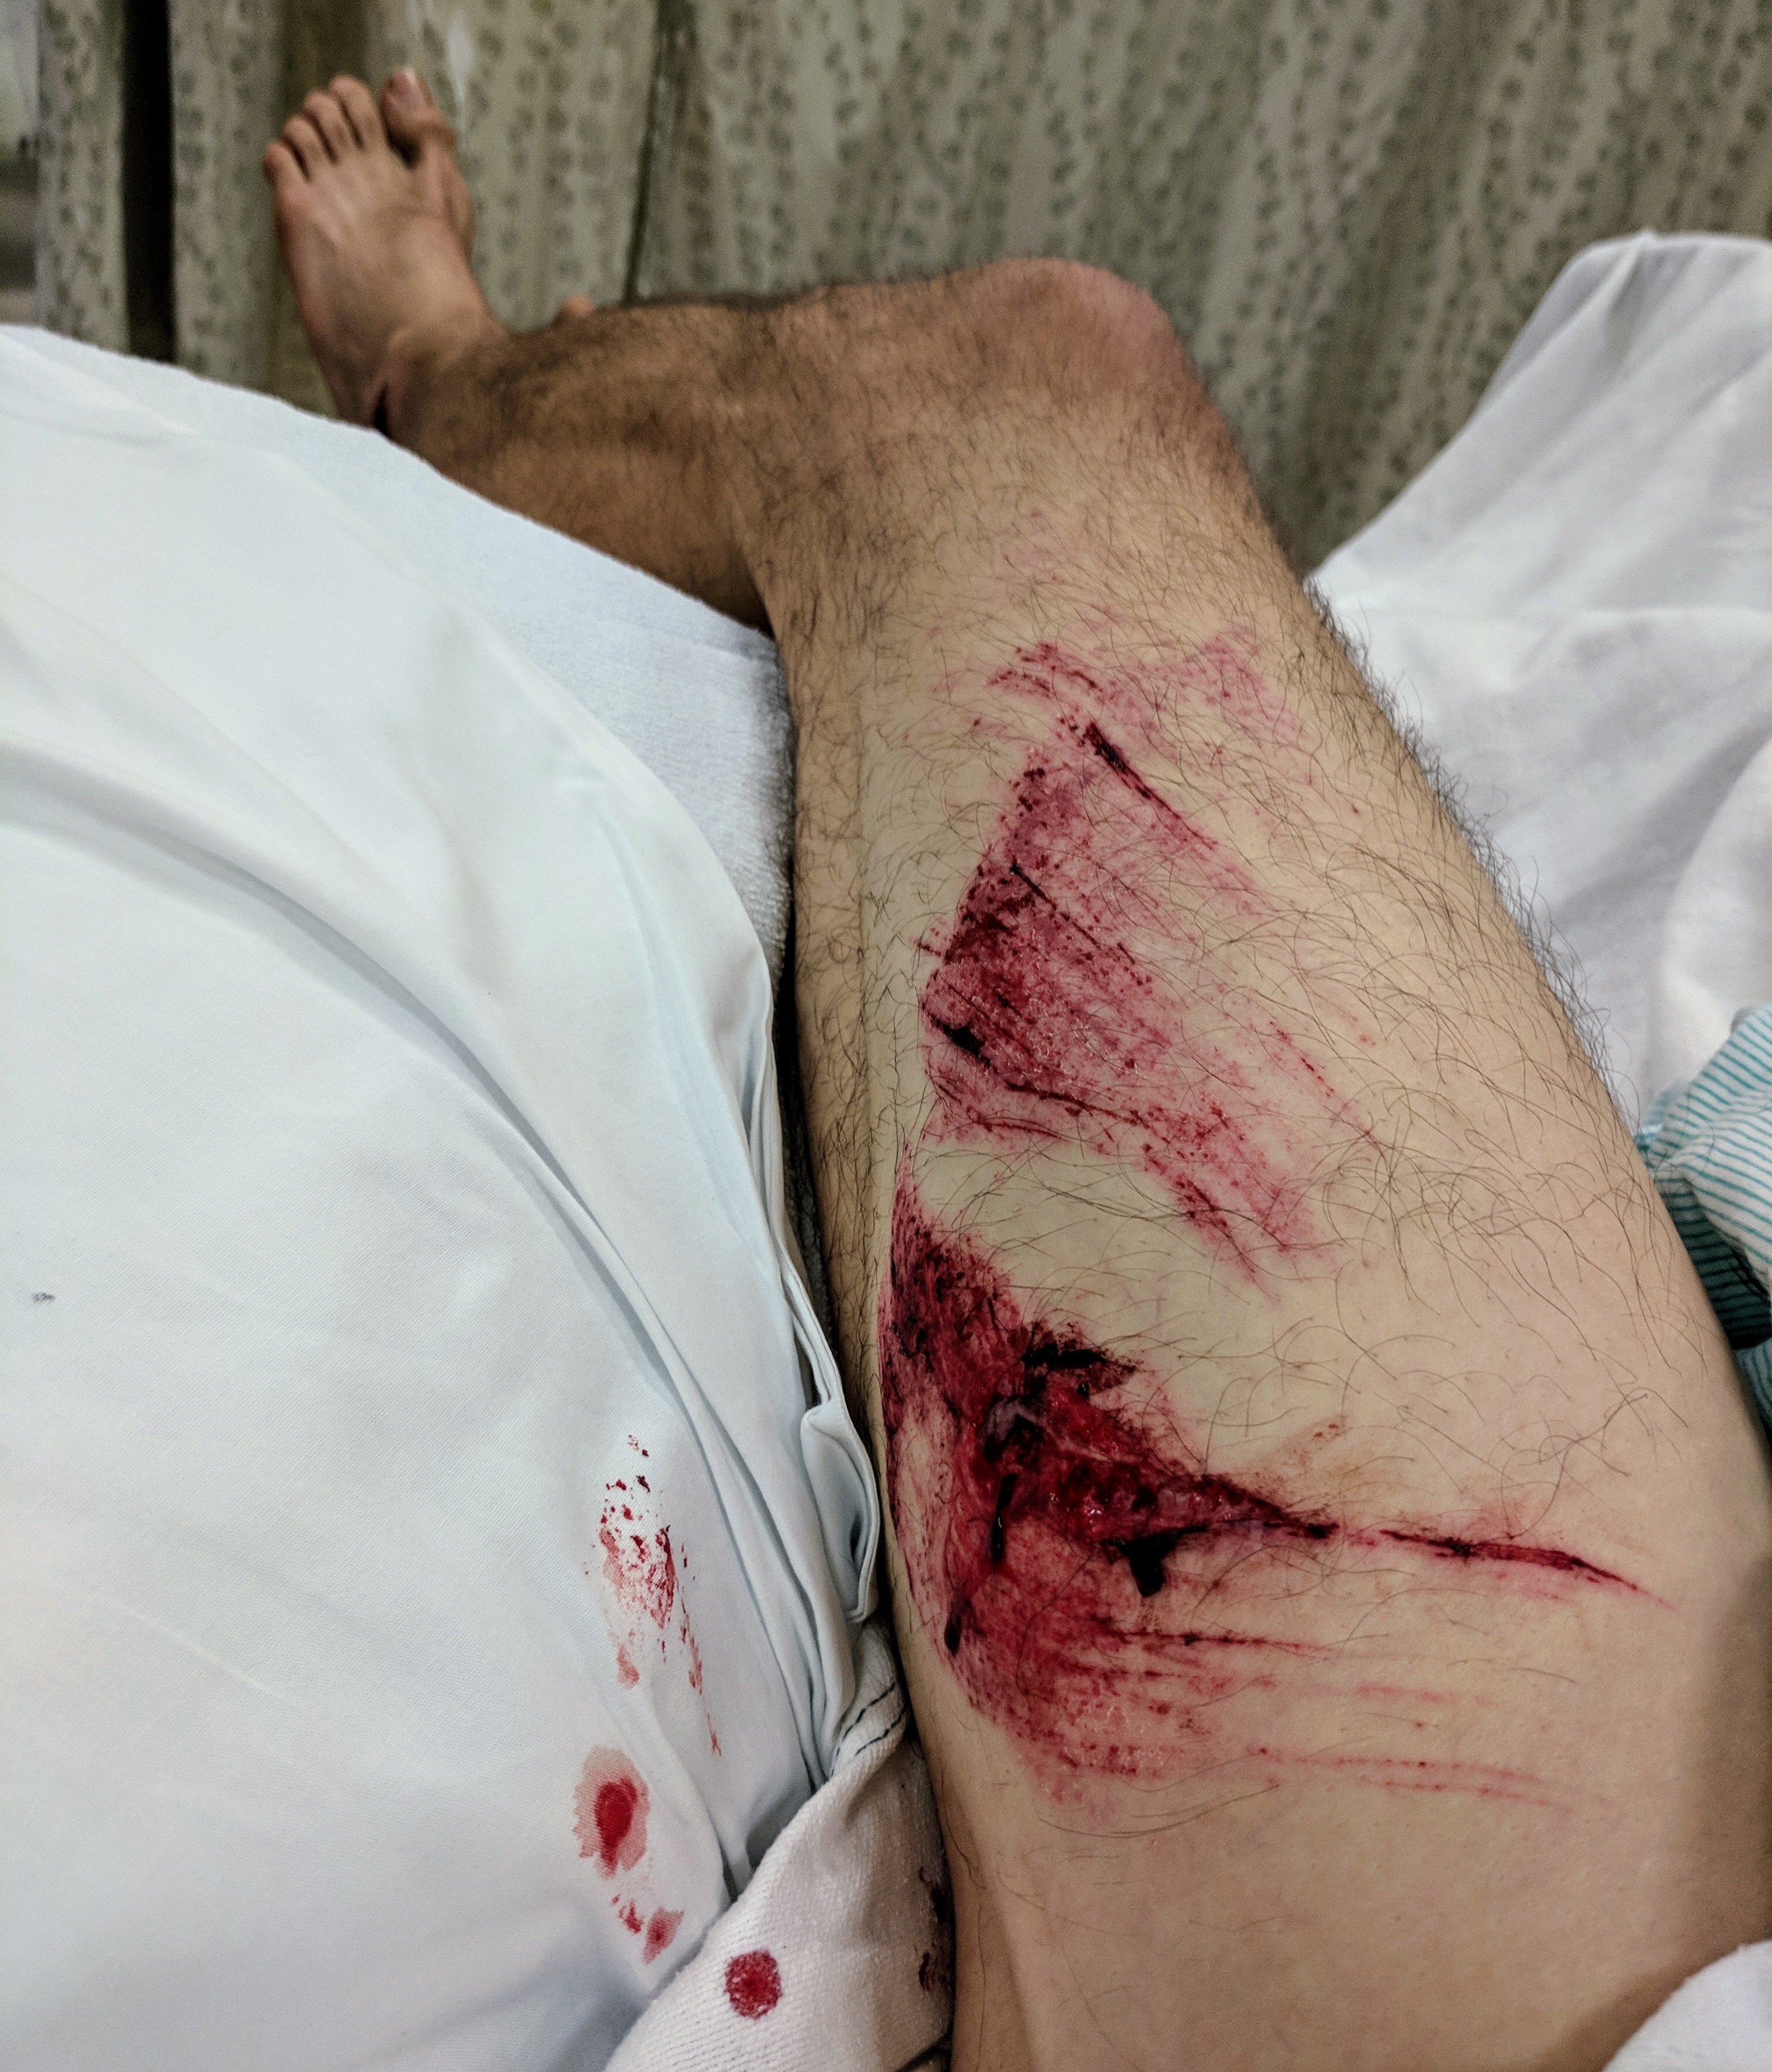
My leg felt a bit sore, so I decided to pull up the shorts on my left leg. There’s a large bloody gash in it. “This doesn’t matter right now”, I think to myself, “we first have to get anchored and safe. If we stay here, we’ll roll off and we’ll be dead no matter what.”

So I walk up to the tree, and start deciding what to sling it with. I try seeing if my pre-sewn double length sling would fit around the tree, but it doesn’t, so I’ll have to tie a sling. I grab my webbing coil from my harness and start tying the water knot around the tree.

As I’m tying, my vision starts to black out. I shouldn’t have looked at my cut! I bet that wouldn’t have happened if I didn’t know I had a cut. But I force myself to concentrate, breathe, and finish tying the knot.

Then I clip my personal anchor into the newly created bomber anchor. We’re safe from absolute death. If my temporary anchor failed below, my MegaJul belay device would catch Alexis (pulling on me, but I’m anchored in).

Now I need to get Alexis up here with me, somewhere more comfortable than upside down on a slope. Luckily, there’s a nice flat ledge right beneath my new tree anchor.

I forget exactly what I did next… I think I put the rope through a carabiner attached to the anchor, as if it’s a top rope setup, and then I walked down to Alexis (with the belay device still attached to me), letting out slack to reach her (but therefore still keeping the system tight so that if either of us fell, we wouldn’t fall anywhere). Or possibly I was able to reach her with my personal anchor chord. Tough to remember.

Once I reached Alexis, I tried talking to her a bit more. This time she was constantly repeating “my wrist is broken”, “my teeth are broken” (that’s called perseverating). I told her we have to get her upright and up to the ledge. I considered the concern of spinal injuries, but in the risky position she was, I decided she had to be moved regardless – help would be hours away. I started pulling her upwards from the back of her backpack, in an attempt to rotate her onto her feet. Luckily, she was somewhat assisting, and after about 30 seconds, I eventually got her upright. And then I helped her walk up to the ledge, and laid her down on the nice flat ledge. As we walked up, I was taking in the slack between us. This is where the MegaJul auto locking came handy once again… otherwise I’d constantly need a hand on the break, or I’d need to set up a top belay, which would take more time. After laying her down on the ledge, I clove hitched her rope into the anchor, and placed an extra pack under her head. We were finally comfortable and secure.

After I got us secured and calling for help.

Calling for help

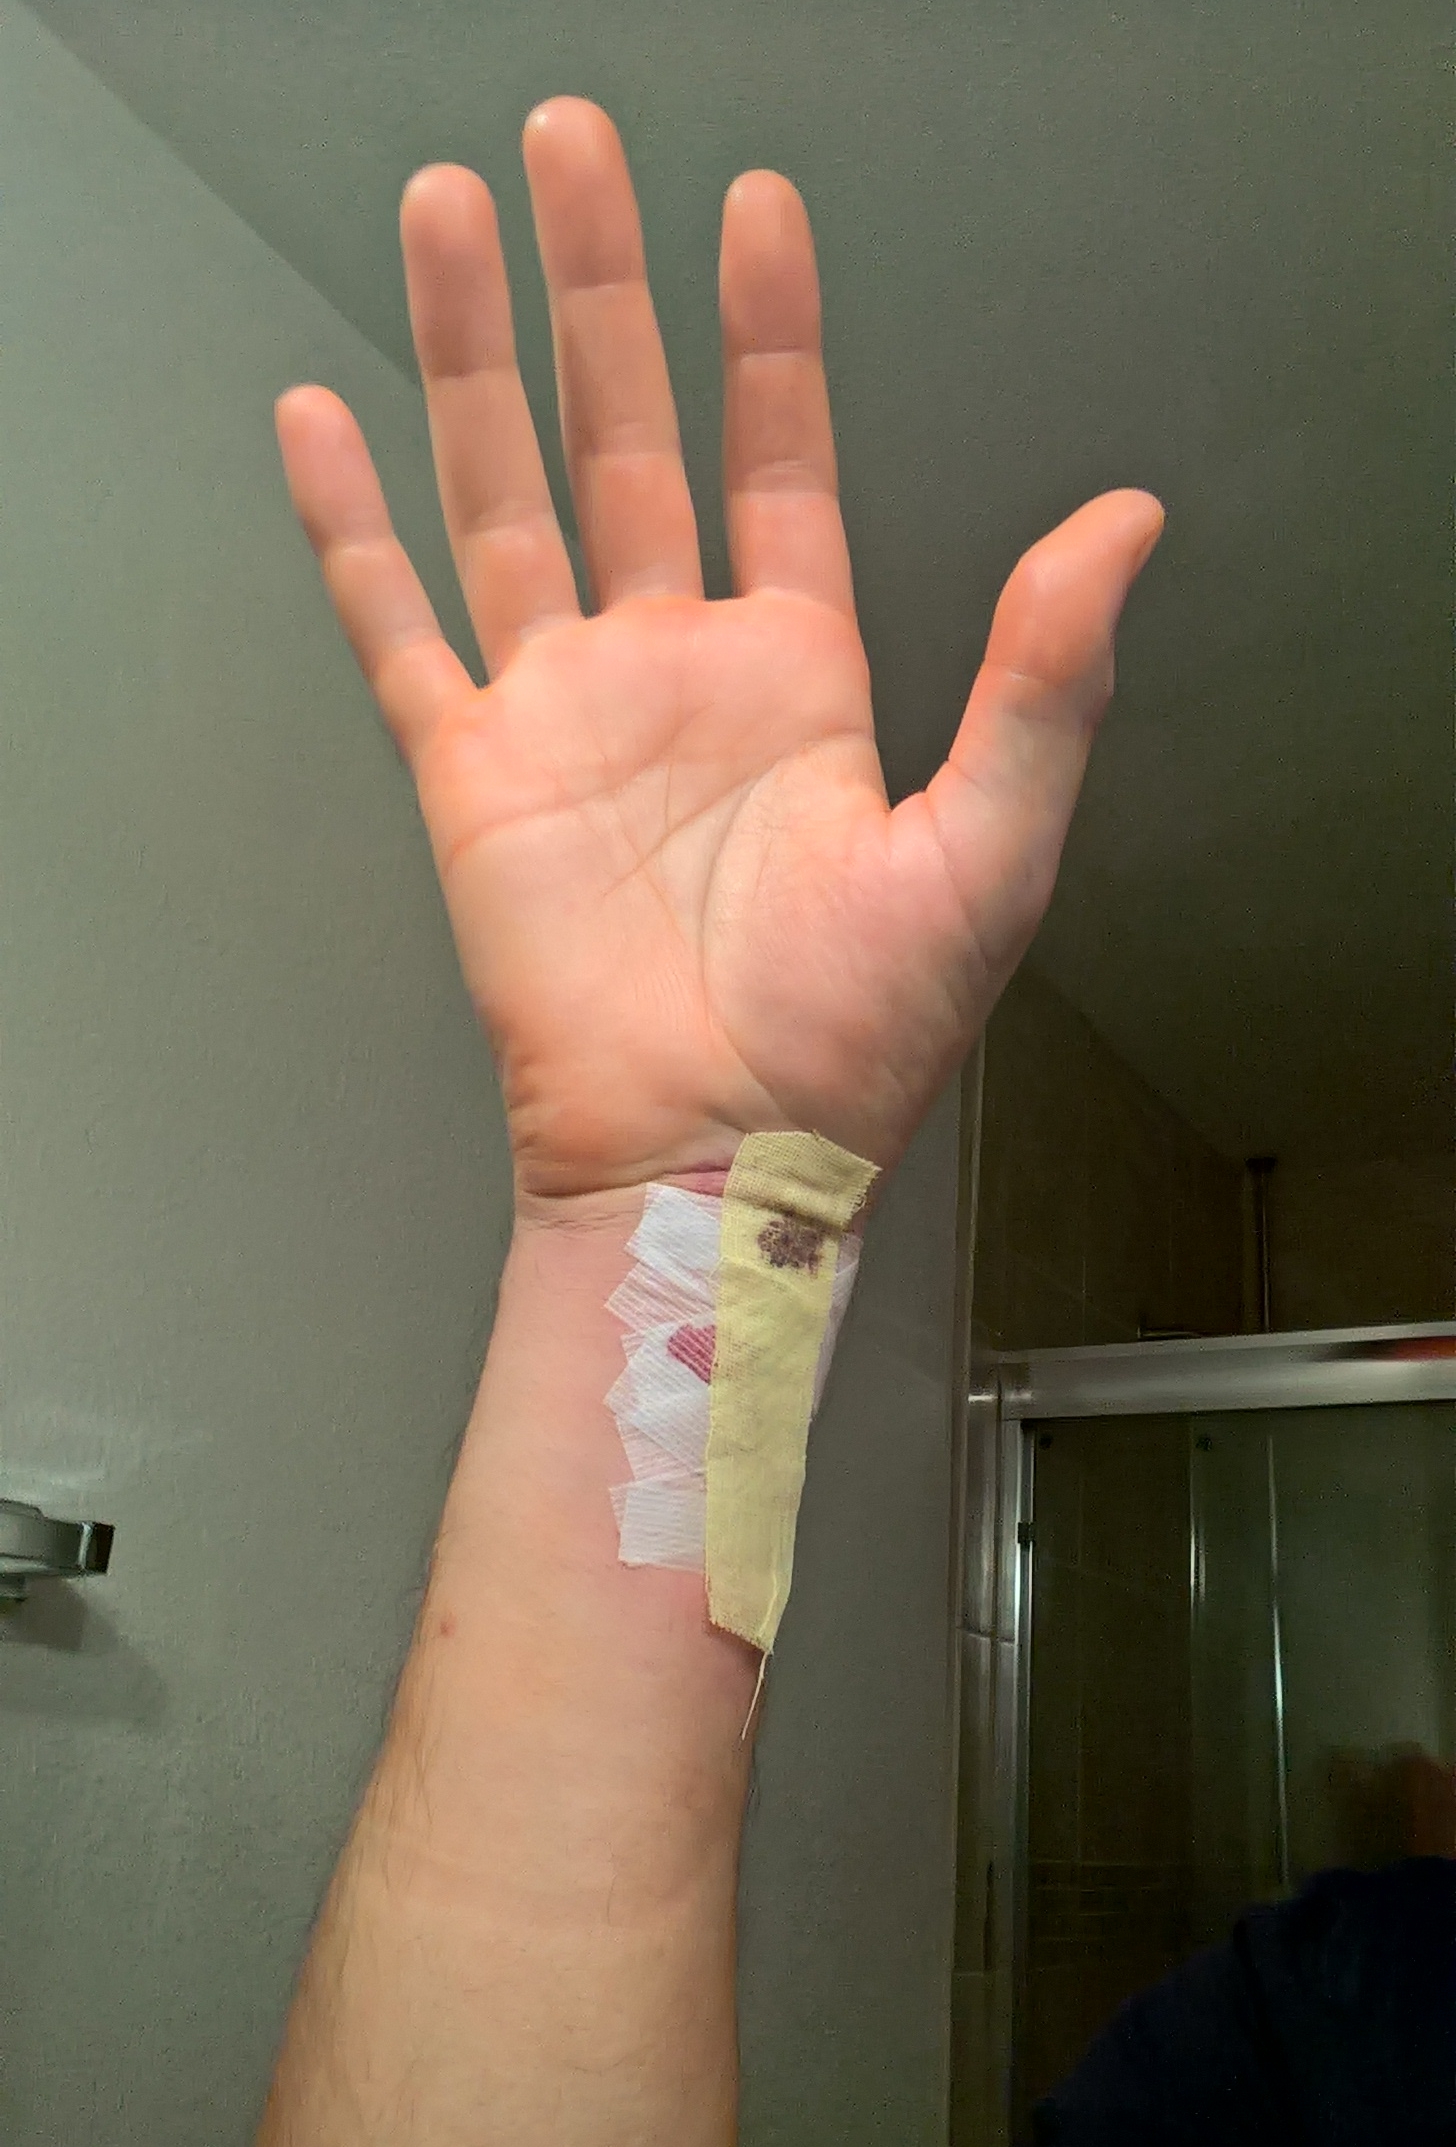
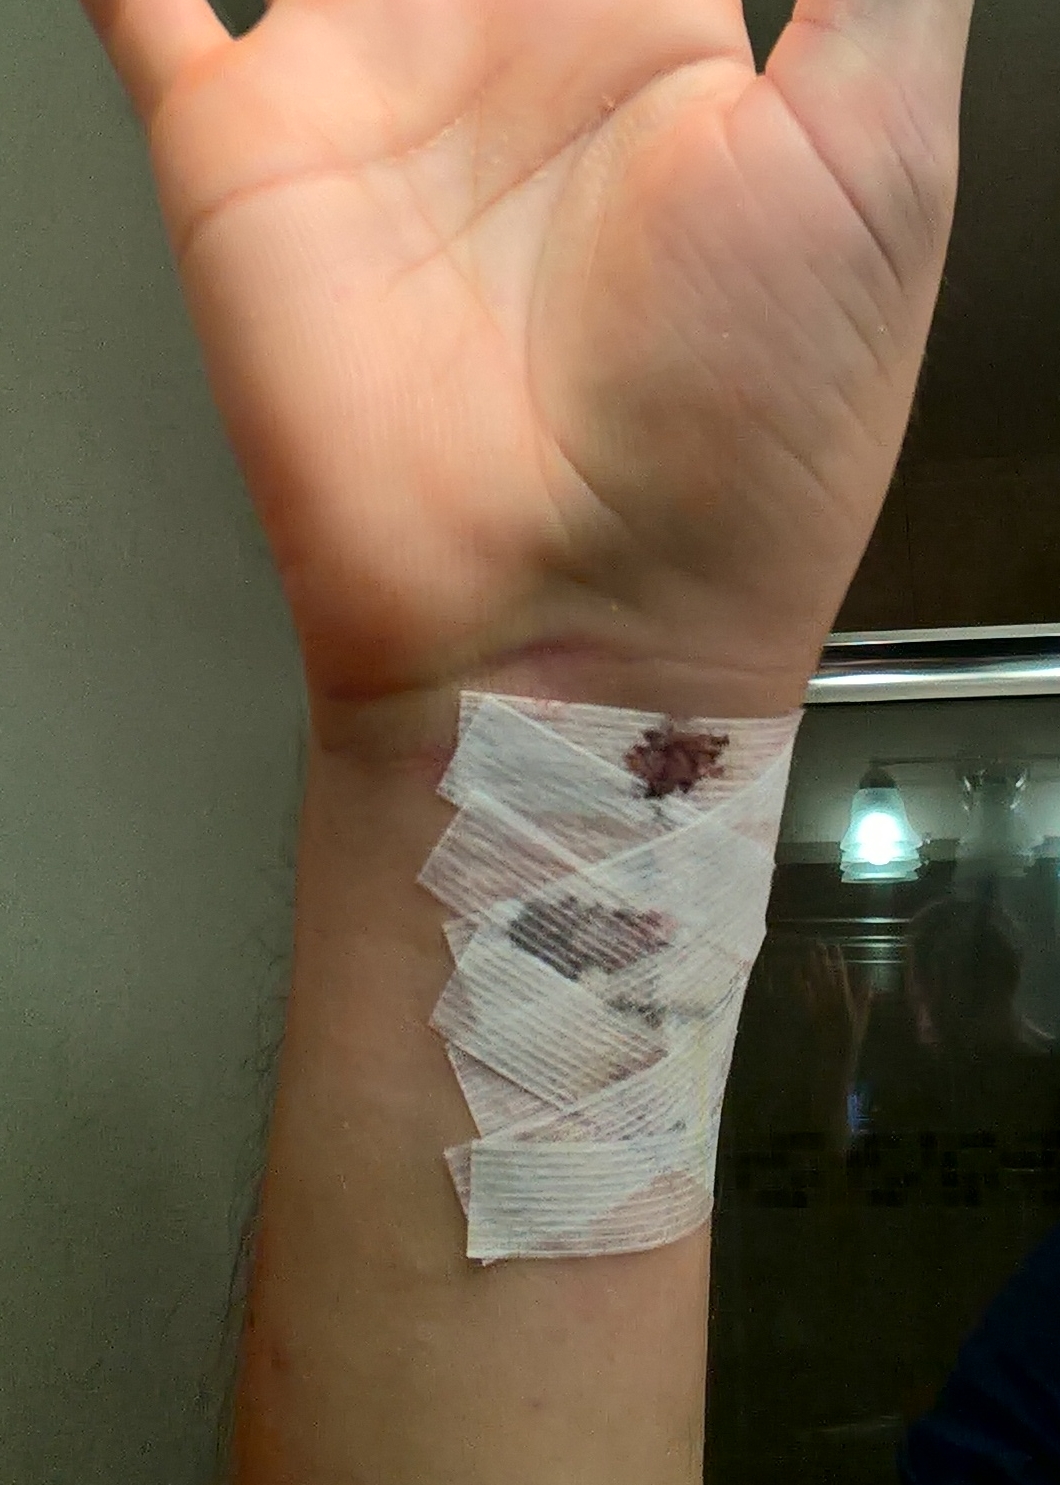
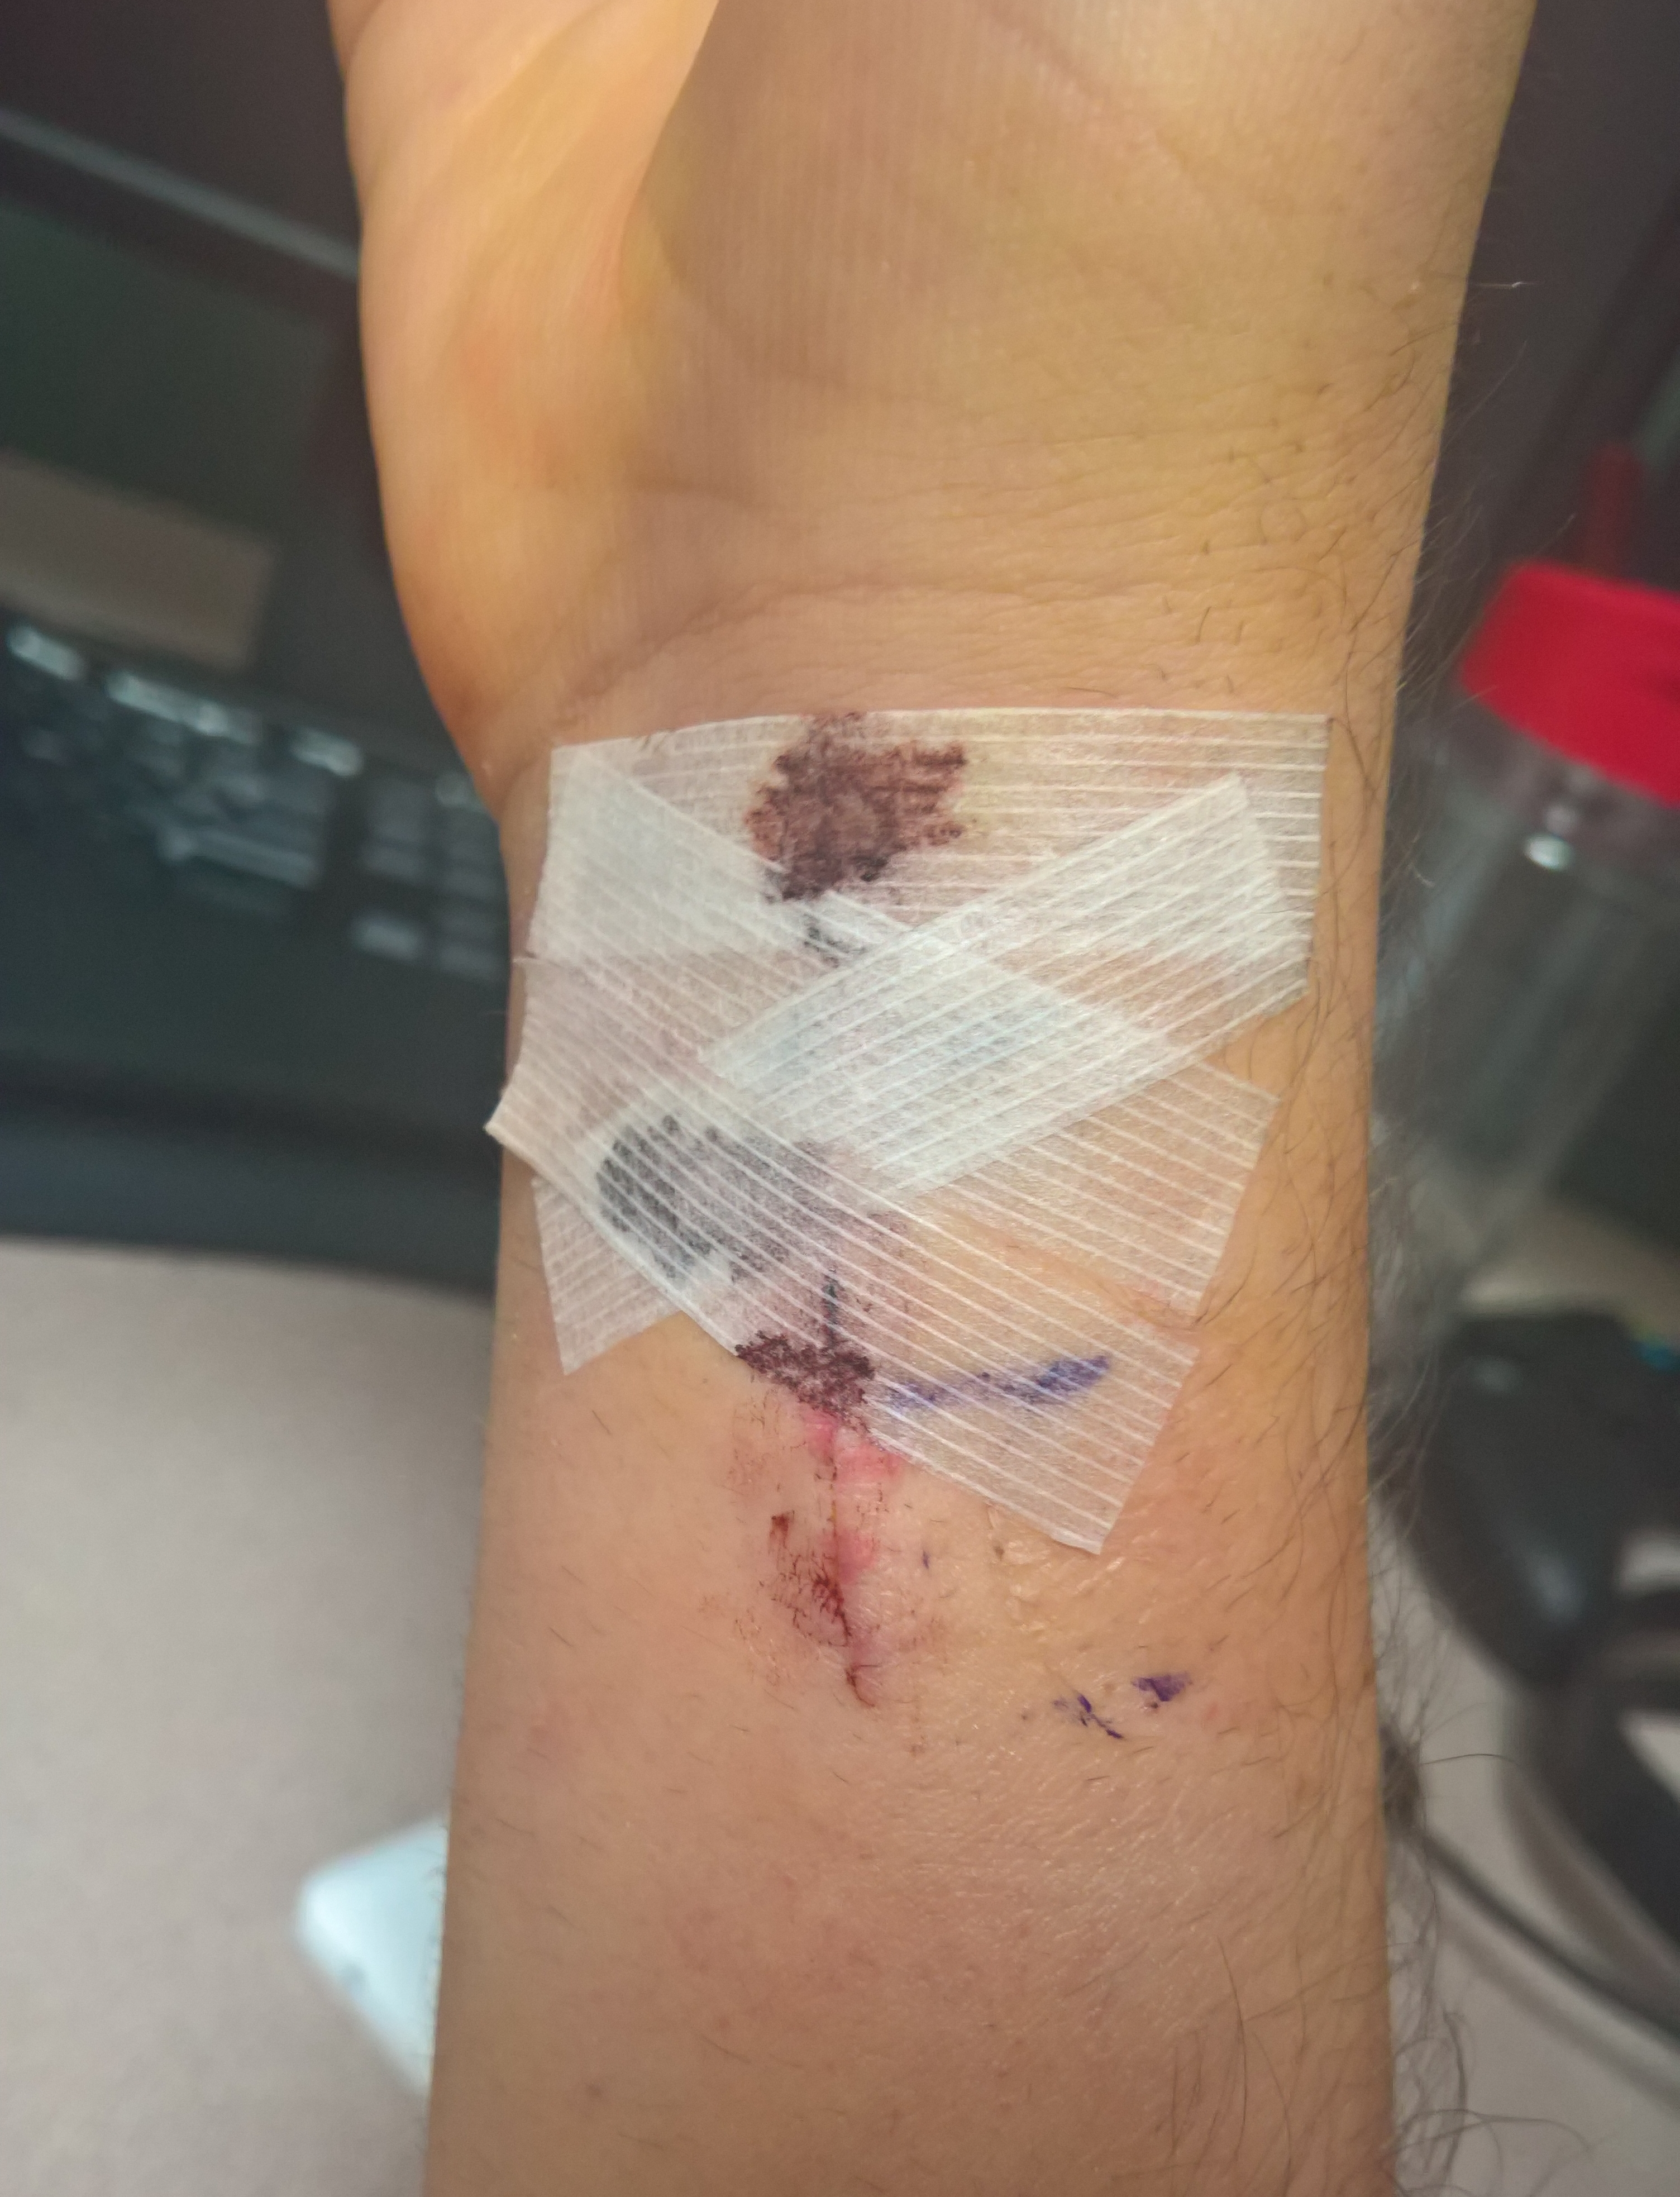
Now that we were secure, I needed to figure out how we were going to get out of here. I took another look at the cut on my leg. Somehow it wasn’t bleeding. It seemed pretty deep, but apparently not deep enough! That’s good! That would have been a pain to deal with.

Alexis was constantly repeating “my wrist is broken”, “my teeth are broken”, “what happened”? She was clearly concussed (didn’t have to have any special training to figure this one out). But thankfully, I knew her main injuries – broken wrist, concussion, and broken teeth.

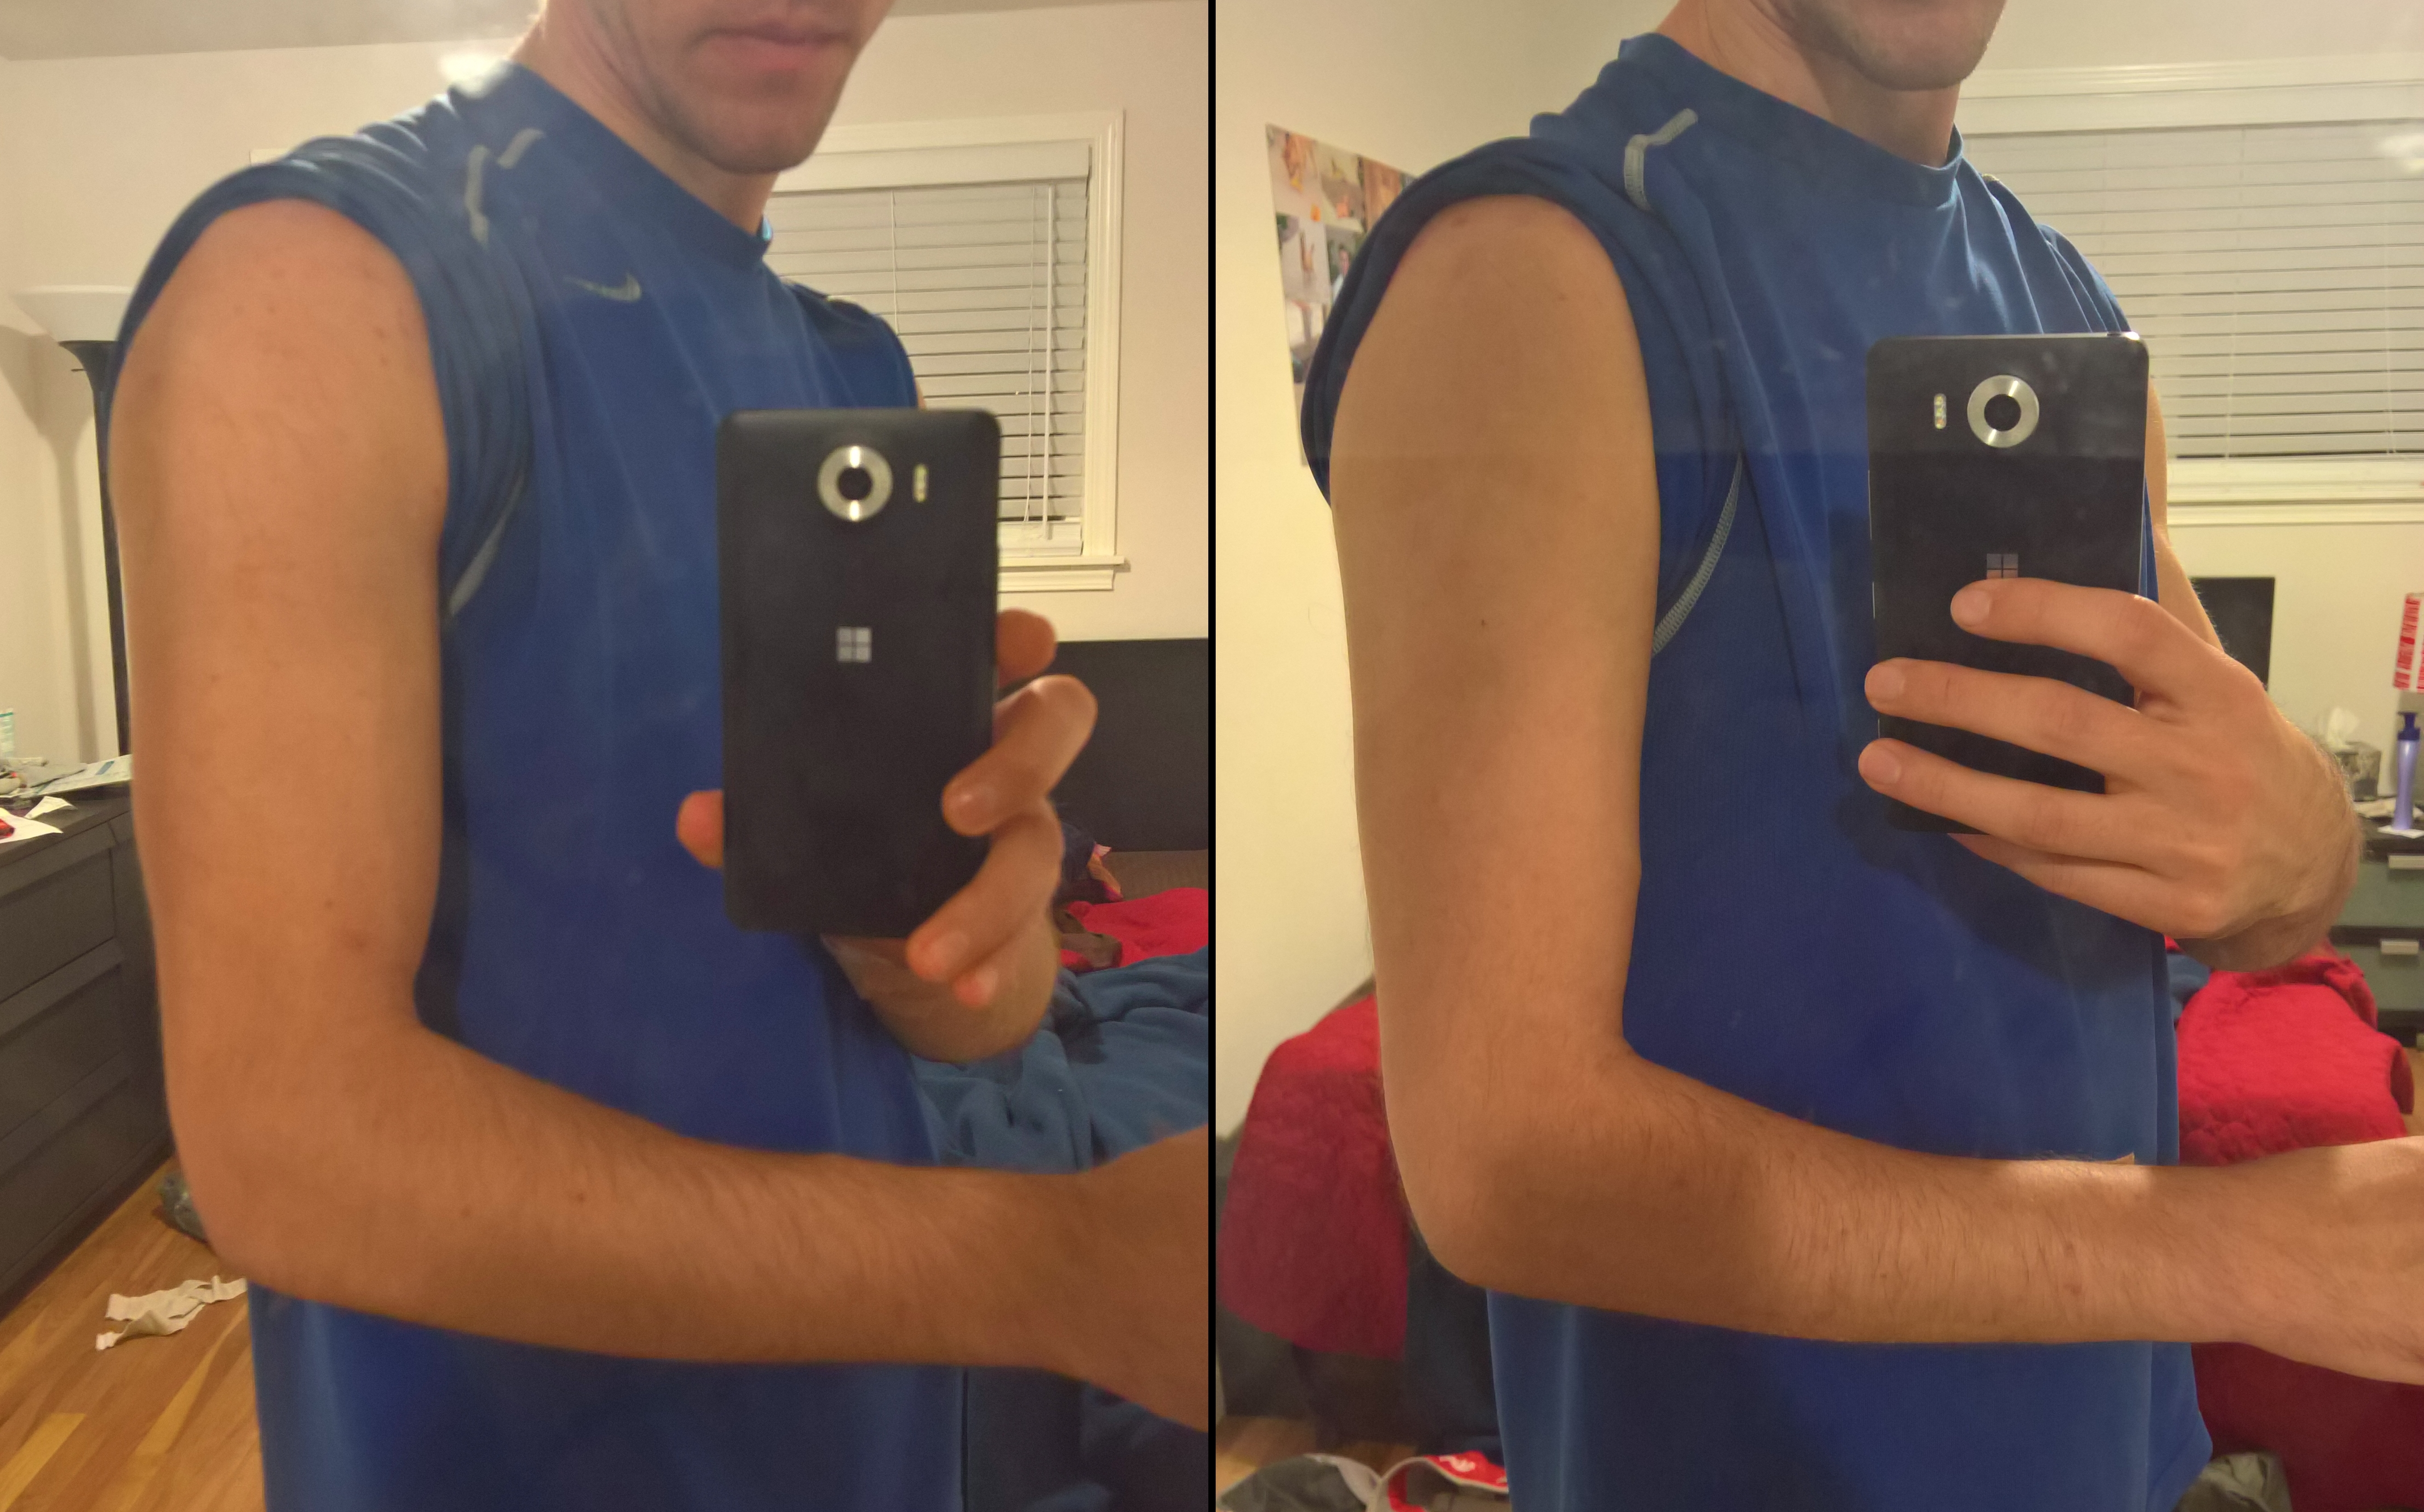
As for my injuries, it seemed difficult to walk on my leg, but the cut wasn’t bleeding. Maybe I had a slightly broken thigh bone?

The gash on my left leg

Considering the trail back down is an hour of class 3-4 scrambling with probably three sections that one would rappel in normal uninjured conditions, there was essentially no chance we would be able to get down the trail by ourselves.

Therefore, I decided to use the Garmin InReach SOS. But first I had to get to the device… which was in Alexis’ backpack… which she was laying on comfortably on the ledge… And I also didn’t know what pocket it was in… and Alexis wasn’t in a state where she could tell me.

It took a while, but I finally found it inside a bag inside her main pack.

I activated SOS mode and sent the following messages…

Me (7:13 AM): I have an emergency, and I need you to send help. Broken wrist concussion cut on leg. 2 climbers injured.

Me: Walkie talkie channel 1. 1. At base of first pitch. Suspect broken leg.

Garmin: (7:35 AM): Emergency Response acknowledged your emergency.

Garmin: (7:36 AM): This is the IERCC, we have received your SOS activation. What is the nature of your emergency?

Me: (7:38 AM): Need pack out cannot walk both climbers

Garmin: (7:41 AM): What are the names/ages of injured climbers?

Garmin: (7:42 AM): Emergency services have been made aware of your activation and are working to get to your location. We do not have an ETA at this time.

Me: (sent names and ages)

Me: (8:32 AM): Any update

Garmin: (8:40 AM): We just got off the phone with the assigned agency, they mentioned a helicopter will likely be used but did not give an ETA yet.

Garmin: (8:41 AM): What is the combined weight of the injured climbers?

Me: 265 combined weight plus 30 lbs gear

10:10 AM: Helicopter arrived

11:00 AM: Helicopter hoisting me up (and then Alexis)

It took a long time for the messages to actually send. I tried walking around the corner of the ledge (which was difficult, since my leg was starting to hurt more and couldn’t really bear any weight). I started to scan channels with our walkie talkies, to see if anyone would pick up, in case the GPS fails to work. Someone actually responded on channel 1.1, but they were just some other climbers on a different peak.

After about 15 minutes, the message finally sent!

During this time, Alexis was still not fully conscious, repeating the same questions over and over again. I figured I should check her for any other potential hidden injuries, so I pressed on her back/spine and legs as I’ve seen others do, but luckily there weren’t any hidden injuries or spinal injuries.

About 30-40 minutes after the initial fall, Alexis finally started to become coherent again. Her first questions were “Are we married?” and “Is it after the fourth of July?” It’s interesting the questions your brain thinks of when it first comes back online! She was very confused as to what happened, and it took her a while to understand that we had fallen.

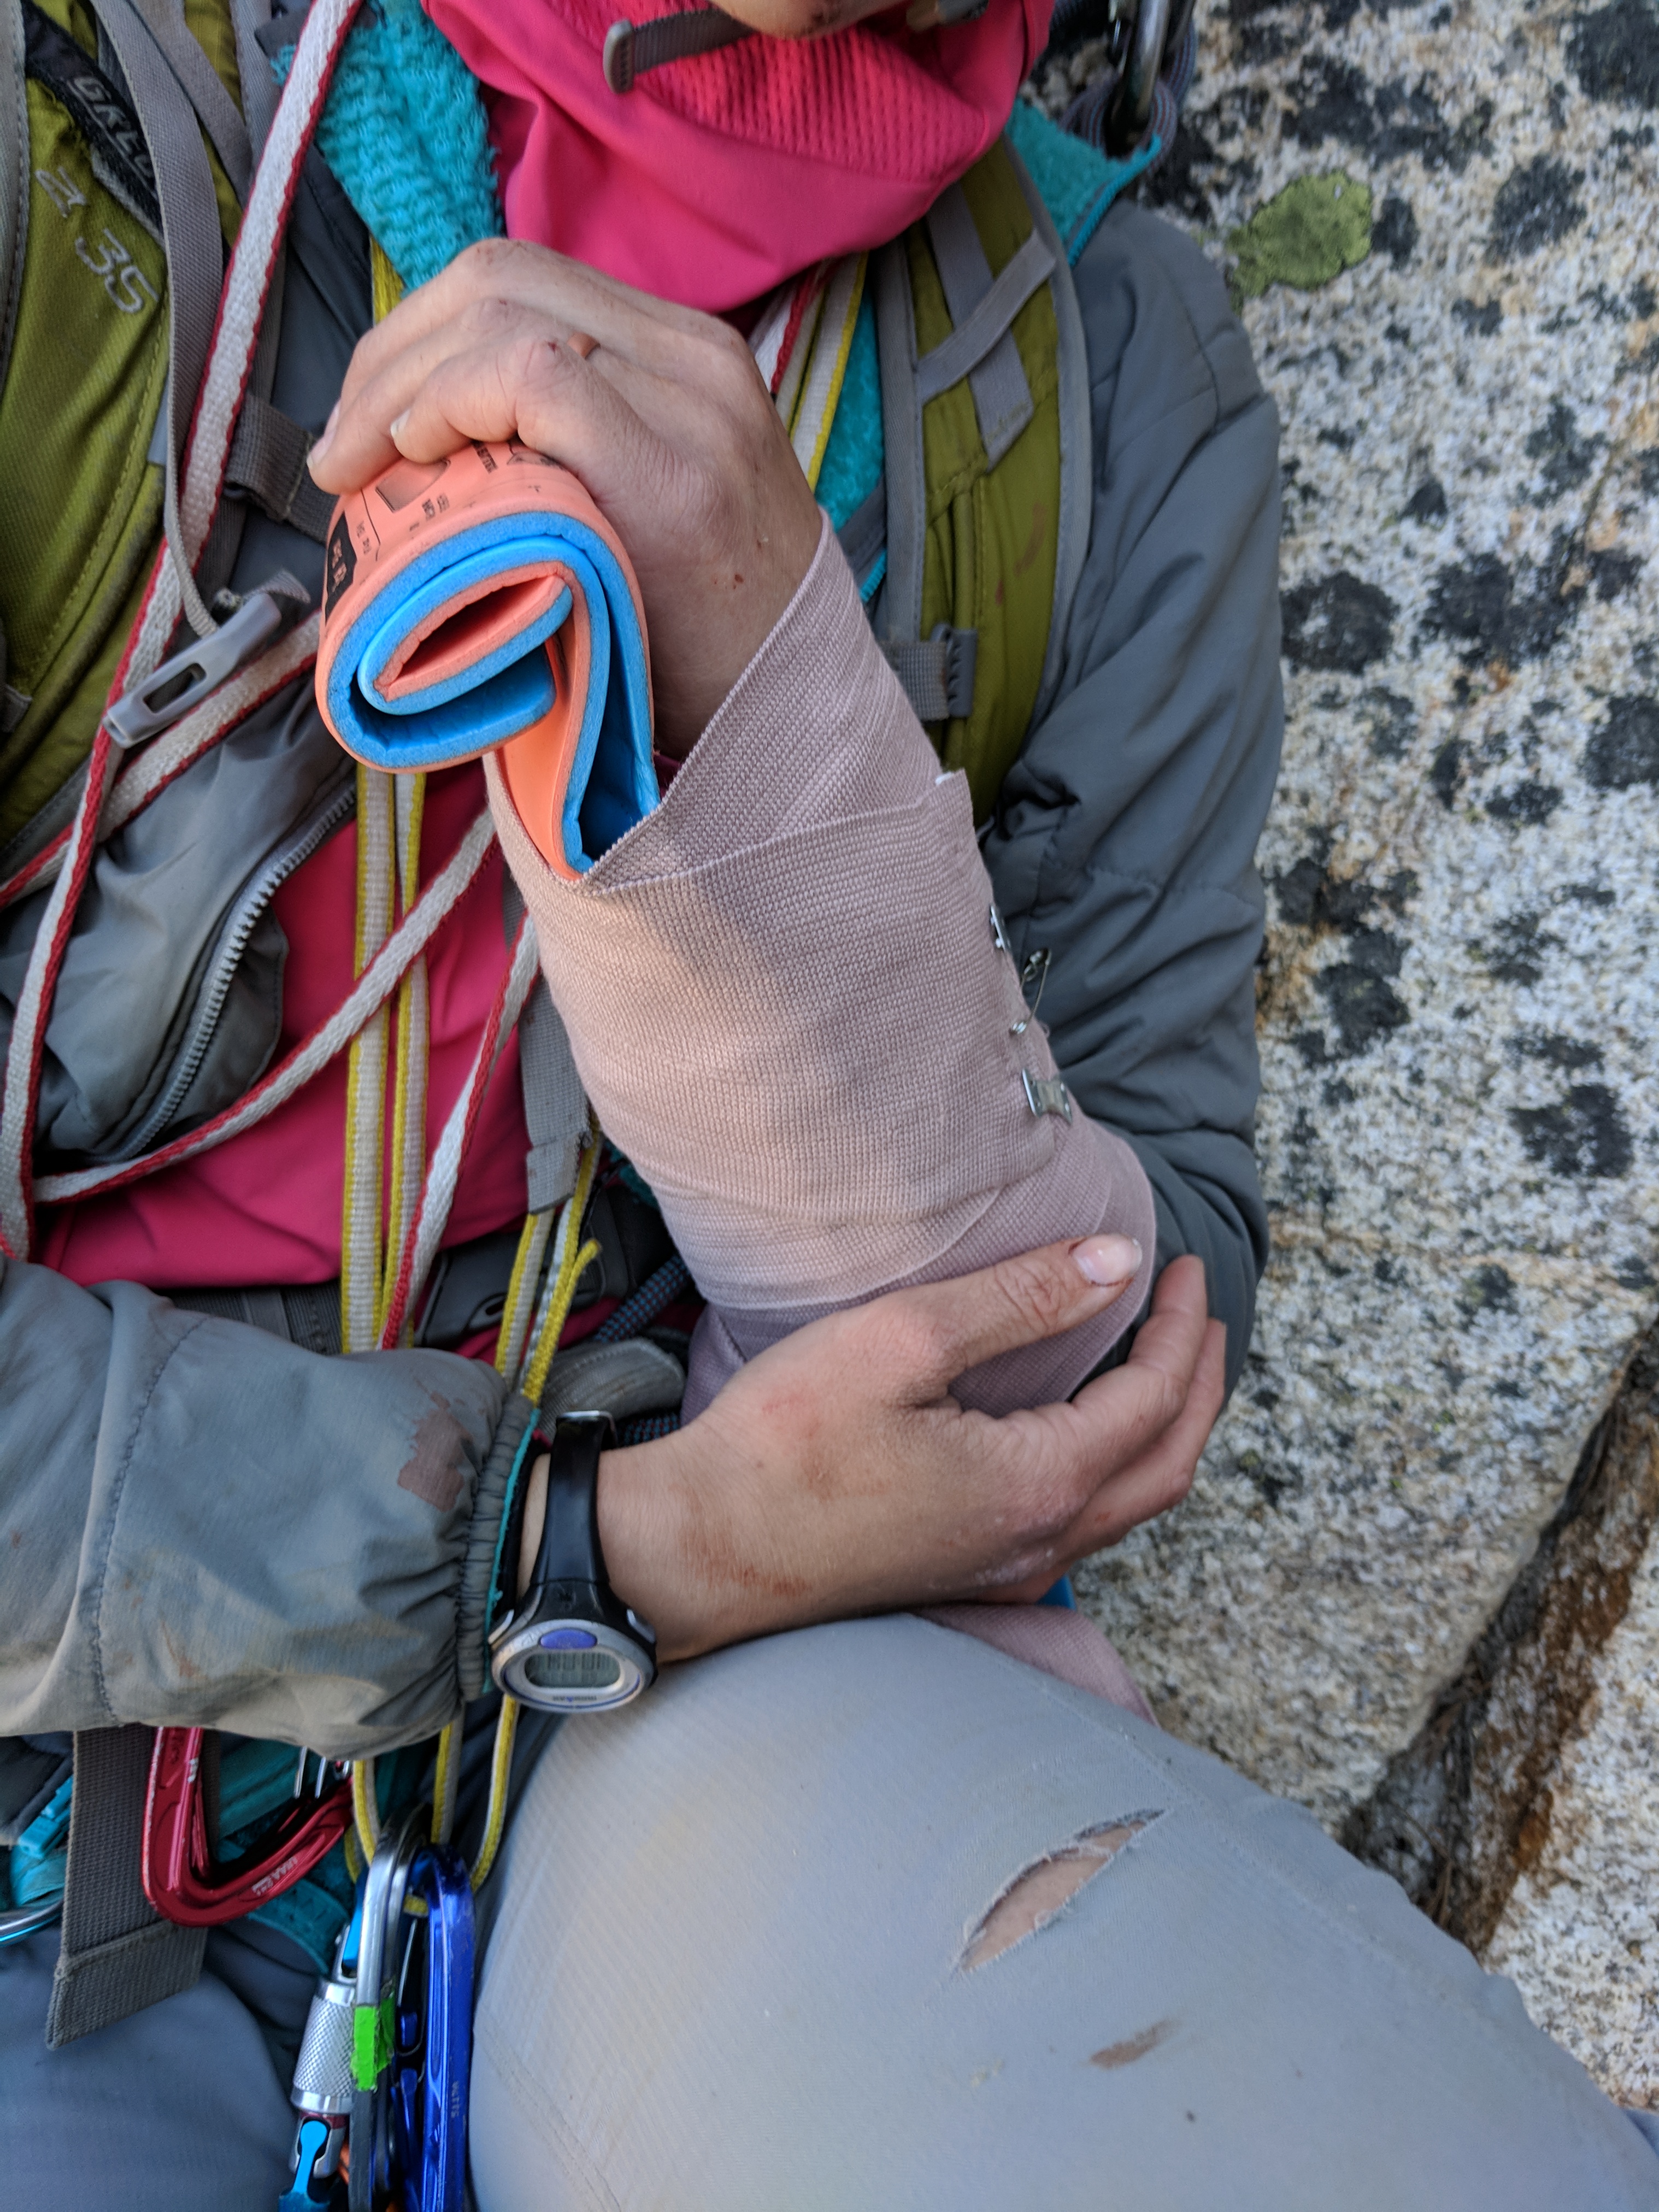
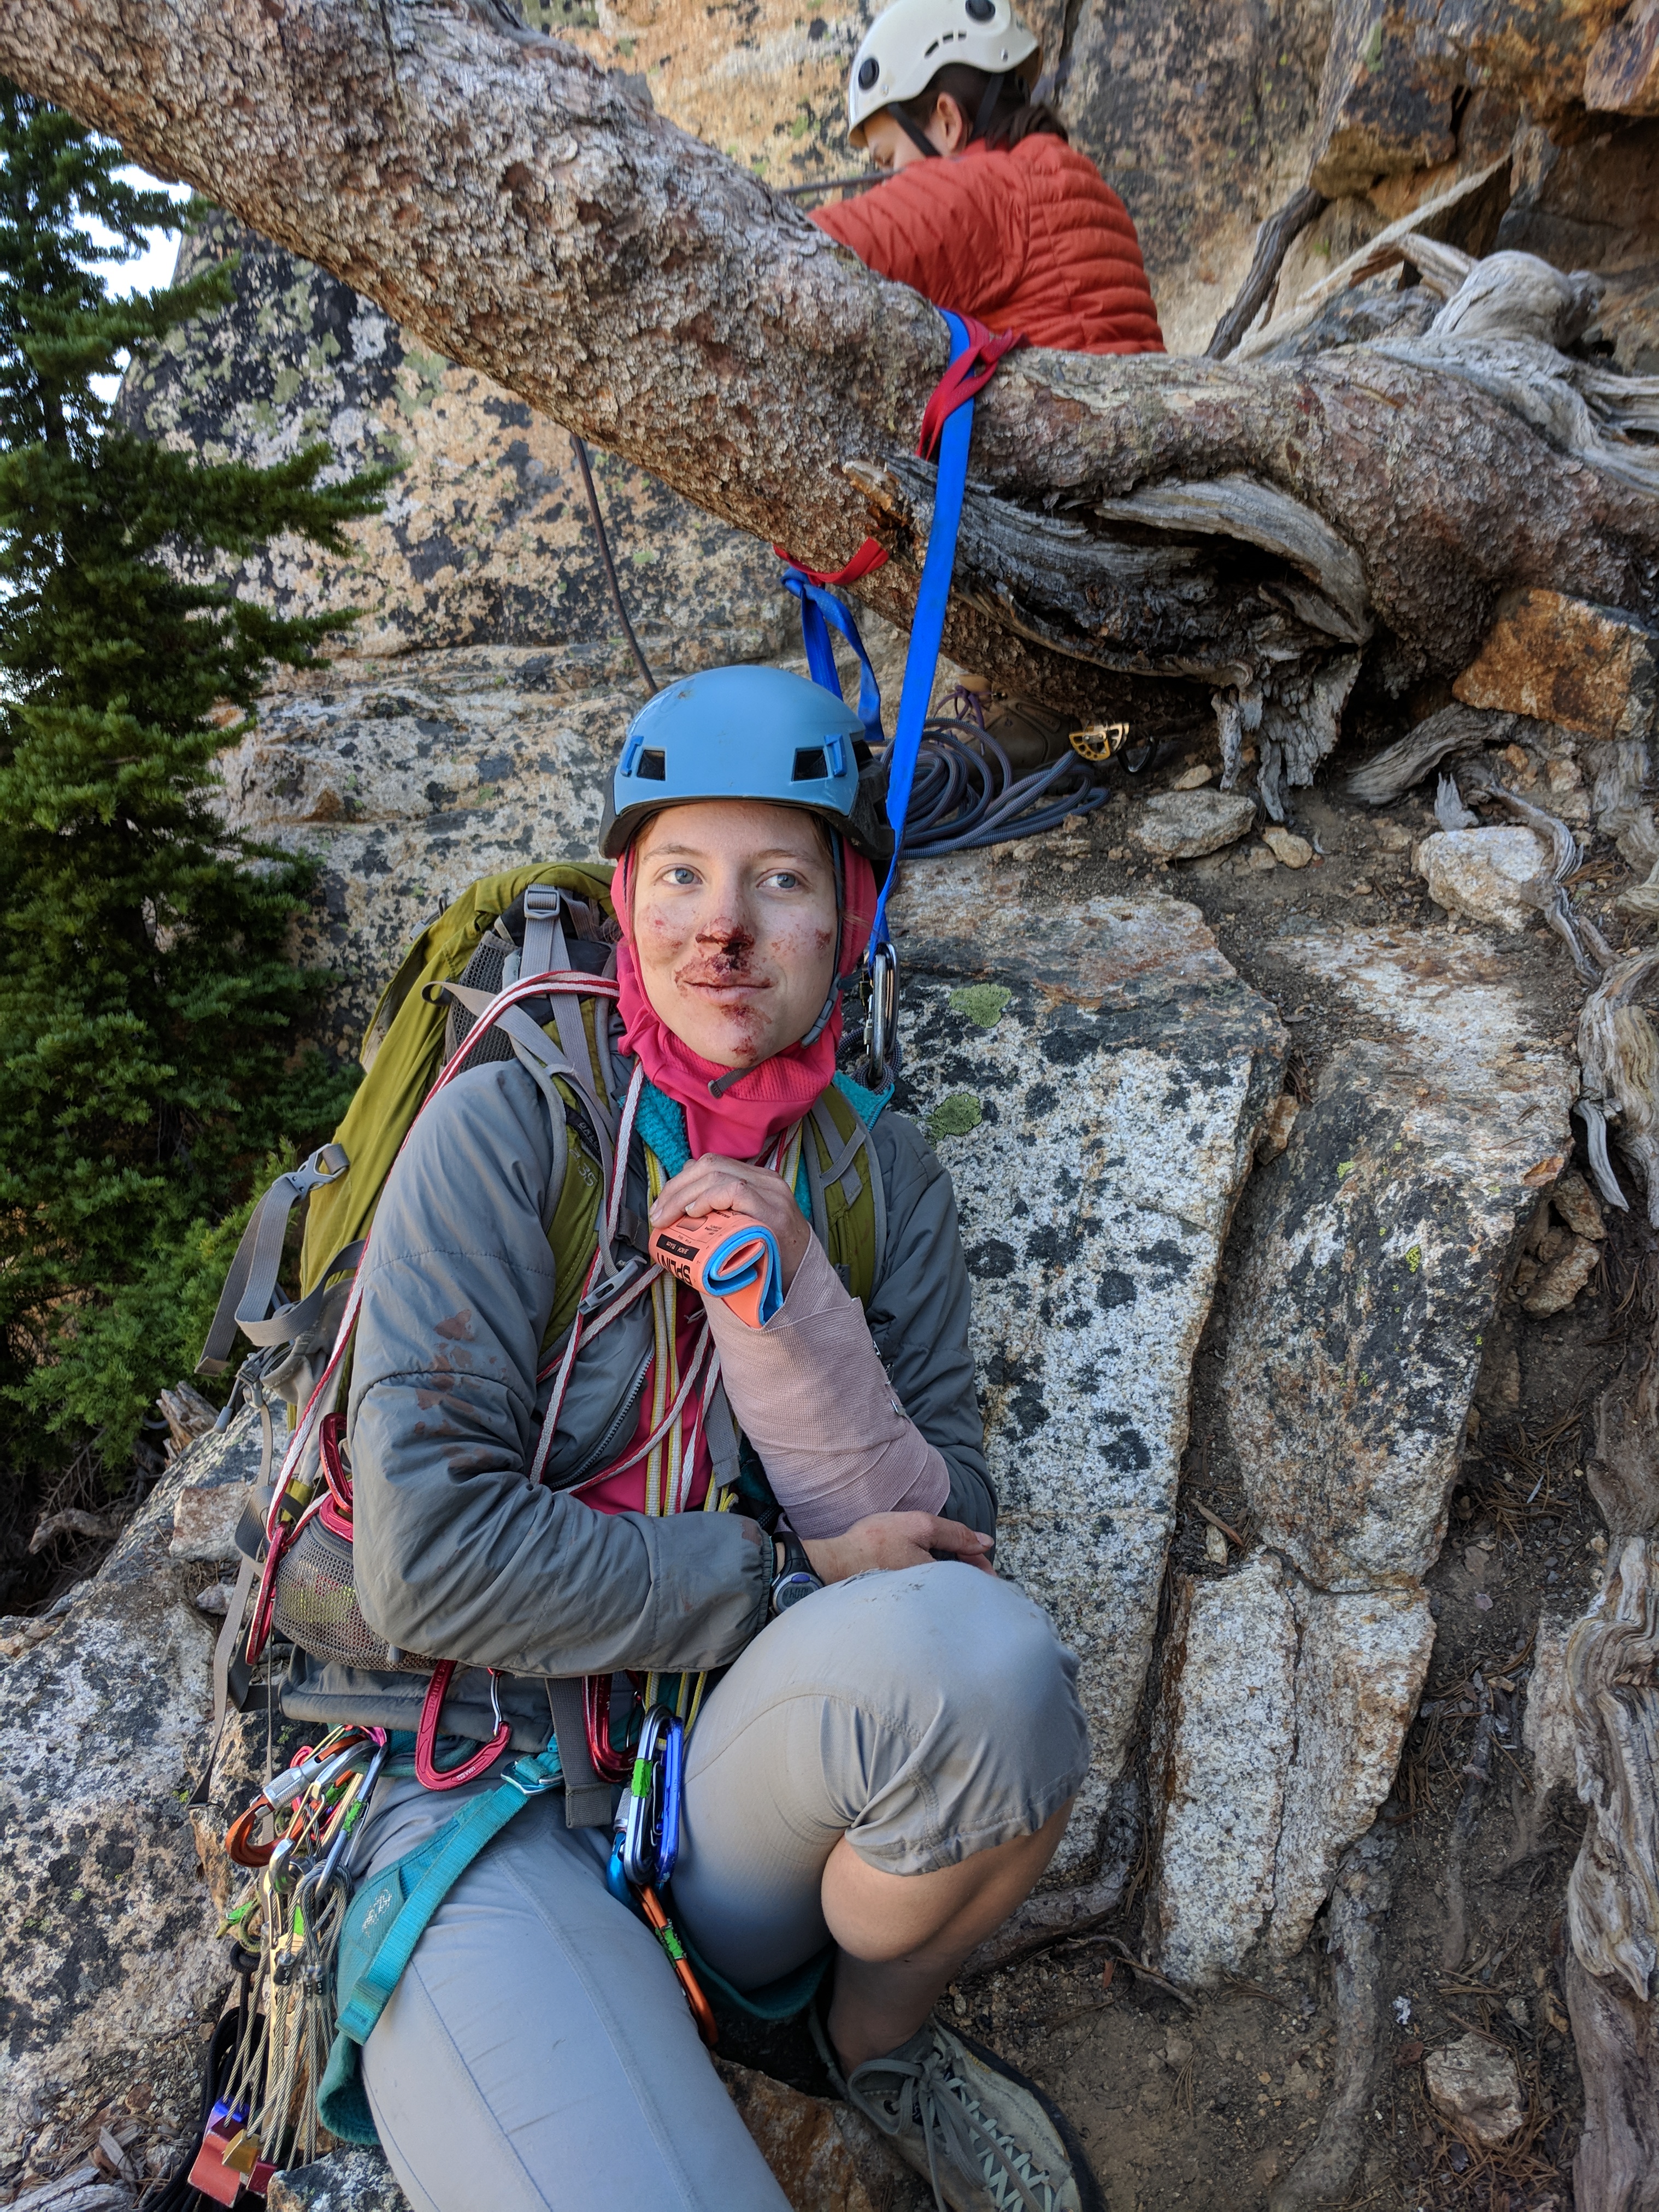
I had a SAM splint in my first aid pack, but hadn’t put it on Alexis’ wrist yet, since I wasn’t very confident in my splinting skills. Once she was conscious, I asked her whether she wanted me to put it on. Luckily, I had one of these splints put on myself, when I broke my wrist, and I’ve also seen other people practice putting them on, so I had a decent idea what I was doing, and I put it on decently well. It probably would have been better to put the splint on while she was still semi-unconscious so she didn’t have to experience as much discomfort, but my lack of confidence in my first aid skills meant that I wanted to wait to have a second opinion when placing the splint.

The splint on Alexis’ broken left wrist
Alexis sitting upright as we’re preparing for the helicopter to drop the first Navy person off

Before the fall, we saw another group arrive at the trailhead (you can see the road/trailhead from the cliff), and this group finally reached us at this time.

They were a group of 4 with one person that was ex-marine. He helped wrap my leg gash (I postponed this since I was busy with other things, and it wasn’t actually bleeding), and they gave some energy goo snacks to Alexis which were great since she couldn’t eat with her teeth.

After some more time, we got a response that helicopter will likely be coming, but no ETA.

The other group decided to send down two of their people to communicate with any help that came to the road. We gave them our second walkie talkie (we’ve been using walkie talkies on rock climbs, they work so much better than yelling!), so that we could communicate with them.

After more time, they arrived at the cars, where the sherrif arrived moments ago. They either used our radio or the sherrif’s radio to communicate with us, which was so helpful. They told us that a helicopter would be coming overhead in 10 minutes.

The Navy helicopter from Whidby Island came in and dropped one person to come check us out. They then dropped another person after the first person requested another.

They were classic Navy men, large, built, certainly makes you feel safe.

They rigged the backpacks up to haul, and then took me up in the stretcher (due to concern about my leg), and finally Alexis up in the chest harness.

The helicopter taking me up in the litter

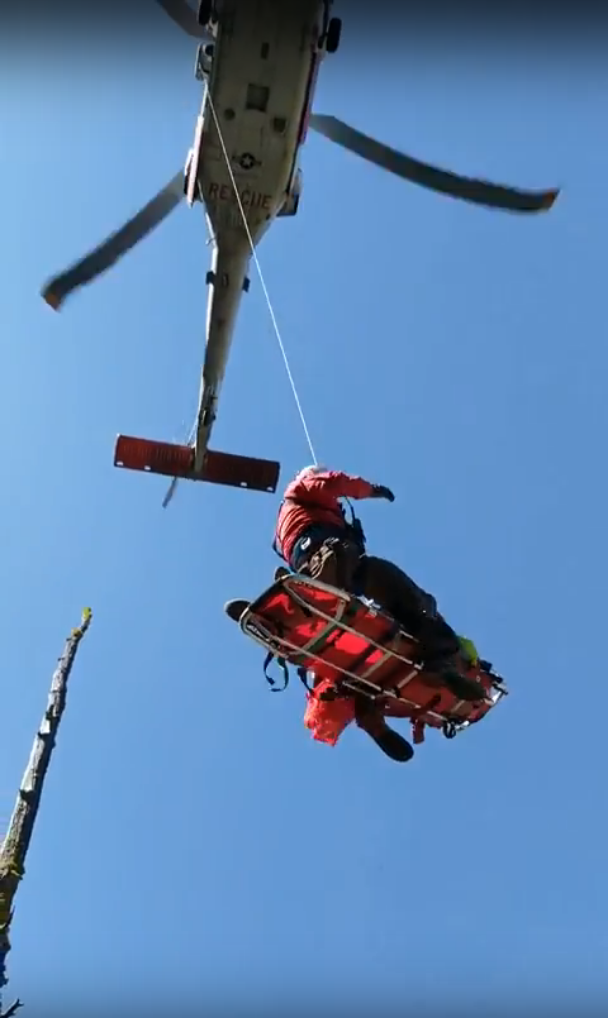
The helicopter was noisy as ever, but it was so quick getting to UW Hospital! Maybe like 40 minutes! I never want to do that 3:30 hour drive again!

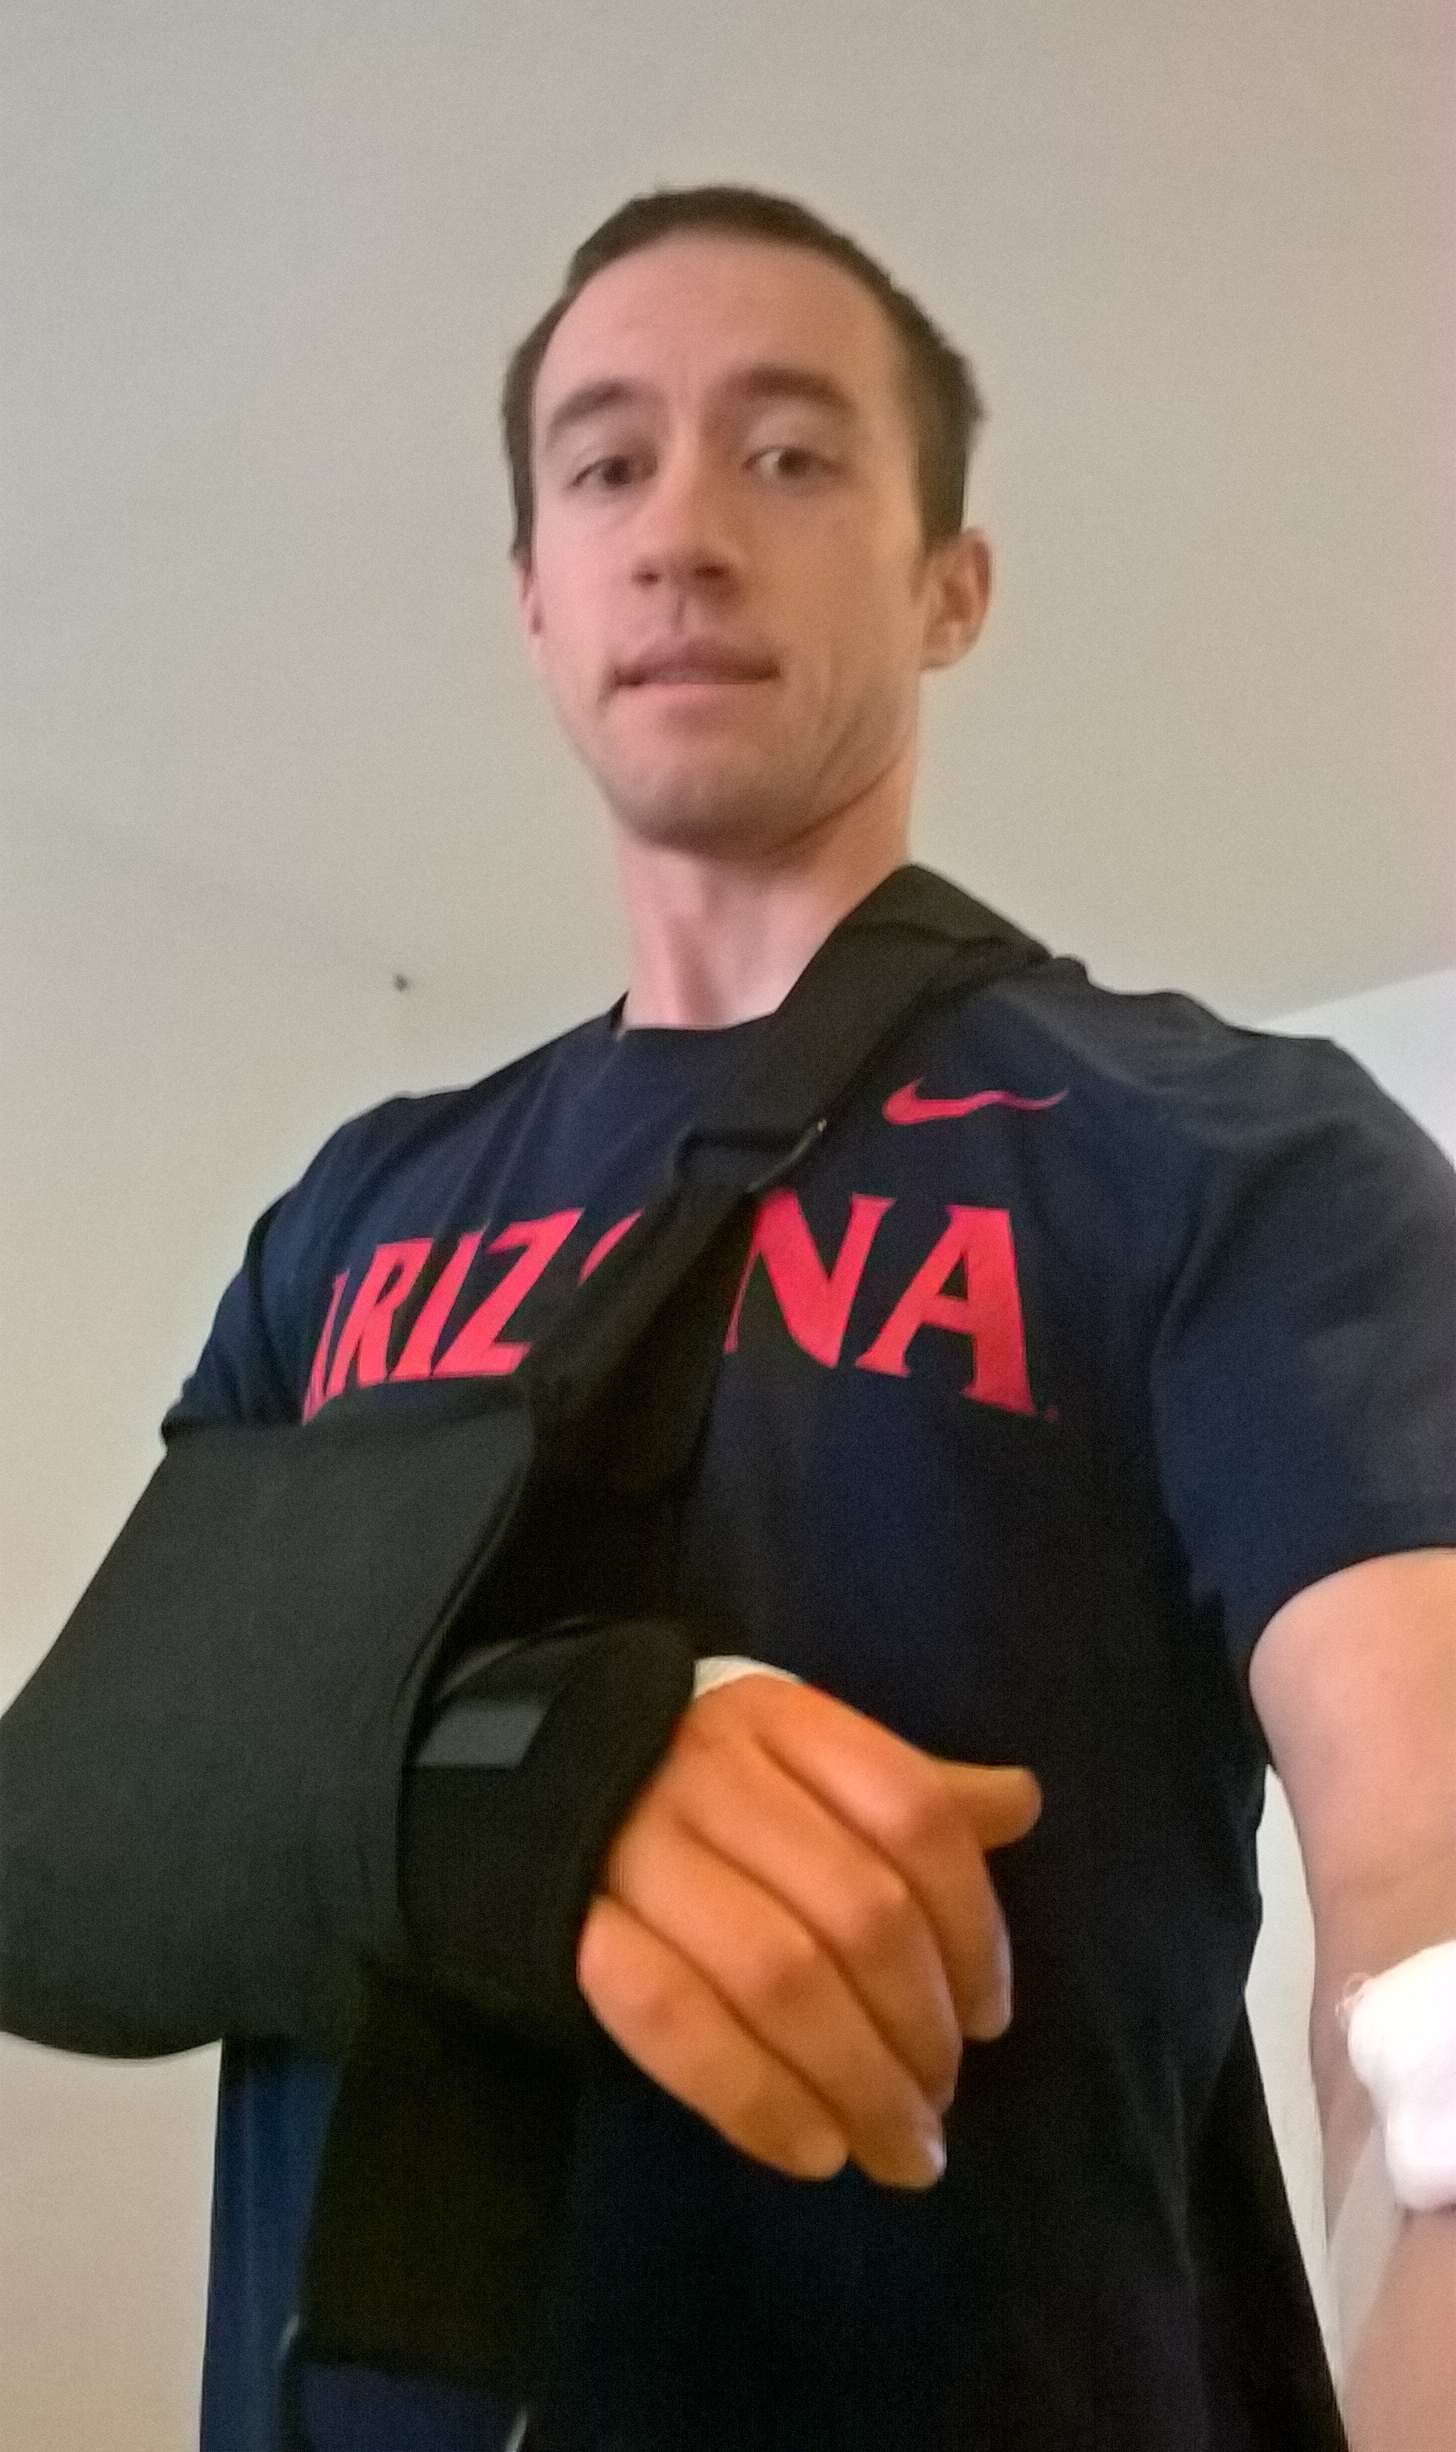
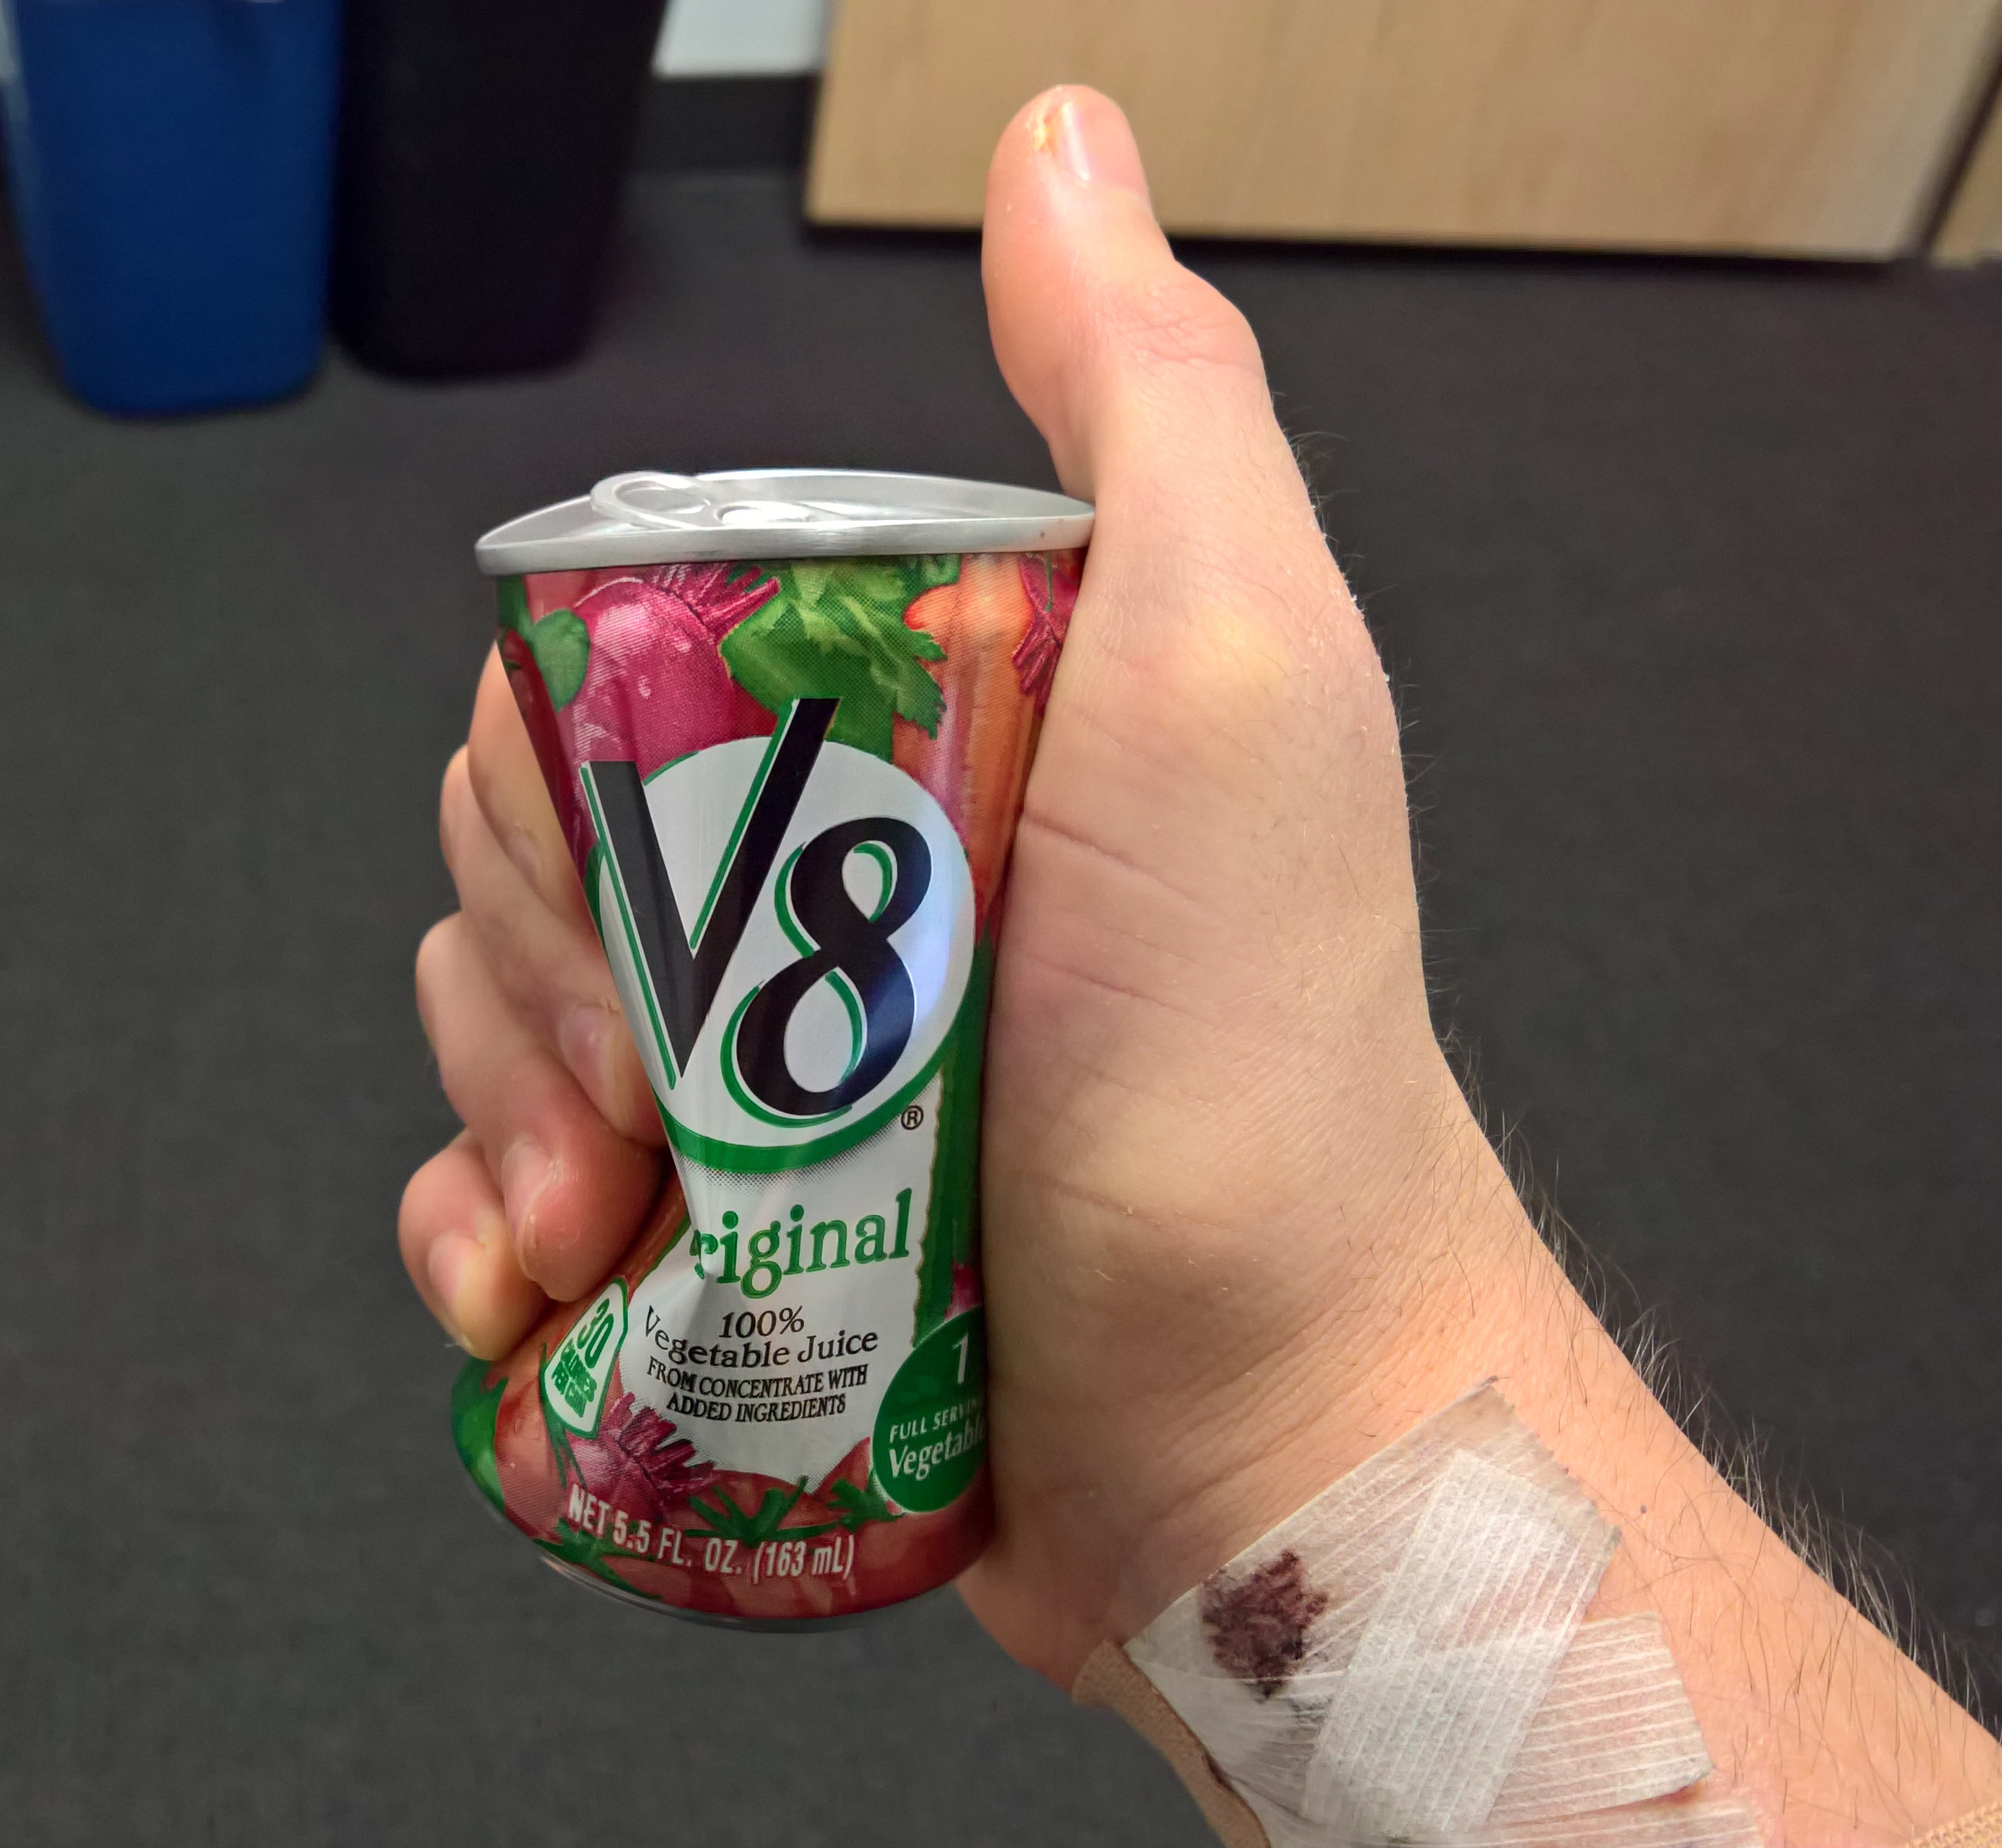
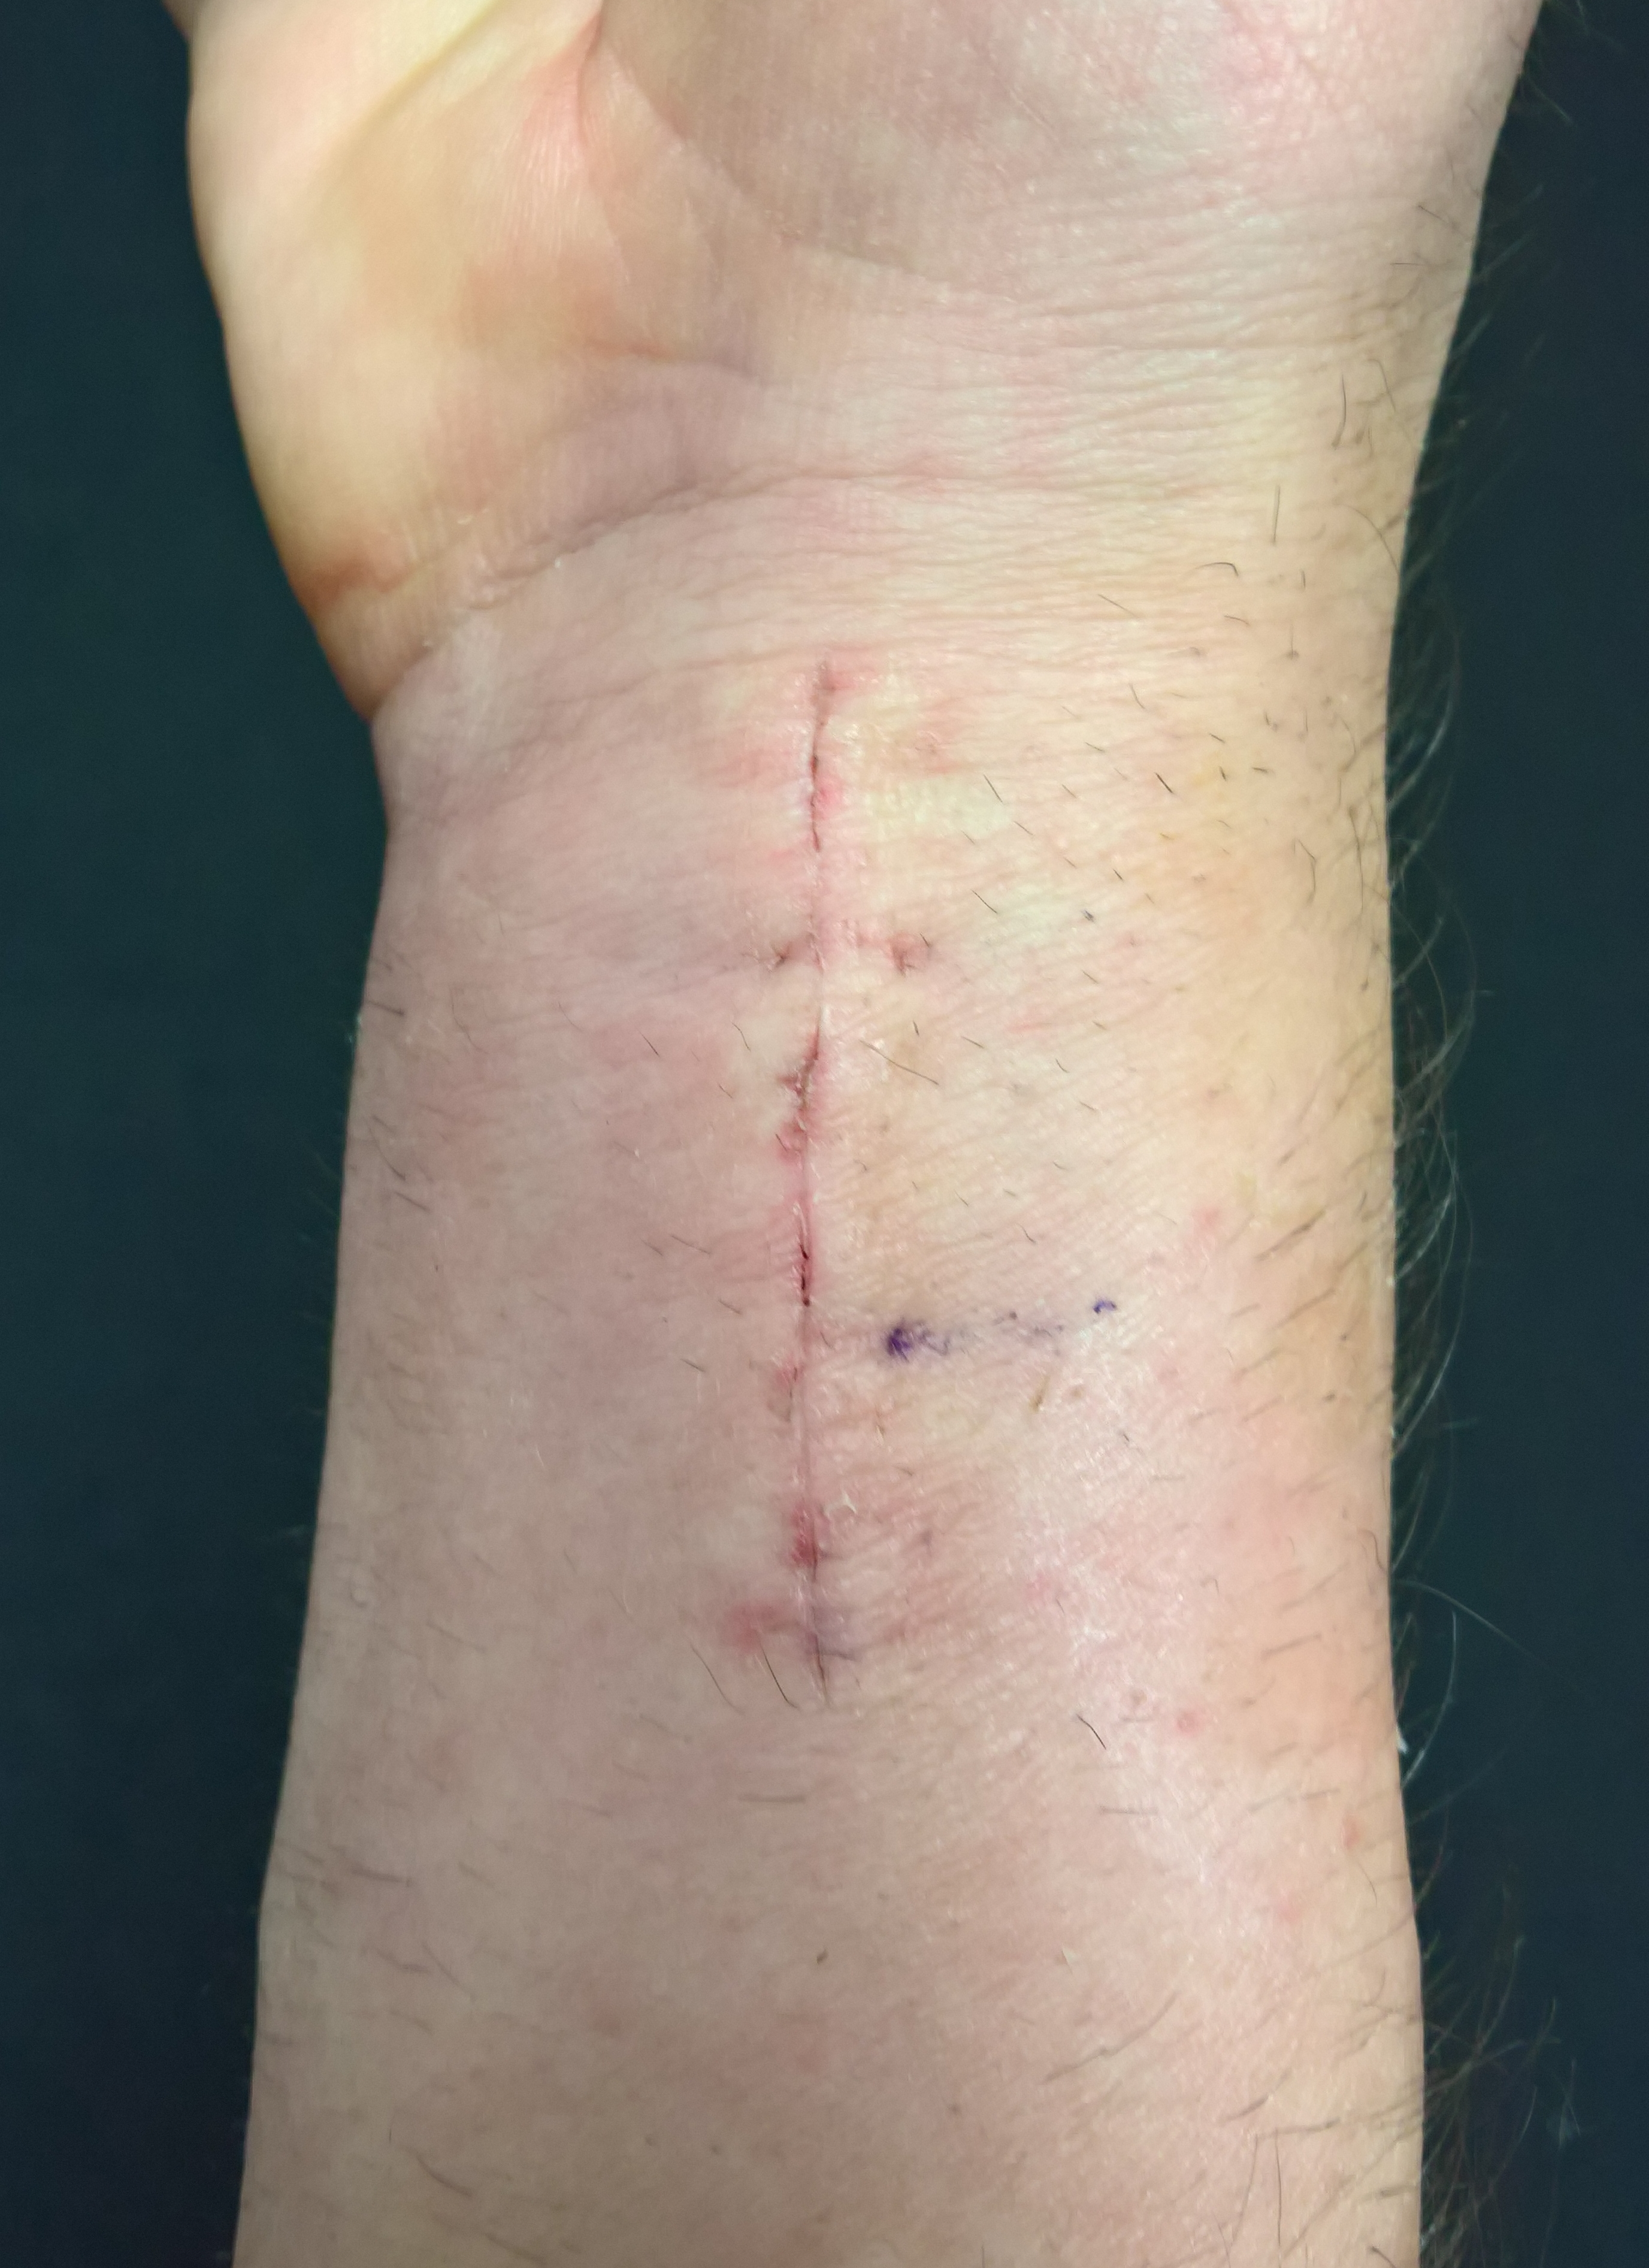
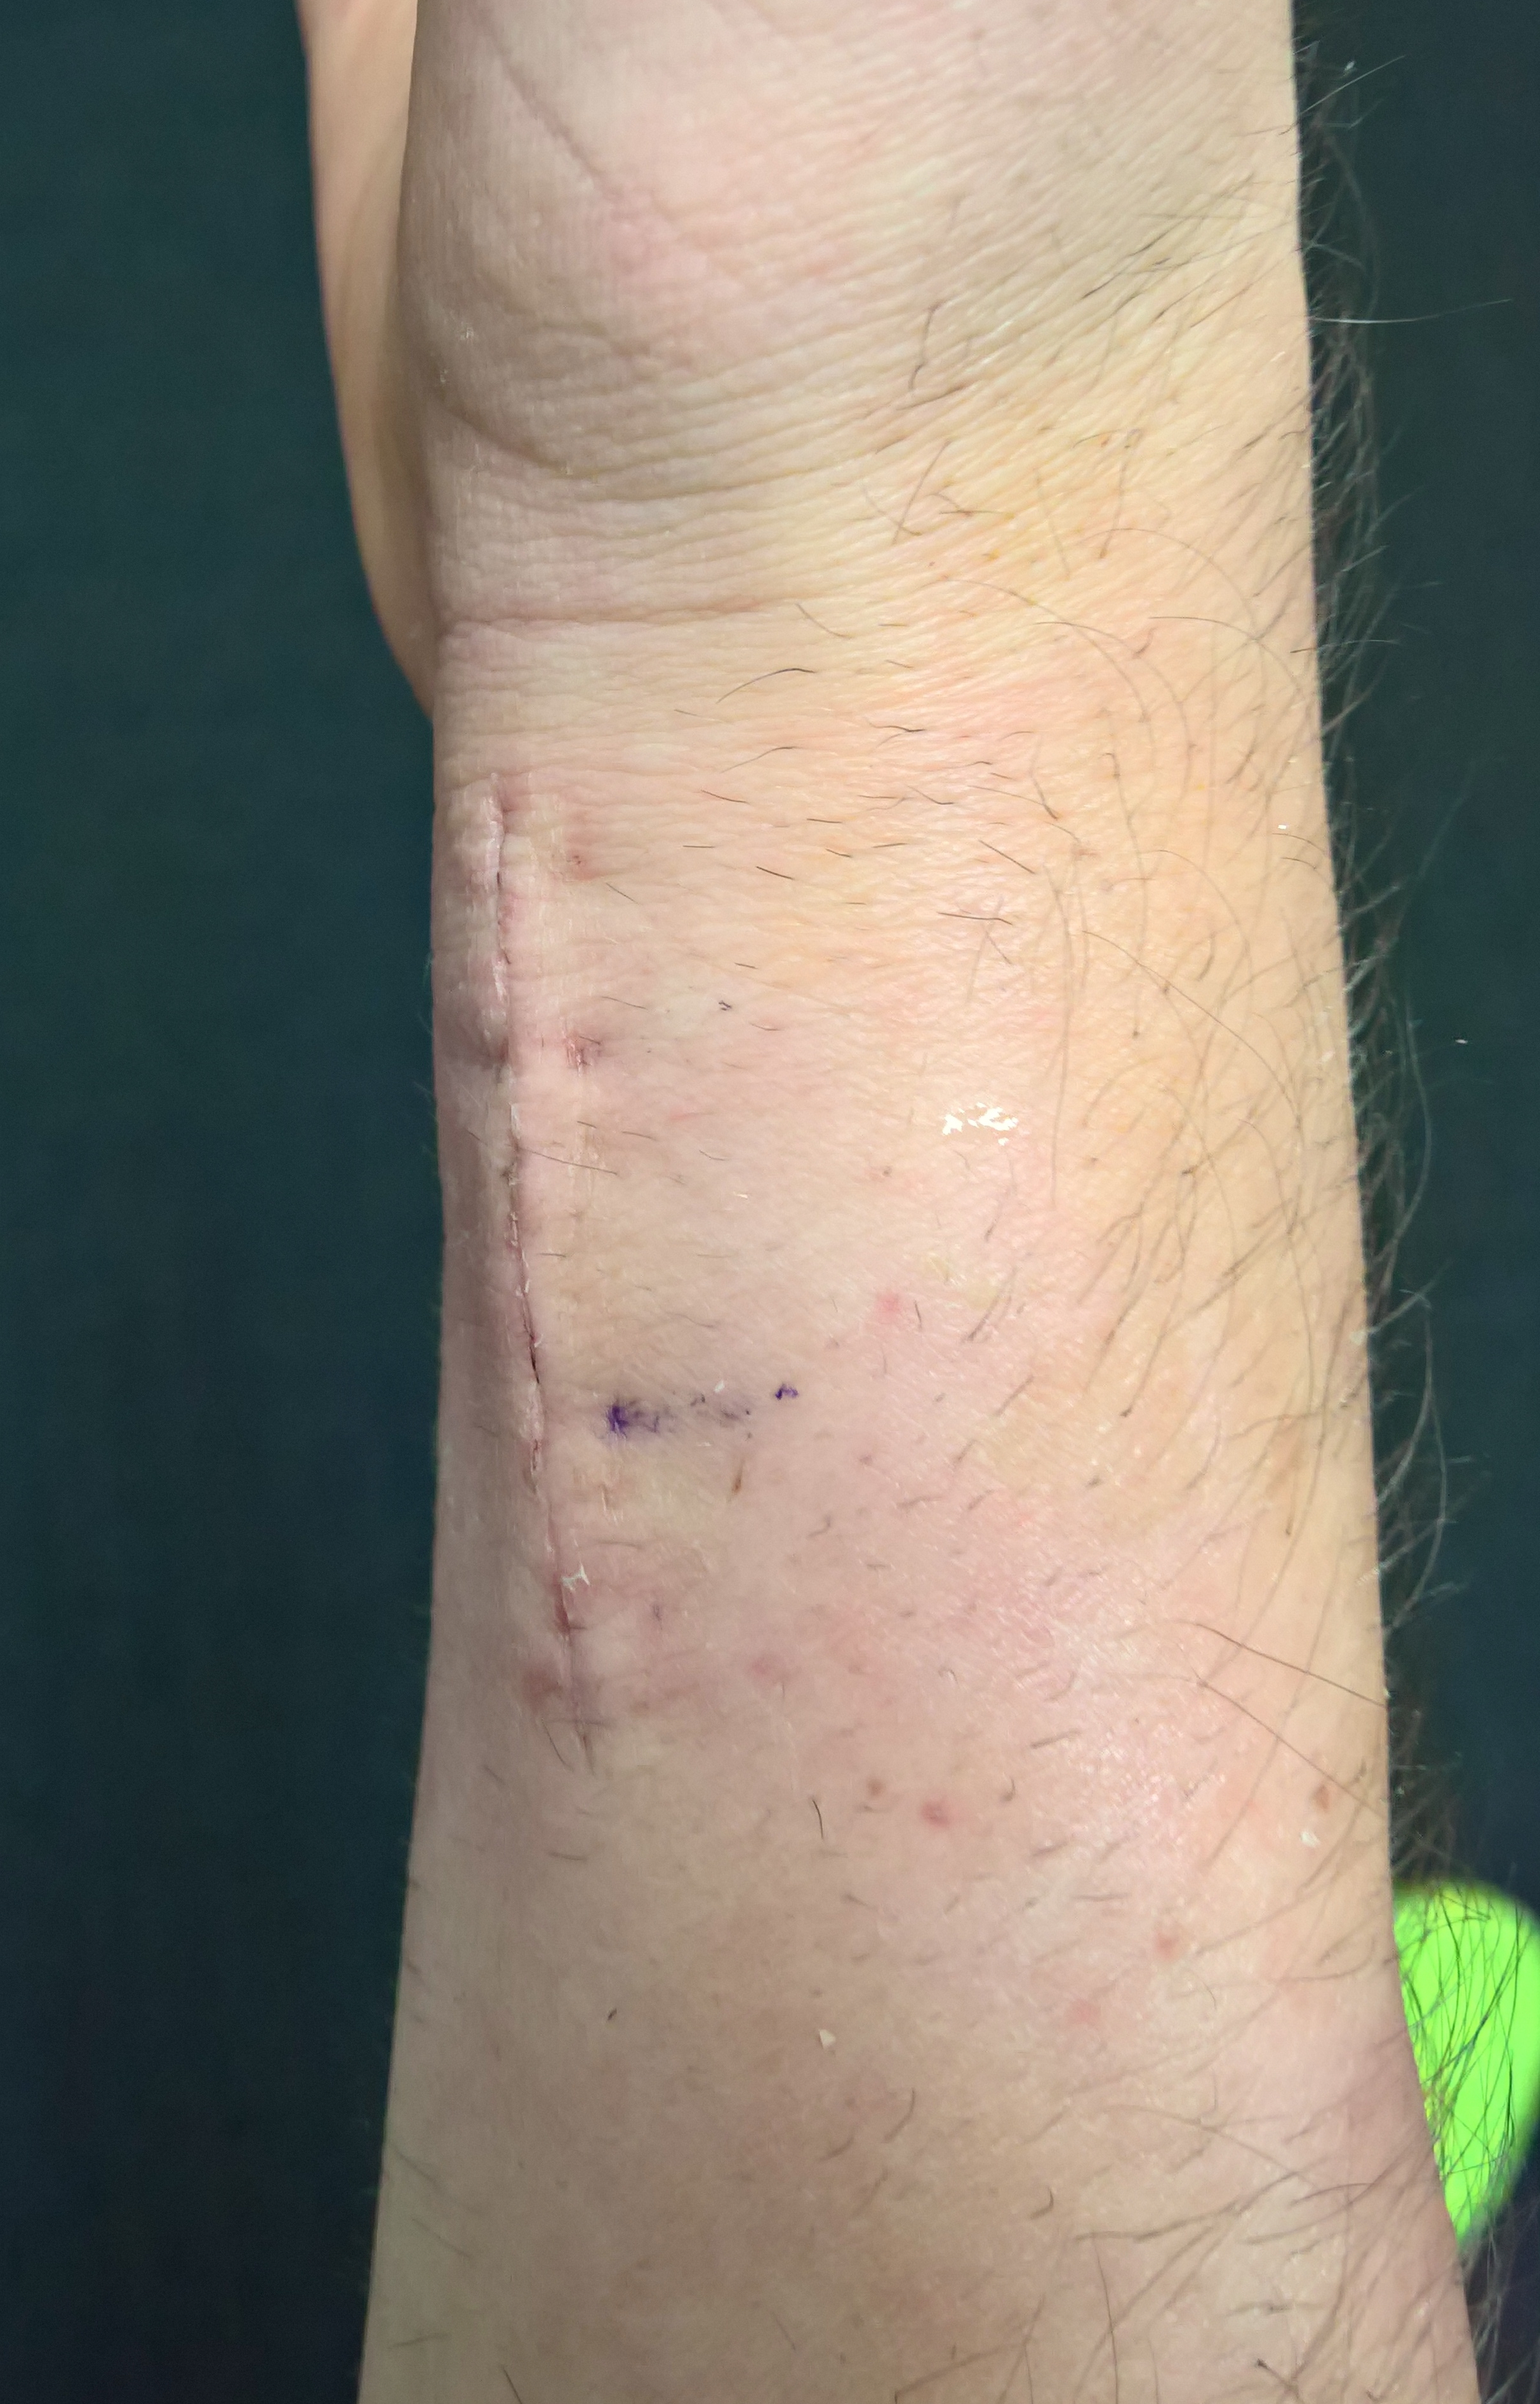
In the hospital, we found out that Alexis broke her larger wrist bone. I actually didn’t break my leg, just severe muscle bruising (and later I found out that my knee also probably had some ligament/tendon damage, possibly the meniscus). For the first few days, I could hardly bend my knee.

Being thankful

Looking back on everything, all we can really say is that we were thankful for all the good luck that we had. We’re thankful we managed to stop falling before the 50+ foot cliff. We’re thankful the weather was clear and a helicopter could come rescue us. We’re thankful the group of 4 was able to help us by standing by our sides and keeping us company. We’re thankful that group were able to drive our car back to Seattle for us. We’re thankful that we have excellent health insurance, so that finances were never a concern when going to the hospital. We’re thankful that Seattle has a great trauma hospital. We’re thankful that we don’t have any permanent injuries!

Learning lessons

As with everything, there are so many lessons to be learned.

We did a lot of things right…

  • We had a two-way communication PLB (Garmin InReach) so we could send SOS outside of cell reception. Communicating with SOS services (telling them our injuries, etc) is critical, way better than a one-way device that can’t send messages.
  • We had a quality first-aid pack. I was able to splint Alexis’ wrist. If my thigh cut had been deeper, I had deep tissue wound supplies, even a quick-clot pack.
  • We had walkie-talkies, great for communicating with local emergency services.
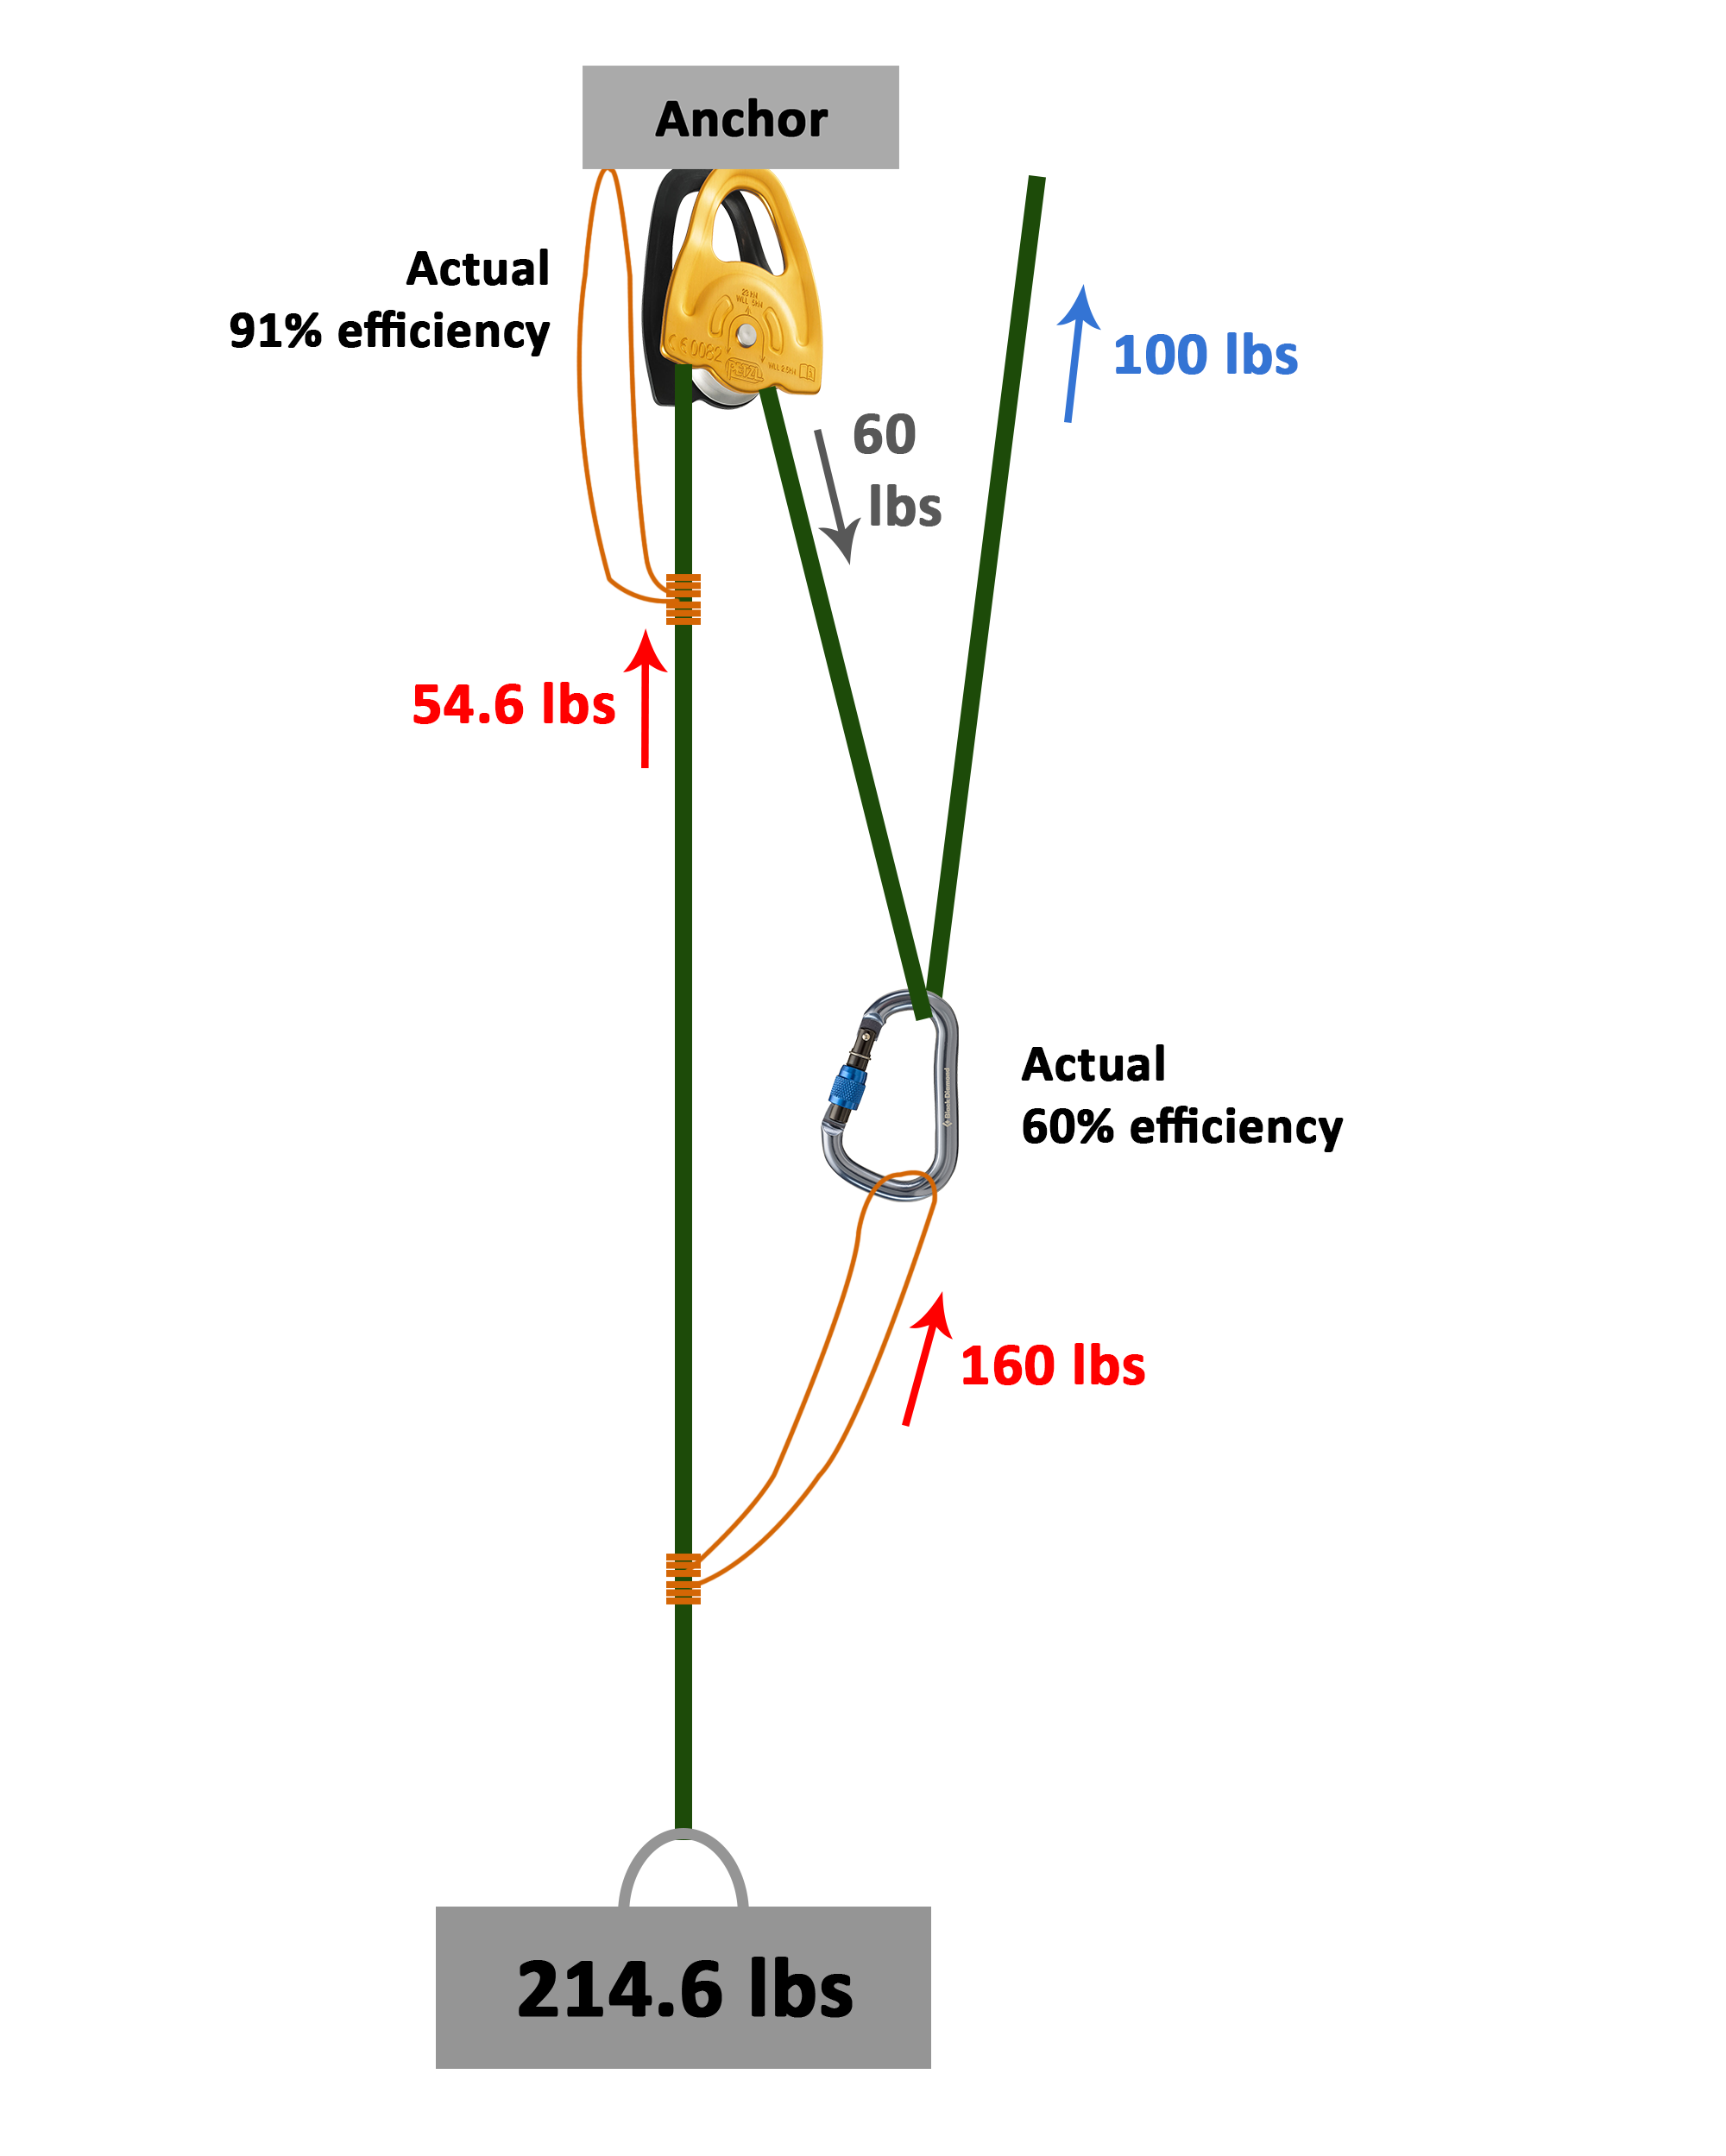
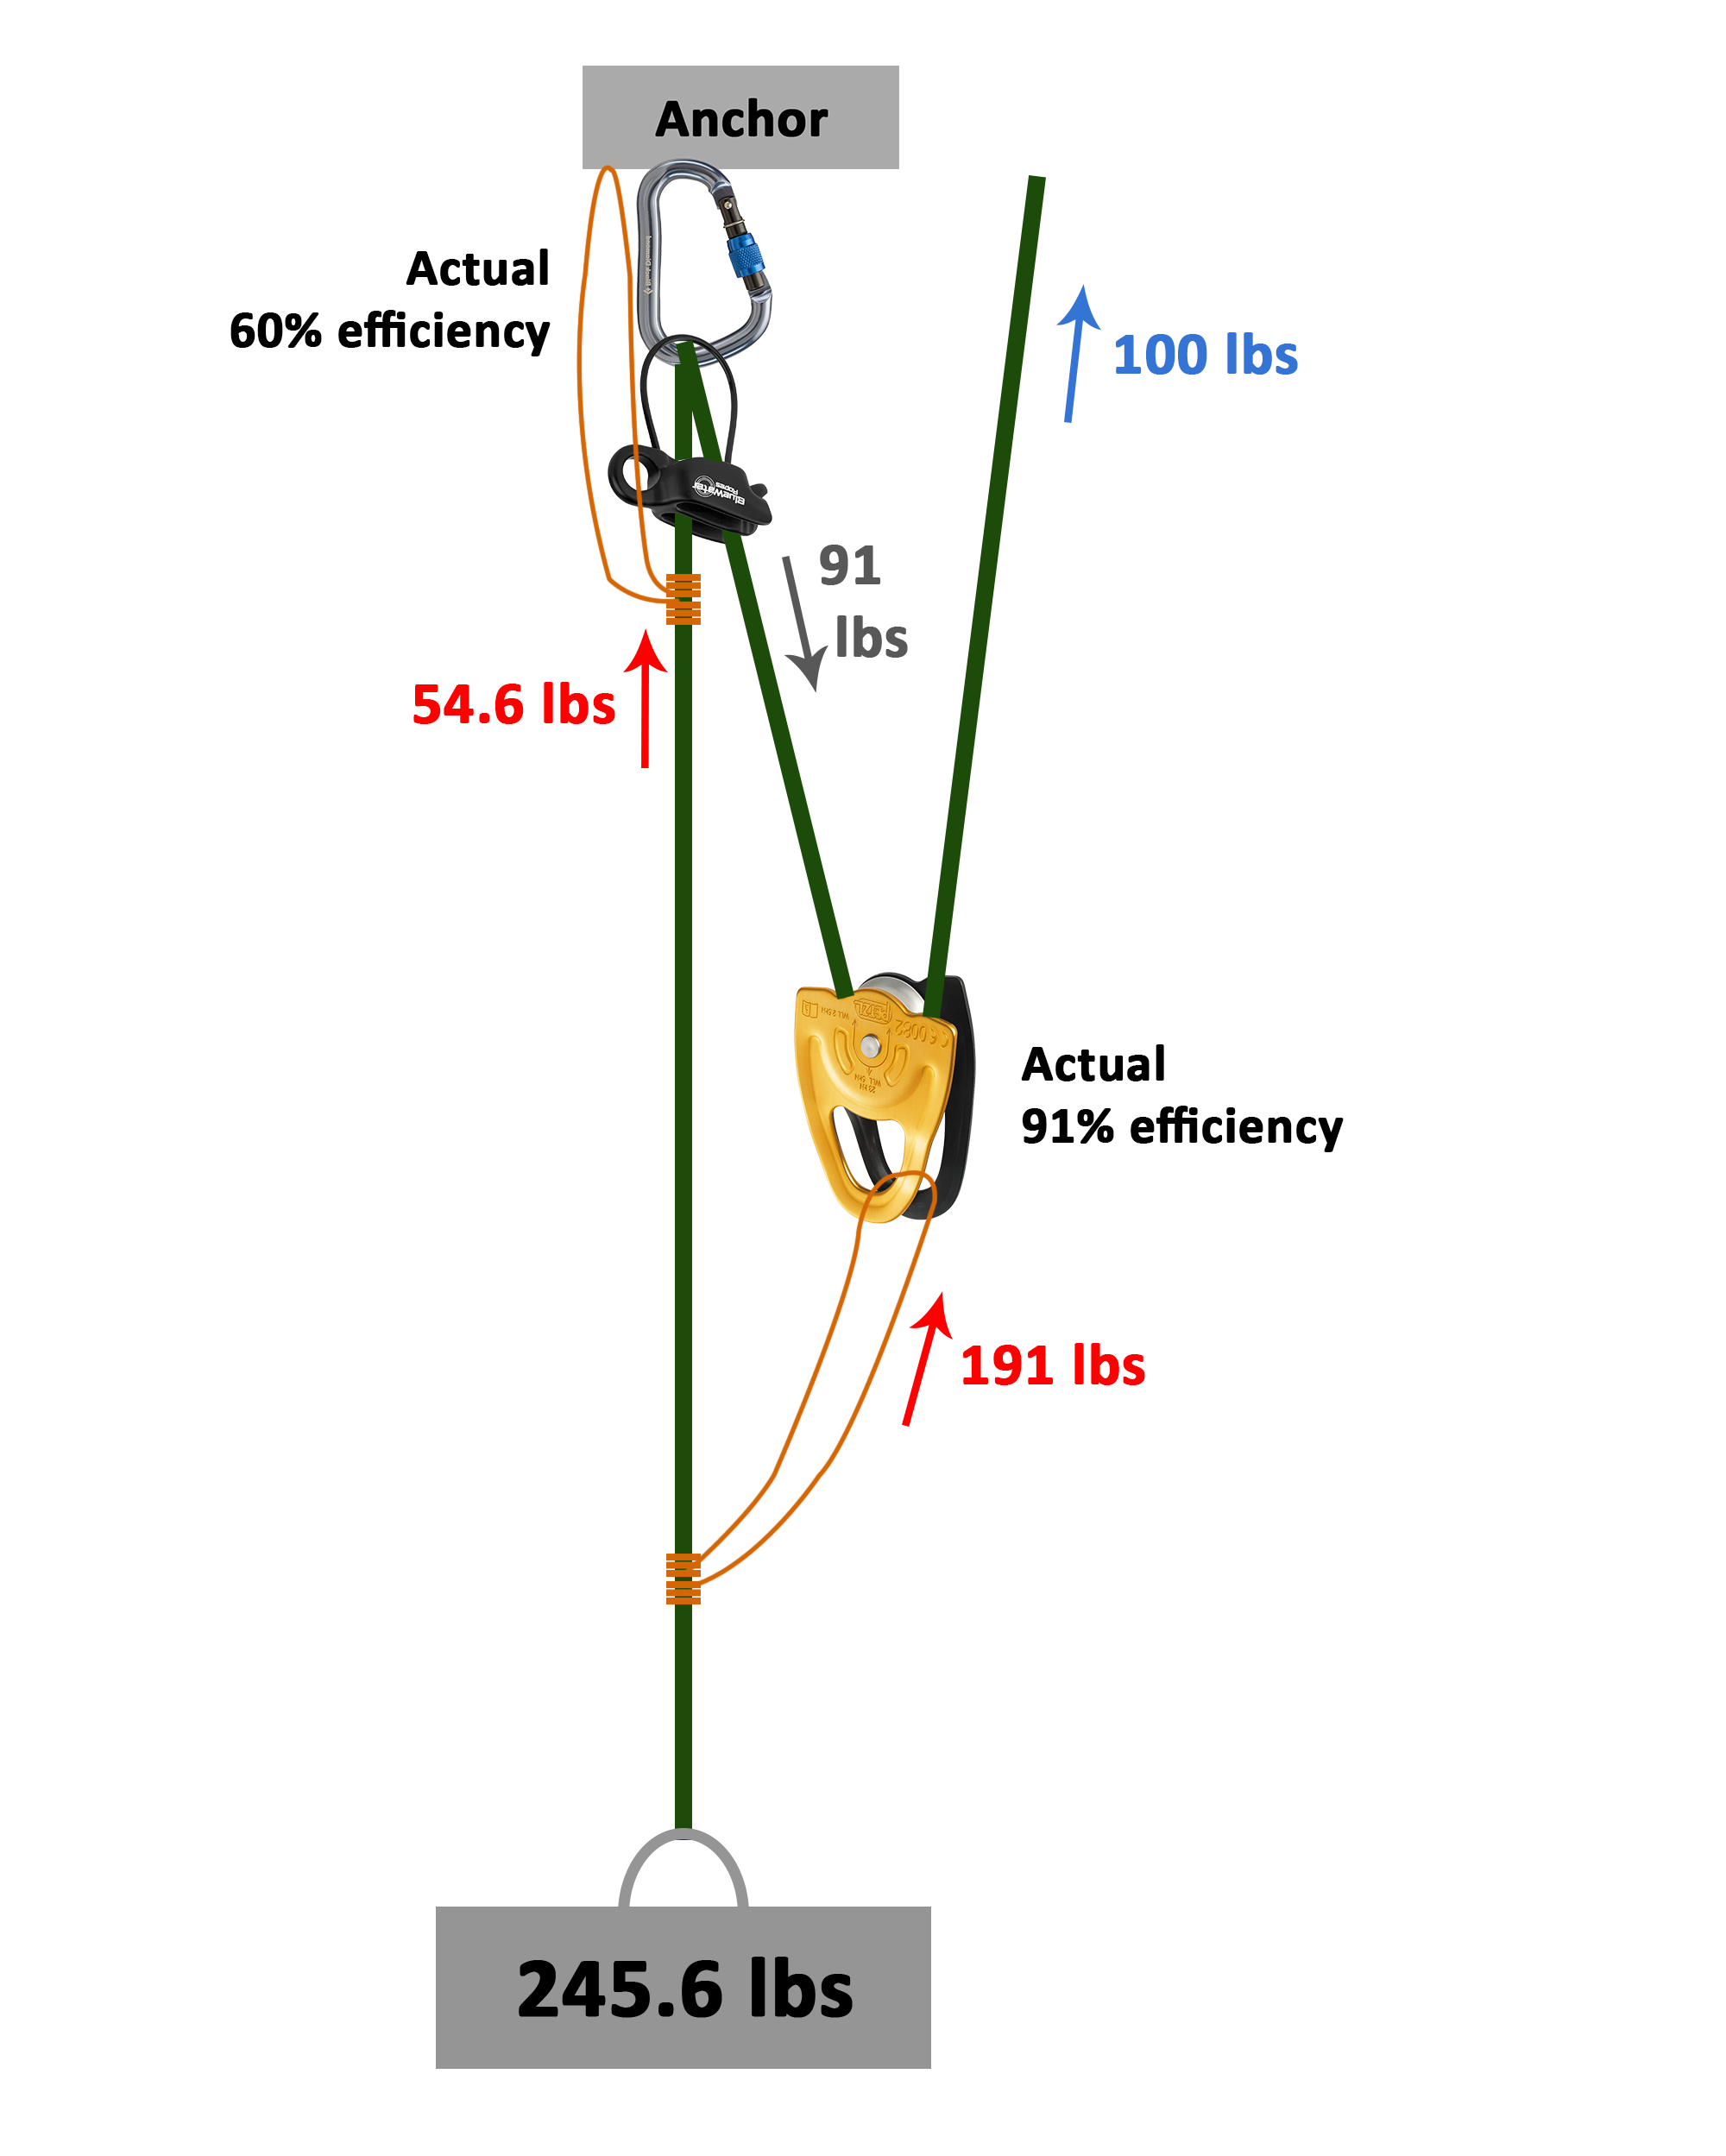
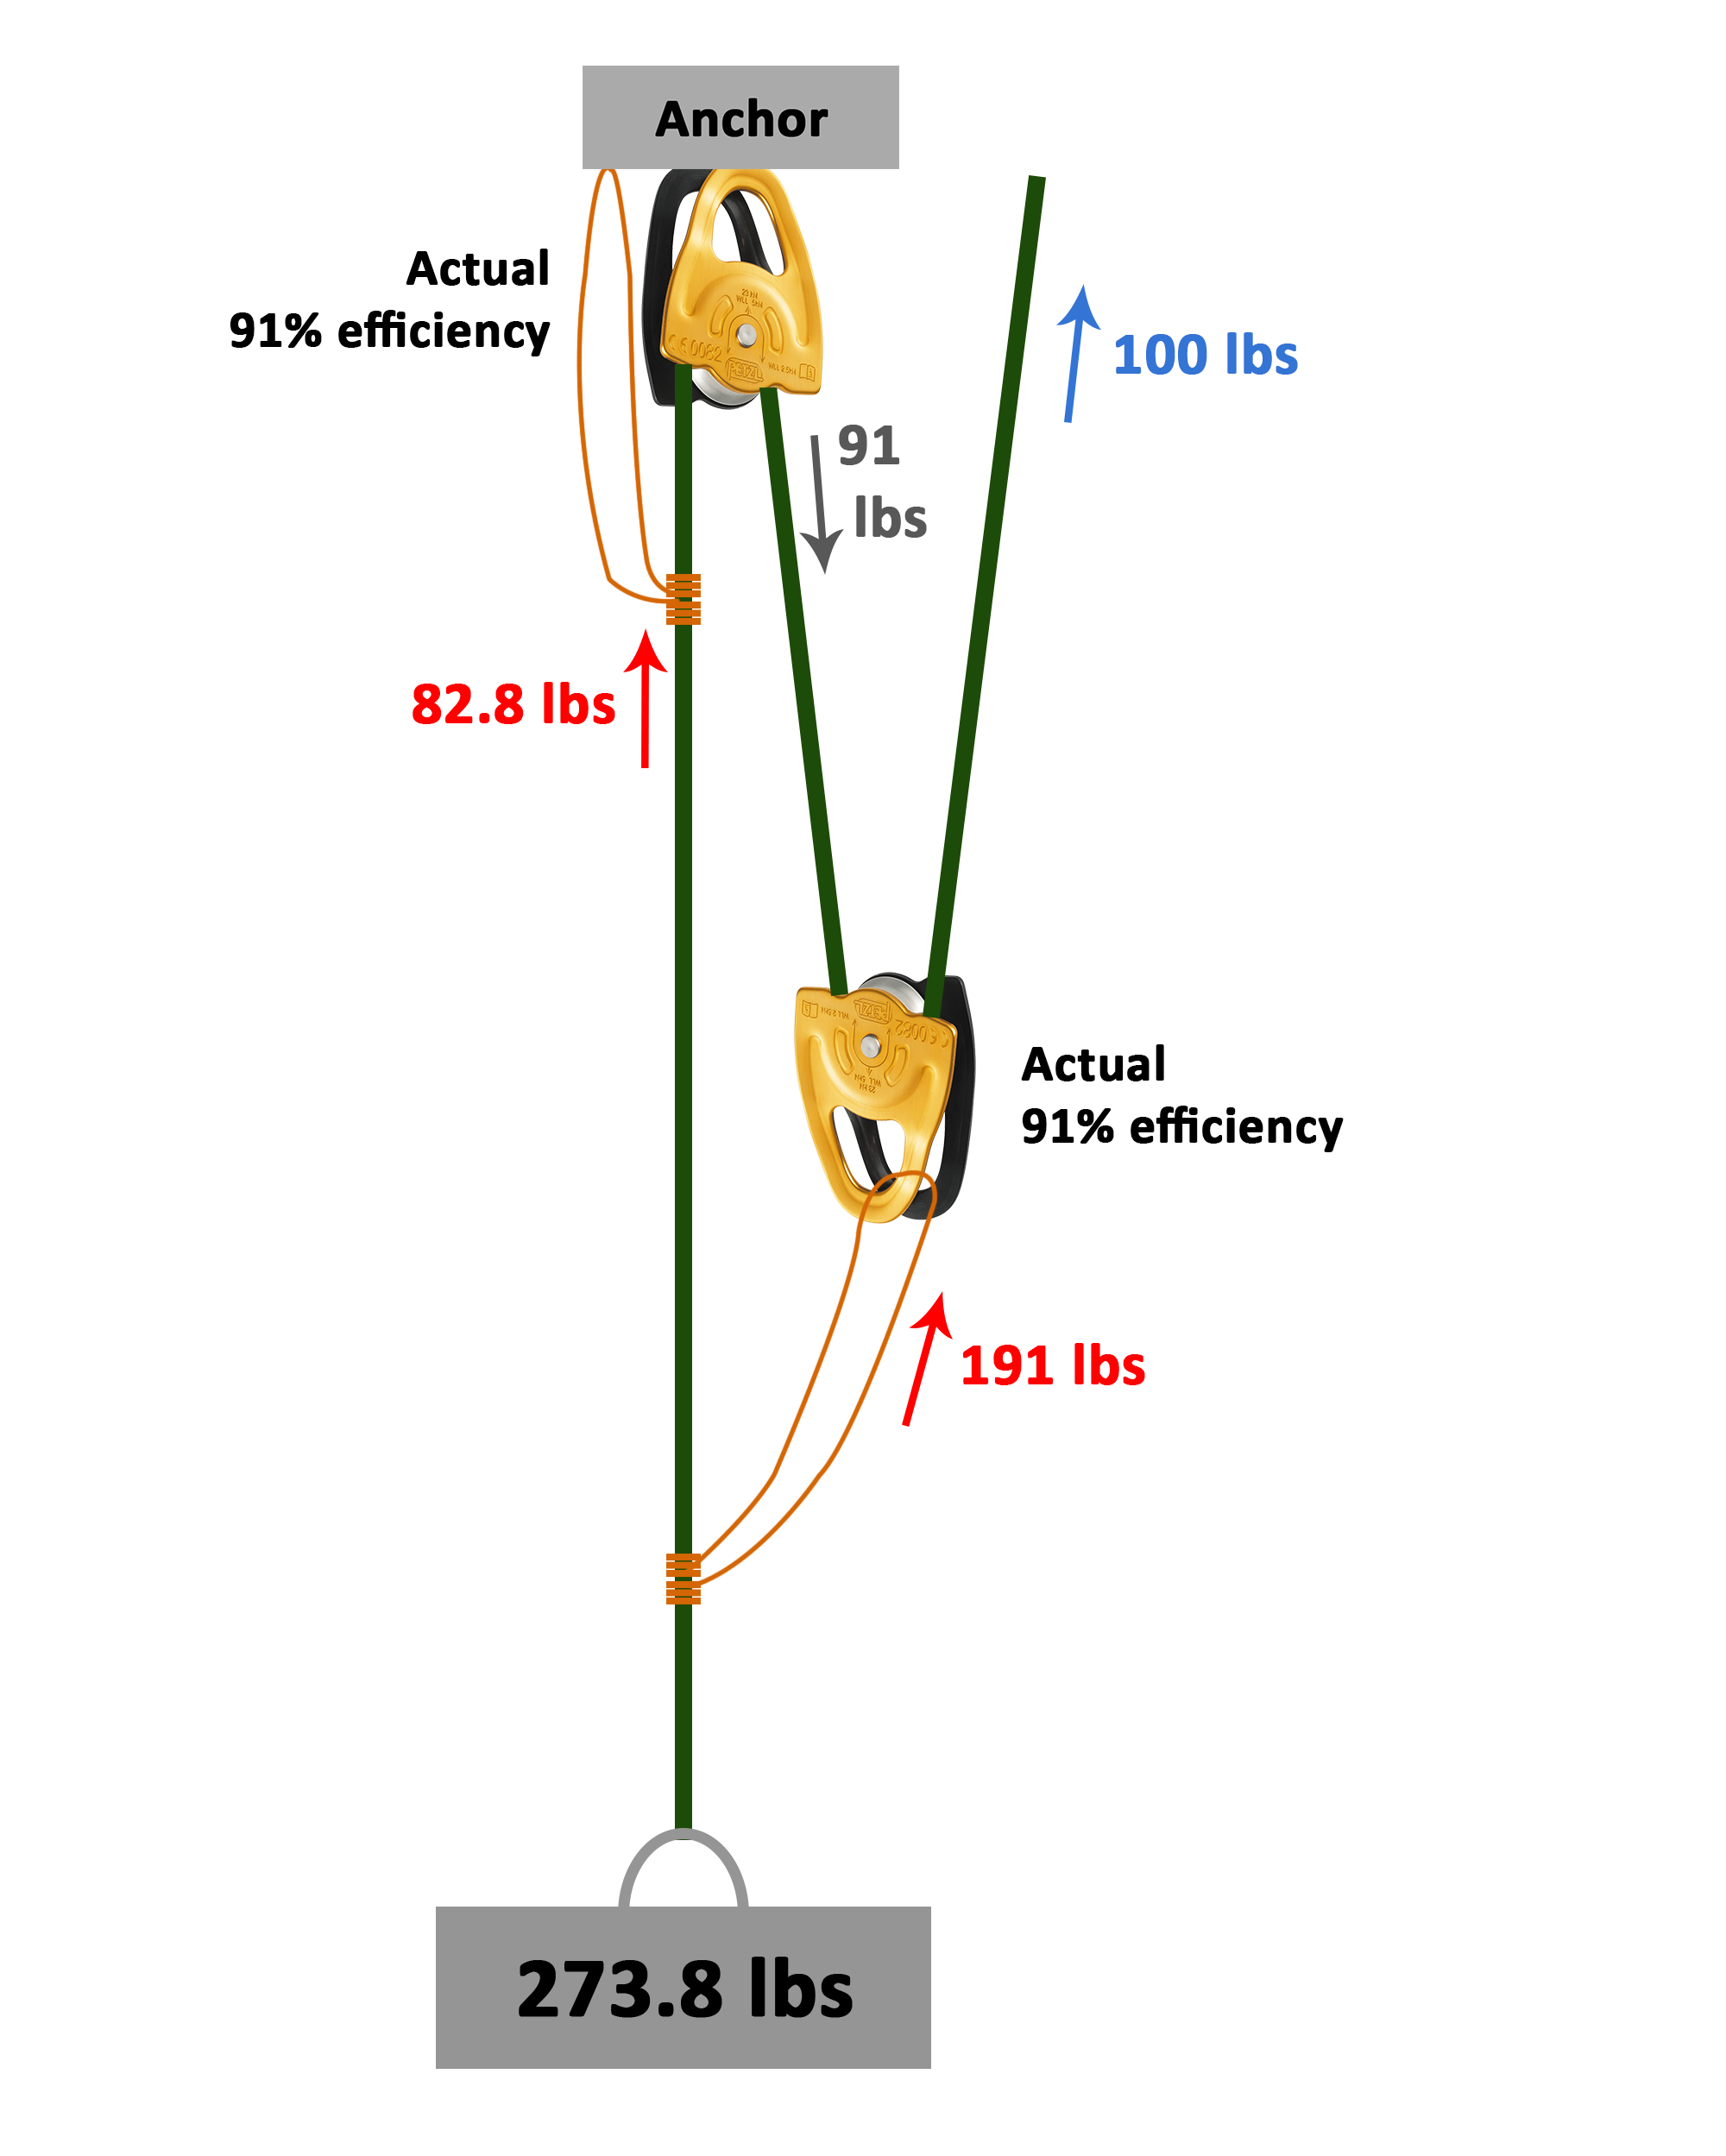
  • We both had experience improvising with anchors/belay systems, etc (knew how to improvise when shit went south). That meant I was able to safely get us secured after the fall. If I needed to use a mechanical advantage 3:1 or greater, I could.
  • I knew how to apply a wrist splint and I knew signs of concussion.

We obviously made mistakes…

  • Not realizing we were on a small “multi-pitch” ledge for our first pitch (the most dangerous mistake which could have killed us)
  • Downclimbing mistakes
  • Not properly spotting the climber
  • Looked at injury before getting safe/secure – I almost passed out while I was rigging our bomber anchor since I had looked at my gash on my thigh before hand. First get secure, then look at injuries, in case they make you pass out!
  • Not both knowing where the Garmin InReach was (I had to search for a while)

And there were some mistakes that didn’t have significance this time, but could have in different circumstances…

  • My first-aid pack lacked a triangle wrap. If we had to walk out, that would have been nice to stabilize a broken wrist against the chest.
  • My first-aid pack lacked some nice medical tape. If we had to tape up some bandages, I didn’t have anything for that.
  • We hadn’t told our family where we were climbing or when to expect us, so if we hadn’t been able to use the Garmin (maybe it broke, maybe we lost our backpacks), we could have potentially been stranded if another group didn’t show up.
  • My first-aid knowledge is very limited. Had injuries been worse, I might have not been able to help.

You might have been placing 3-1 crevasse rescue pulleys incorrectly

A common question when building a 3-1 crevasse rescue system is “If I only have one pulley, where should I place it?”

It seems like many people answer “at the anchor”, since they seem to believe that’s where the most force and friction will be.

Interestingly enough, even many instructors/guides have never done the math behind this decision. Placing the single pulley at the anchor only adds a measly 9% more total pulling force… you end up with a 2.15-to-1 system. For comparison, a system built solely with carabiners ends up being 1.96-to-1. That pulley hardly did anything! If you’re able to input 100 lbs of force pulling the rope, that means you only gain an additional 19 lbs of output force by adding the pulley.

But if you place the pulley at the correct location, down at the hauling prusik, you add an impressive 25% more total pulling force. You end up with a 2.46-to-1 system. Now that’s a noticeable improvement! If you’re inputting that same 100 lbs of force, that means you gain an additional 50 lbs of output force by adding the pulley to the correct location compared to carabiners alone!

There were only a few sources that taught the correct placement of a single pulley, including books Glacier Mountaineering and Freedom of Hills Bible, and this scientific paper from the University of Oregon.

Only carabiners 1 pulley at anchor 1 pulley at hauling prusik 2 pulleys
Effective ratio 1.96 : 1 2.15 : 1 2.46 : 1 2.74 : 1
Weight lifted from 100 lbs input force 196 lbs 214.6 lbs 245.6 lbs 273.8 lbs
Additional weight lifted compared to carabiners +19 lbs +50 lbs +78 lbs
Percent increase compared to carabiners +9% +25% +40%
Additional weight lifted compared to previous +19 lbs +31 lbs +28 lbs
Percent increase compared to previous +9% +14% +11%

Why does the placement make such a dramatic difference? Let’s get into the physics!

First, we need to clarify the numbers we’ll use.

  • Pulley efficiency: 91%
  • Carabiner efficiency: 60%

Petzl’s MINI pulley has a claimed 91% efficiency. Efficiency of carabiners can be debated, but we’ll assume a value of 60% efficiency. It’s certainly unlikely carabiners are anywhere more than 66% efficient.

Only carabiners

Let’s take a look at a system built using solely carabiners. We’re assuming an input force of 100 lbs on each of these systems.

The first piece of physics the system encounters is the hauling prusik carabiner. This is actually a 2-1 system, which multiplies the force you input by two. However, due to loss of efficiency of the carabiner, your 100 lbs of force only becomes 60 lbs of force on the other side of the rope, which means your final force is 160 lbs (100 lbs + the 60 lbs on the other side of the carabiner).

60 lbs of force is then also transferred through the anchor. The anchor simply serves as a redirection of force, it is NOT providing any mechanical advantage. That section is a simple 1:1. But due to the loss of efficiency, this 60 lbs of force again gets cut down to a measly 36 lbs of force pulling the fallen climber upwards.

So you end up essentially with a 2:1 system due to the carabiners, which only results in 196 lbs of force from your initial 100 lbs. But that’s significantly better than a 2-to-1 alone, which would actually be 1.6-to-1 when carabiner efficiency is factored in!

1 pulley, placed incorrectly

Now let’s add a pulley. But let’s place it where most people think is optimal: at the anchor.

Just like the system we previously inspected, the first element encountered is the 2-1 system on the hauling prusik. Since we still have a carabiner here, this system fails to multiply our force significantly as we saw in the previous example.

The only improvement here is that the measly 60 lbs of force going around the anchor 1-1 redirect now has a pulley on it, so most of that force is preserved resulting in 54.6 lbs of force pulling the fallen climber. We end up with a small improvement of 19 lbs more force.

1 pulley, placed correctly

The key is to minimize loss of efficiency at the points where you have the most mechanical advantage. The only mechanical advantage in the system is at the hauling prusik, since that’s where you have a 2:1 effect.

In this system, when we reach the 2:1, we’re preserving 91% of our force on the other side, which means we output an upwards pull of 191 lbs thanks to the 2:1 nature of the system. In fact, this means that a simple 2:1 system with a pulley is close to as powerful as a 3:1 built with only carabiners which came in at a similar 196 lbs of force!

And on the other side of the rope, 91 lbs of force is transferred and redirected around the anchor back to the climber. However, we lose efficiency here with the carabiner, but since this is just a 1:1 direction redirect, lost efficiency at this location isn’t as significant as lost efficiency on a 2:1 system. We end up with 54.6 lbs of force helping to pull the fallen climber upwards, for a total of 245.6 lbs of force, an improvement of 31 lbs compared to the incorrect pulley, and 50 lbs compared to carabiners alone.

2 pulleys

If you happen to have two pulleys, sweet. However, do note if you end up making your system into a 6:1, you should use both of your pulleys on the respective 2:1 systems and just use a carabiner on the anchor, for the exact same reason as previously described: Maximize the efficiency where mechanical advantage is actually occurring.

The 3:1 with two pulleys gains you some additional strength over just one correctly placed pulley, but it’s not a huge improvement. That’s because the only gain in efficiency is in the 1:1 redirection around the anchor, so you don’t have any multiplications of force, just preservation of your original input force.

You end up being able to pull 274 lbs. That’s a nice additional 28 lbs, but not life-changing.

Holy crap, carabiners are inefficient!!

Yes, they are. However, the inefficiency of carabiners is actually what allows us to rock climb, so this inefficiency should be appreciated!

Think about it… how is it that you’re able to belay someone who is close to twice your body weight, but you can still stop their fall?

Imagine two climbers tied into opposite ends of a rope, hanging from a roof with the middle of the rope going through a carabiner on the roof.

If that carabiner at the top was 100% efficient, this would essentially be a balance scale, and if one person was one pound heavier, that person would start to go down, and the other person would start to go up.

But we know that’s not going to happen. The two climbers are going to stay where they are. That’s because the carabiner is only 60% efficient. The carabiner is adding friction to the system, and you need additional force to overcome that friction and start moving. Specifically, you need to be 67% heavier than the other person to start moving. So if you weigh 135 lbs and your partner weighs 224 lbs, there is scientifically no way for you to catch and stop their fall (unless you add even more friction to the top of the system than the standard carabiner).

So, let’s be thankful that carabiners are inefficient! Otherwise we would have to use something specifically designed to add more friction when climbing!

If I don’t put the pulley at the anchor, the prusik will go through the carabiner?

One reason some might choose to place the pulley at the anchor rather than the hauling 2:1 system is because they want auto-tending of their progress capture prusik. Otherwise the prusik might slide up into the carabiner and mess things up.

But there’s an easy solution to that: Simply put the rope through a belay device as seen in the diagrams above. Belay devices will automatically tend the prusik. And then use your pulley where its efficiency is multiplied.

Distal radius fracture surgery and recovery journal

I broke my wrist snowboarding, on January 28th, 2017, a distal radius fracture which had to be reduced (the ski patrol had a doctor on hand who reset the bone).

Long story short, I had surgery (2/15) with Dr Lohse at Proliance Orthopaedics and Sports Medicine, he put a plate on the radius, and 3 days after surgery (2/18) (literally less than 72 hours) I started typing this blog with both of my hands! Absolutely incredible recovery time! Note that I’m an athletic 24-year old, experiences may vary. But I strongly recommend going with surgery… it’s fabulous.

Long story: For the first two weeks, I was in a splint that Proliance put on. The bone was initially in a good position such that it would heal naturally. However, the 1-week x-ray showed that the bone shifted slightly. It was still in an ok position, but there was a good chance it would continue moving. I had the choice of either getting surgery ASAP, or waiting another week and seeing whether it moved again.

They didn’t have any surgery slots open for that week anyways, so that made the decision simple: Get an x-ray next week while also scheduling the surgery for next week… if it stayed in position we can cancel the surgery, otherwise I need to be cut open. But looking back, if getting surgery instantly was an option, I should have simply gone for that. The surgery is WAY better than being casted.

So the 2nd week rolled around… a few days before that, I could actually feel the bone moving around inside my wrist… sure enough it moved some more. Dr. Lohse describes the pros and cons very well, and makes sure that you understand both options. He claimed that if I was a 65-year old, he would likely just keep it splinted and attempt to let it recover naturally, since there’s not as much active years in your life left. However, as a 24-year-old active and physically athletic adult, there’s so many years left such that we should make sure the bone heals correctly so that I can do all the activities I want.

Therefore, my surgery was two days later. Thanks to anesthesia and everything, I don’t remember any pain or any of the surgery.

The first day after surgery was painful – but I managed to avoid taking the narcotic pain meds, and only used Tylenol/Advil (I’m not a fan of pain meds, and I also have a decent tolerance for pain). It felt like my arm was ran over by a steamroller. Sleeping was difficult. The first day was rough.

The second day after surgery, they set up an appointment with the hand therapist for me. I went in there, and within less than 48 hours after surgery, they removed the wrist brace!! My arm was naked other than the last remaining bandages on the stitches! The therapist did some massaging of my soft tissues to help redistribute the swelling (the wrist brace was on quite tight, it felt nice to get rid of that pressure), and then we started some wrist movement exercises! The pain was almost completely gone after this – getting everything moving and the brace off made a huge improvement.

The third day after surgery was even better. Sleeping is still difficult, that’s when I experience the most pain, but otherwise I’ve stopped the Tylenol and only took some Advil in the morning. I can touch my thumb to my pinky today! Yesterday I could only reach the ring finger. And additionally I CAN TYPE!!! I’m not back to normal speed yet, coming in at 54 words per minute, but I’m sure tomorrow will be even faster.

Day 5, I went back to solid strenuous hikes, like an 8 mile, 2,700 ft gain hike!

Day 7, I went for a 2 mile run!

Day 9 was 80% normal daily activities (excluding weight bearing).

Day 12 was 90% normal daily activities, including lifting a heavier cup of water, eating with my right hand, zipping up my jacket decently normally, etc

Day 17, I went for a 9 mile run!

Day 19 was 99% normal daily activities! Able to pour milk, open heavier doors, use door knobs, pull open drawers, use phone one-handed, hold a bag of groceries, and nearly everything else without a second thought!

Day 24 – If I healed naturally, I would have just been coming out of a cast at this time, and would barely be able to rotate the wrist. Instead, I’m running 100% normal, hiking 100% normal, doing pushups on my fists, doing assisted pull ups, and 99% of my normal daily activities!

Note that I’m a rock climber, so I really wasn’t worried about my fingers losing strength… I knew those would be okay thanks to the accumulated strength from rock climbing. Others might have more trouble getting back that strength. And in general, I’m fast/strong/ahead of the curve, so others very well might take longer to recover.

Day 1 after surgery (Thurs 2/16/2017)

  • The night of sleep last night was really poor. Laid on my back with the sling still on, arm resting on my chest. At 3:00 am I noticed I was able to slightly move my finger, meaning the nerve block was wearing off just 11 hours after surgery. The arm was still numb though. At 7:00 am the nerve block was completely gone (15 hours after surgery) and the pain was pretty bad. Luckily it never got worse, and it was bearable with ice and Tylenol/Advil.
  • Two extra strength Tylenol (1,000 mg) and two Advil every 4 hours
  • Frequent icing
  • No oxycodone
  • Pain definitely bad, but bearable. Almost feels like the wrist is just numb. Feels as if a steamroller ran over my wrist.
  • Can slightly move my fingers, but not eager to try moving them out of fear of pain


Day 2

  • I actually got some sleep last night. 5 hours of actual sleep out of 8 hours of being in bed. Still very uncomfortable, and if the wrist is lying flat down on a pillow, it’s painful since it’s pressing on the stitches through the brace. But it can be comfortable on the side, since that doesn’t put as much pressure on it.
  • Decreasing pain meds to every 6 hours
  • Started hand therapy… removing the brace and wrapping, and the massage they did, dramatically reduced the pain I previously had. The wrist brace was on too tight, removing that felt fabulous.
  • Able to touch my thumb to my ring finger but not pinky. Can form a decent fist. Finger movement all pretty good as I figured.
  • Wrist movement is very limited, can’t bend it forward or back, or to the side very well. And rotating as if you’re a waiter holding a plate is impossible, I can only get a little past 90 degrees there, nowhere near flat.


Day 3

  • Sleeping last night was better, however the wrist is still painful when it’s laying on the stitches for a long time. So I woke up a number of times with pain, and unfortunately you can’t really find a comfortable position. Got 6.5 hours of actual sleep out of 8.5 hours of being in bed.
  • Only down to Advil’s at this point and will probably stop the Advil today. Mainly took it due to the pain I was in when I woke up from sleeping.
  • Able to touch my thumb to my pinky now! Just barely, but I managed it the first time in the day so it’ll get even better today!
  • Typing with two hands now! 54 words per minute… slow, but better than just one hand
  • Wrist movement still very limited, no noticeable improvement from yesterday.


Day 4

Left arm compared to right (injured) arm (photo mirrored)
  • Sleeping still difficult, wrist is most painful while sleeping. Didn’t use any pain meds this time, which didn’t make any difference. Got 6.5 hours of actual sleep out of 9.5 hours in bed.
  • No pain meds today. There’s slight soreness and whatnot, but overall not bad.
  • Up to 61 words per minute now.
  • Wrist movement still very limited.
  • Able to play video games with the Playstation controller. I’m just about as good at Uncharted as I was before!
  • Can mostly write with my hand! Can sign my name! Print writing is messy and slow, but way better than my left hand already.
  • Walked 3 miles round trip to the grocery store.
  • Upper arm noticeably thinner than my left arm. Can’t imagine what 6 weeks in a cast would have done.

Day 5

  • Sleeping the same, difficult. 6 hrs out of 8.75 hrs in bed. I realized part of the pain is simply the muscle soreness.
  • Wrist movement slowly improving, but very slowly improving.
  • Can pick up a light cup of water and other light stuff. Grip strength is decent… not open-a-jar strong, but slightly functional.
  • Went on an 8 mile, 2,700 ft gain hike today, with an average heart rate of 120! Some good exercise that should get the blood pumping! Wrist felt fine through it.
  • Feel some popping of the bone when doing wrist exercises (I think it’s the smaller bone, not the radius)

Day 6

  • 5 hours of sleep out of 8 hours
  • Able to shift through most of the gears on my manual transmission truck with my right hand! Moving the stick to the left for 1st and 2nd is difficult so I still use my left hand for that, but 3rd, 4th, and 5th are all possible with my right hand!
  • Second visit to hand therapist, did some more stretching and hand exercises, and massaging which felt great and some therapy with ultrasound. Big improvement in wrist movement compared to the first day!
  • Therapist took the bottom two bandages off, revealing some of the incision, but when she started to take off the next bandage, she said it still looks a bit open and isn’t ready to be taken off yet. From the bottom of the incision, I don’t have any visible stitches! She was saying that they might be internal stitches with a fish hook at the top which they pull out. Either way, looked a whole lot better than what I was expecting!
  • Still feeling some popping of the bone, therapist said that’s ok as long as it’s not painful

Day 7

  • Slept a bit better, 6.75 hours of sleep out of 8.5 hours, with more deep sleep. Close to normal.
  • Able to shift through all of the gears on my manual transmission truck! Moving the stick to the left for 1st and 2nd is still hard, but it’s possible today.
  • Able to turn the ignition on my vehicle with my right hand to start it!
  • Able to tie my shoes! Didn’t try till today, but it was pretty easy today. Able to button pants too (was previously just wearing athletic shorts).
  • Still feeling frequent popping when doing wrist exercises. Seems like my other bone (not the radius) is becoming a little less prominent. That bone felt like it’s sticking out more than normal, which the therapist said happens since that bone often takes more stress when the radius fractures and shortens.
  • Door handles and knobs are difficult and sometimes impossible to open with injured hand. But the fridge door is fine since that’s simply pulling.
  • Went for a run! Just a 2 mile run, bit slower than normal pace, and wasn’t swinging my injured arm while jogging, but it felt fine.

Day 8

  • Slept for 6.5 hours out of 8.5 hours.
  • Bone isn’t popping frequently while doing wrist exercises. Only pops a few times a day now.
  • Went on another run, just 1 mile this time, but started swinging my arm like normal, felt fine!

Day 9

  • Sleep is slowly getting more close to normal, but I still wake up in the middle of the night with my elbow quite sore if I was sleeping with my arm stretched straight out for a few hours.
  • Feels like I’m 80% back to normal daily activities (not including weight lifting activities).
  • Another therapy appointment… more fun games and stretching and improvements. Measured the grip strength…
  • 41 lbs of grip strength with my injured hand, compared to 72 lbs of grip strength in my left hand. I’m a rock climber… normal grip strength required for daily tasks is apparently only 20 lbs haha…
  • 8 lbs of pinching force between my thumb and index/middle finger, compared to 18 lbs of force in my left hand. So overall I’m halfway to rock climber strength between grip and pinching!
  • Typing at 73 words per minute, basically 100% normal.
  • Bending the wrist forward, and rotating the wrist to the “waiter” pose (holding a plate with your palm) are my two least flexible positions and still have lots of room for improvement.

Day 10

  • Went on a 13 mile, 3,800 ft elevation gain hike through steep snow, arm felt fine!

Day 11

  • Daily activities are feeling quite normal.

Day 12

  • Feels like I’m 90% back to normal daily activities. Can pull some doors open, can lift a heavier cup of water, can zip up my jacket quite normally, can eat with my right hand pretty normally, etc.

Day 13

  • Bandages completely off and the scar is naked! Started scar massages!
  • Ran my normal 3 mile route, all felt good. Swinging my arm pretty normally while running.

Day 15

  • Follow-up x-ray with Dr Lohse looked good
  • Officially have no restrictions other than no impact activities (like chopping wood), although obviously I shouldn’t do something that’s painful
  • Able to mostly do a pull up – I’m mostly using my left arm, only putting a small amount of weight on my right arm to help pull up

Day 16

  • Can use my phone one-handed just like I used to before, which means my thumb and finger articulation is almost completely normal
  • Hiked an 8 mile, 3,150 ft gain hike

Day 17

  • Went for a 9 mile, 1 hr 15 min run!

Day 19

  • Wrist/hand is at 99% functionality for daily activities (excluding weight lifting/other intensive activities). Able to pour milk, open heavier doors, use door knobs, pull open drawers, use phone one-handed, hold a bag of groceries, and nearly everything else without a second thought! There are only a few moments where I feel a little difficulty, for example I don’t wash my hair as vigorously with my recovering hand, or I won’t lift extremely heavy items.

Day 21

  • Grip strength is at 68 lbs compared to 80 lbs in left hand, almost there! Pinching strength is at 15 lbs compared to 18 lbs, so similarly almost there!
  • Rotation (hand palm-up) and flexation (bending hand backwards) are within 5 degrees of my left hand!

Day 24 – 6 weeks after broken wrist / 3.4 weeks after surgery

  • Rotation (hand palm-up) is basically all the way there, I’d say it’s 0-1 degrees within normal
  • If I healed naturally, I would have just been coming out of my cast today! Crazy to believe how much faster surgery is!

Day 25

  • Able to do pushups on my fists! Can’t do palms since can’t bend back 90 degrees yet, but fists felt perfectly fine! Full normal weight on the hand and everything!
  • Went on a 7.5 mile, 2,000 ft gain trail run!

Day 27

  • Grip strength 100% normal! 75 lbs grip strength. Pinching with the thumb and index finger is still only at 12 lbs out of 18 lbs
  • Wrist rotation (hand palm-up) is 100% normal. Bending palm backwards still needs a bit more but is close.

Day 29

  • Can do pull ups with 30% of weight on my injured hand. Haven’t tried full 50/50 weight distribution yet.

Day 30

  • Can do push ups on my palms! It’s not 100% normal, but I can put probably 30-40% weight on my injured hand.

Day 33

  • Biked to work today! Hand felt fine, although over rough bumps I kept my right hand loose to avoid vibration in the wrist (road bikes aren’t very smooth over bumps).

Day 35

  • Went rock climbing! Felt pretty normal. Didn’t do any one-handed hangs, but it feels like my strength is all there and I could probably do a one-handed hang if I had to!

Day 38

  • Ran a half marathon! Running has been unaffected for a while (which isn’t surprising since you don’t use your wrist that much while running).
  • Push ups are probably 95% normal. I can place the normal weight on my hand (equally distributing the weight between my hands), but my hand isn’t at the normal right angle yet, it still has some backwards flexibility to go. But I can do my normal sets of 10 pushups without a problem!
  • Daily activities are definitely 99.9% normal. There’s some rare occasional things that I’ll hold back on, like shaking a drink before opening it, since the shaking slightly aggravates it, but overall I never have to think twice!
  • Scar is slowly improving in appearance. Using Mederma 4x a day, medical tape during the day, and silicone scar pad overnight. It still is slightly raised with some slight bumpiness, but 90% normal. Wrist still seems a bit thicker than my left wrist.

Day 59

  • I went mountain biking! Downhill semi-technical riding with some small jumps! Wrist felt fine!

Day 74

  • Rock climbing is definitely quite normal. Occasionally there’s an awkward-positioned hold that requires some more difficult wrist flexibility which might feel a bit sore, but overall I can confidently hang one handed and climb normally!
  • Push ups are 99% normal, I’ll notice a slight soreness/slight pain in the wrist if I really try to get my palm perfectly at 90 degrees.
  • I’ve noticed if I start exercising the flexibility more, like doing more pushups in proper form, my wrist feels a bit sore the next day. Hoping that by still exercising it I’ll get it back to full 100% flexibility!
  • Daily activities are 100% normal, no second thoughts about anything.
  • Scar sure takes a long time to fade away! I’ll have to upload another picture…